



Создание веб-термометра на Arduino с датчиком DS18B20
Компоненты и материалы
| Arduino UNO | × | 1 |
| PHPoC WiFi Shield для Arduino (можно использовать PHPoC Shield) | × | 1 |
| Датчик температуры Adafruit DS18B20 | × | 1 |
| Резистор 4.7 кОм (Seeed) | × | 1 |
| Термоусадочная трубка | × | 1 |
О проекте
Если вы новичок, вы можете изучить основы работы с Wi-Fi и датчиками в Arduino из уроков: Wi-Fi и Arduino, Датчик температуры DS18B20.
Аналогичный проект, использующий только PHPoC, представлен здесь.
Демонстрация
Поток данных
Arduino → PHPoC WiFi Shield → Веб-браузер
Arduino считывает температуру с датчика и передает значение на PHPoC WiFi Shield. Получив данные, Shield отправляет их в веб-браузер через WebSocket. JavaScript-функция визуализирует температуру на интерфейсе.
Примечание: В PHPoC Shield встроена программа для передачи данных от Arduino в браузер, поэтому о ней не нужно заботиться.
Что нужно сделать
- Настроить Wi-Fi для PHPoC Shield (SSID и пароль)
- Загрузить веб-интерфейс на PHPoC Shield
- Написать код для Arduino
Настройка Wi-Fi для PHPoC Shield
См. инструкцию.
Загрузка веб-интерфейса на PHPoC Shield
- Скачайте исходный код PHPoC
remote_thermometer.php(в разделе кода). - Загрузите его на PHPoC Shield с помощью PHPoC Debugger по этой инструкции.
Написание кода для Arduino
- Установите три библиотеки: PHPoC Library for Arduino, OneWire и Dallas Temperature (см. инструкцию).
- Загрузите код Arduino (в разделе кода) на плату.
Тестирование
- Откройте монитор порта в Arduino IDE, чтобы увидеть IP-адрес.
- В браузере перейдите по адресу:
https://<IP-адрес>/remote_thermometer.php - Нажмите кнопку «Connect» и проверьте работу.
Лучший стартовый набор Arduino для начинающих
Если ищете набор Arduino, посмотрите Лучший набор Arduino для начинающих.
Справочник функций
- Serial.begin()
- Serial.println()
- delay()
- millis()
- for loop
- while loop
- if else
- loop()
- setup()
- String.toInt()
- String.substring()
- String.indexOf()
- String.remove()
- String.equals()
Код
Код Arduino
#include <OneWire.h>
#include <DallasTemperature.h>
#include "SPI.h"
#include "Phpoc.h"

// Провод данных подключен к порту 8 на Arduino
OneWire oneWire(8);
DallasTemperature sensors(&oneWire);
PhpocServer server(80);
boolean alreadyConnected = false;

void setup() {
  Serial.begin(9600);
  while(!Serial) ;
  sensors.begin();
  Phpoc.begin(PF_LOG_SPI | PF_LOG_NET);
  server.beginWebSocket("thermometer");
  Serial.print("WebSocket server address : ");
  Serial.println(Phpoc.localIP());
}

void loop() {
  // когда клиент отправляет первый байт, говорим привет:
  PhpocClient client = server.available();
  if (client) {
    sensors.requestTemperatures();
    float temp = sensors.getTempCByIndex(0);
    String txtMsg = String(temp) + "\r\n";
    char buf[txtMsg.length()];
    txtMsg.toCharArray(buf, txtMsg.length());
    server.write(buf, txtMsg.length());
    delay(300);
  }
}
remote_thermometer.php (веб-интерфейс)
Этот файл предоставляет веб-интерфейс пользователя. Загрузите его на PHPoC WiFi Shield или PHPoC Shield согласно инструкции.
<!DOCTYPE html>
<html>
<head>
<title>Arduino - PHPoC Shield - Thermometer</title>
<meta name="viewport" content="width=device-width, initial-scale=0.7, maximum-scale=0.7">
<meta charset="utf-8">
<style>
body { text-align: center; font-size: width/2pt; }
h1 { font-weight: bold; font-size: width/2pt; }
h2 { font-weight: bold; font-size: width/2pt; }
button { font-weight: bold; font-size: width/2pt; }
</style>
<script>
var canvas_width = 200, canvas_height = 450;
var ws;
var buffer = "";

function init() {
  var canvas = document.getElementById("remote");
  canvas.width = canvas_width;
  canvas.height = canvas_height;
  var ctx = canvas.getContext("2d");
  ctx.translate(canvas_width/2, canvas_height - 80);
  update_view(0);
}

function connect_onclick() {
  if(ws == null) {
    var ws_host_addr = "<?echo _SERVER("HTTP_HOST")?>";
    if((navigator.platform.indexOf("Win") != -1) && (ws_host_addr.charAt(0) == "[")) {
      ws_host_addr = ws_host_addr.replace(/[\[\]]/g, '');
      ws_host_addr = ws_host_addr.replace(/:/g, "-");
      ws_host_addr += ".ipv6-literal.net";
    }
    ws = new WebSocket("ws://" + ws_host_addr + "/thermometer", "text.phpoc");
    document.getElementById("ws_state").innerHTML = "CONNECTING";
    ws.onopen = ws_onopen;
    ws.onclose = ws_onclose;
    ws.onmessage = ws_onmessage;
  } else ws.close();
}

function ws_onopen() {
  document.getElementById("ws_state").innerHTML = "<font color='blue'>CONNECTED</font>";
  document.getElementById("bt_connect").innerHTML = "Disconnect";
  ws.send("B\r\n");
  update_view(0);
}

function ws_onclose() {
  document.getElementById("ws_state").innerHTML = "<font color='gray'>CLOSED</font>";
  document.getElementById("bt_connect").innerHTML = "Connect";
  ws.onopen = null;
  ws.onclose = null;
  ws.onmessage = null;
  ws = null;
  update_view(0);
}

function ws_onmessage(e_msg) {
  e_msg = e_msg || window.event;
  console.log(e_msg.data);
  update_view(parseFloat(e_msg.data));
}

function update_view(temp) {
  var canvas = document.getElementById("remote");
  var ctx = canvas.getContext("2d");
  var radius = 70;
  var offset = 5;
  var width = 45;
  var height = 330;
  ctx.clearRect(-canvas_width/2, -350, canvas_width, canvas_height);
  if(ws != null) {
    ctx.strokeStyle="blue";
    ctx.fillStyle="blue";
  } else {
    ctx.strokeStyle="Gray";
    ctx.fillStyle="Gray";
  }
  // 5-ступенчатые деления
  var x = -width/2;
  ctx.lineWidth=2;
  for (var i = 0; i <= 100; i+=5) {
    var y = -(height - radius)*i/100 - radius - 5;
    ctx.beginPath();
    ctx.lineTo(x, y);
    ctx.lineTo(x - 20, y);
    ctx.stroke();
  }
  // 20-ступенчатые деления
  ctx.lineWidth=5;
  for (var i = 0; i <= 100; i+=20) {
    var y = -(height - radius)*i/100 - radius - 5;
    ctx.beginPath();
    ctx.lineTo(x, y);
    ctx.lineTo(x - 25, y);
    ctx.stroke();
    ctx.font="20px Georgia";
    ctx.textBaseline="middle";
    ctx.textAlign="right";
    ctx.fillText(i.toString(), x - 35, y);
  }
  // форма термометра
  ctx.lineWidth=16;
  ctx.beginPath();
  ctx.arc(0, 0, radius, 0, 2 * Math.PI);
  ctx.stroke();
  ctx.beginPath();
  ctx.rect(-width/2, -height, width, height);
  ctx.stroke();
  ctx.beginPath();
  ctx.arc(0, -height, width/2, 0, 2 * Math.PI);
  ctx.stroke();
  ctx.fillStyle="#e6e6ff";
  ctx.beginPath();
  ctx.arc(0, 0, radius, 0, 2 * Math.PI);
  ctx.fill();
  ctx.beginPath();
  ctx.rect(-width/2, -height, width, height);
  ctx.fill();
  ctx.beginPath();
  ctx.arc(0, -height, width/2, 0, 2 * Math.PI);
  ctx.fill();
  // значение температуры
  if(ws != null) ctx.fillStyle="#ff1a1a";
  else ctx.fillStyle="Gray";
  ctx.beginPath();
  ctx.arc(0, 0, radius - offset, 0, 2 * Math.PI);
  ctx.fill();
  temp = Math.round(temp);
  var y = (height - radius)*temp/100.0 + radius + 5;
  ctx.beginPath();
  ctx.rect(-width/2 + offset, -y, width - 2*offset, y);
  ctx.fill();
  if(ws != null) {
    ctx.fillStyle="white";
    ctx.font="bold 34px Georgia";
    ctx.textBaseline="middle";
    ctx.textAlign="center";
    ctx.fillText(temp.toString() + "°C", 0, 0);
  }
}
window.onload = init;
</script>
</head>
<body>
<p>
<h1>Arduino - Web Thermometer</h1>
</p>
<canvas id="remote"></canvas>
<h2>
<p> WebSocket : <span id="ws_state">null</span> </p>
<button id="bt_connect" type="button" onclick="connect_onclick();">Connect</button>
</h2>
</body>
</html>
Схемы
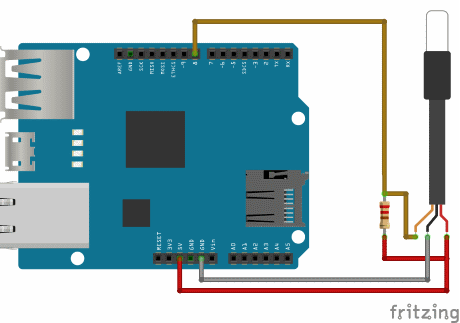
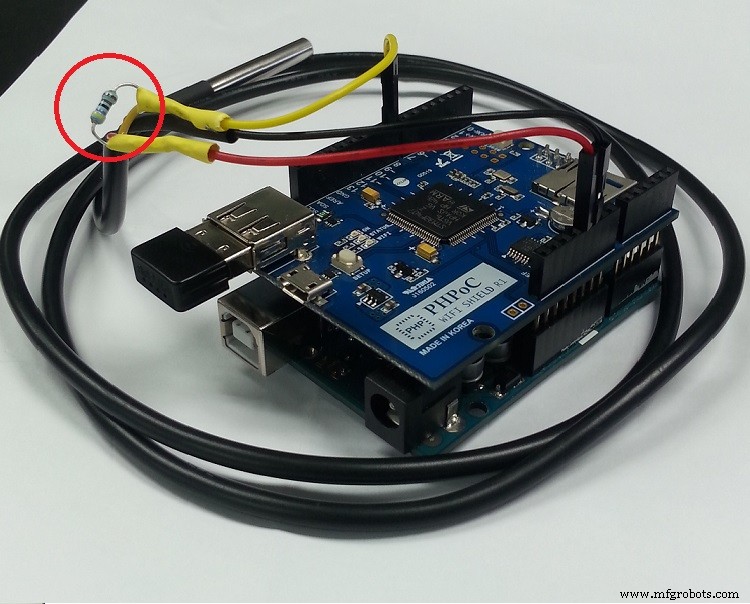
- Установите PHPoC WiFi Shield или PHPoC Shield на Arduino.
- Соберите схему согласно изображениям ниже.
Производственный процесс
- Термометр: от термоскопа Галилея к современным цифровым датчикам
- Сборка Bluetooth-робота-шпиона на Arduino с управлением с телефона
- FlickMote: жестовое IR-пульт для умного дома на Arduino 101 и ультразвуковом датчике
- DIY Arduino TV-B-Gone: универсальный пульт для выключения любого телевизора
- Создание пользовательских LED-часов с будильником — видно с 12 метров
- Find Me: Умный поисковик вещей на Arduino и Bluetooth
- Оптимизированные решения питания для проектов на Arduino
- Веб-управляемый MP3-плеер на Arduino: Воспроизведение аудио через браузер
- Крестики-нолики на Arduino с матрицей MAX7219 и картонным корпусом
- Пошаговое руководство: сборка умного четырёхногого робота на Arduino