


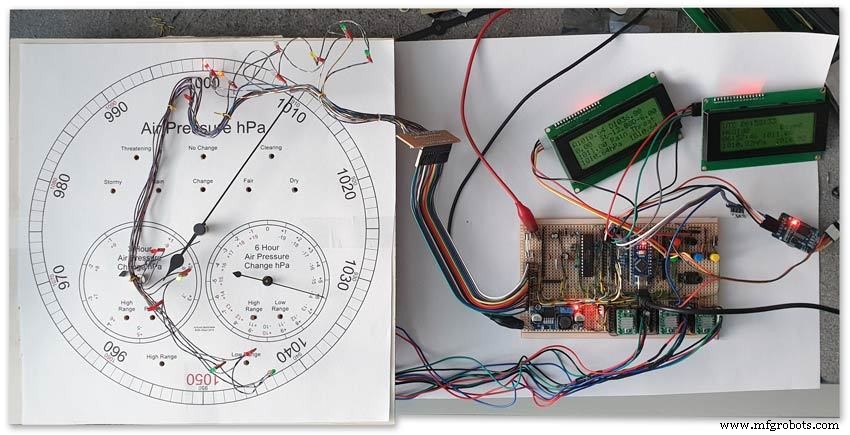
Барометр Arduino
Компоненты и расходные материалы
 |
| × | 1 | |||
 |
| × | 1 |
Об этом проекте
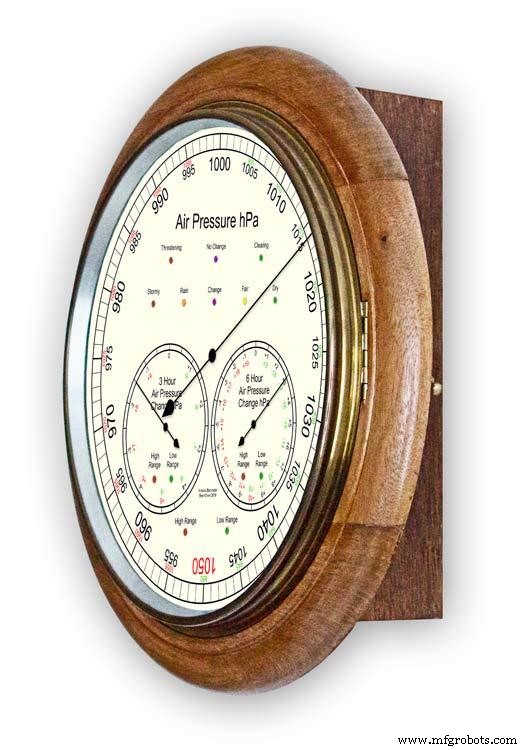
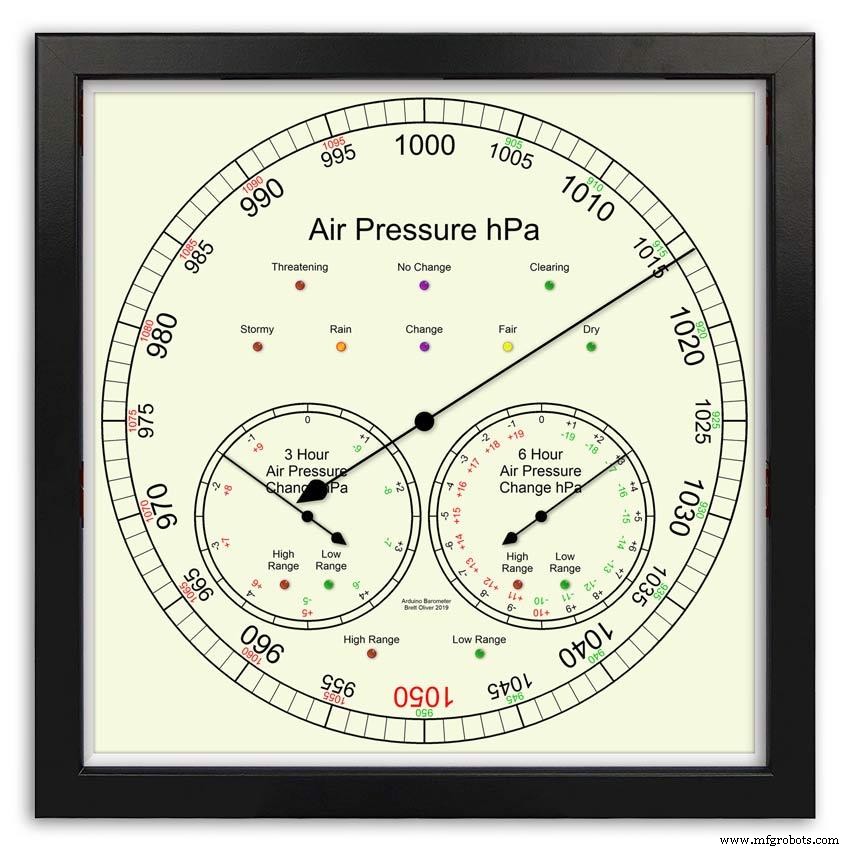
Использование Arduino UNO и Nano для отображения давления воздуха на аналоговом дисплее 12 дюймов (300 м) с использованием 3 шаговых двигателей.
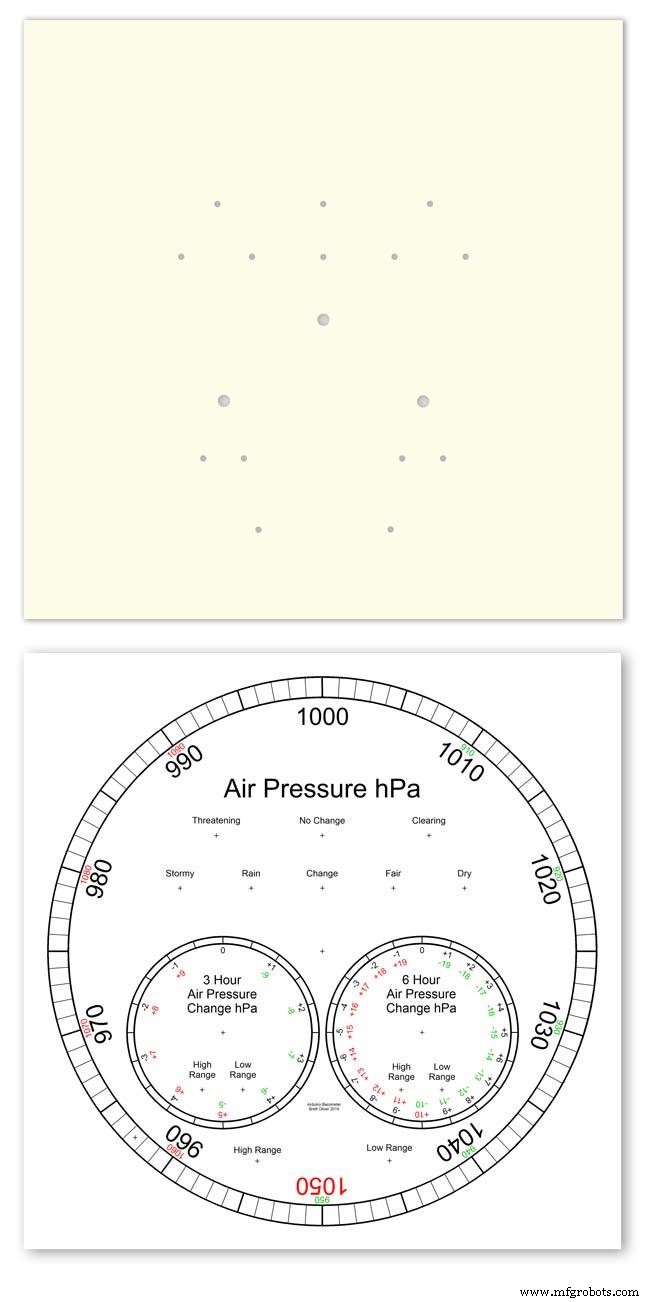
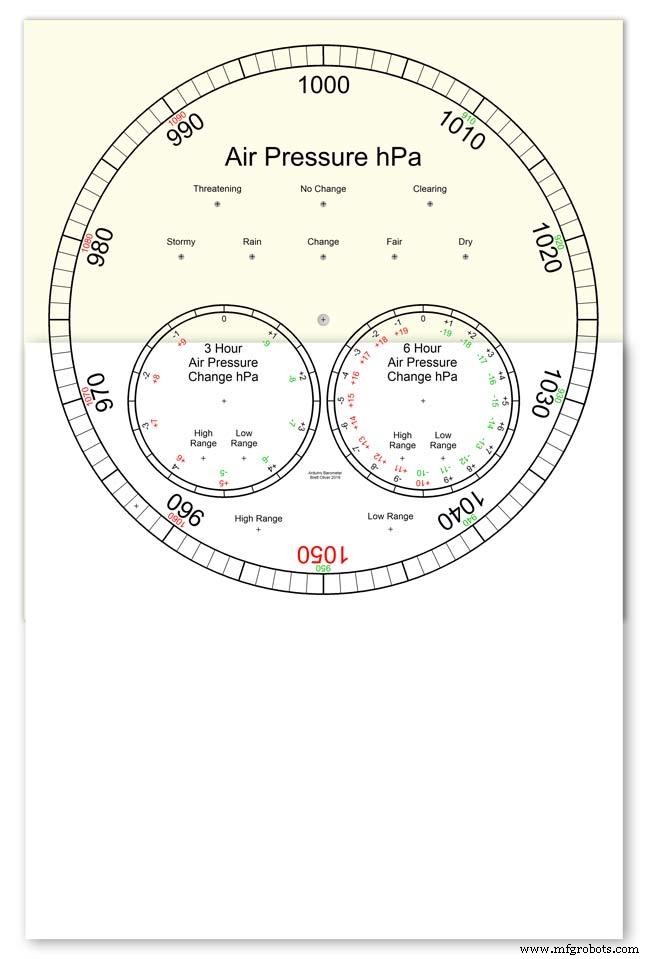
На выбор предлагается 2 дизайна циферблата:современный и классический.
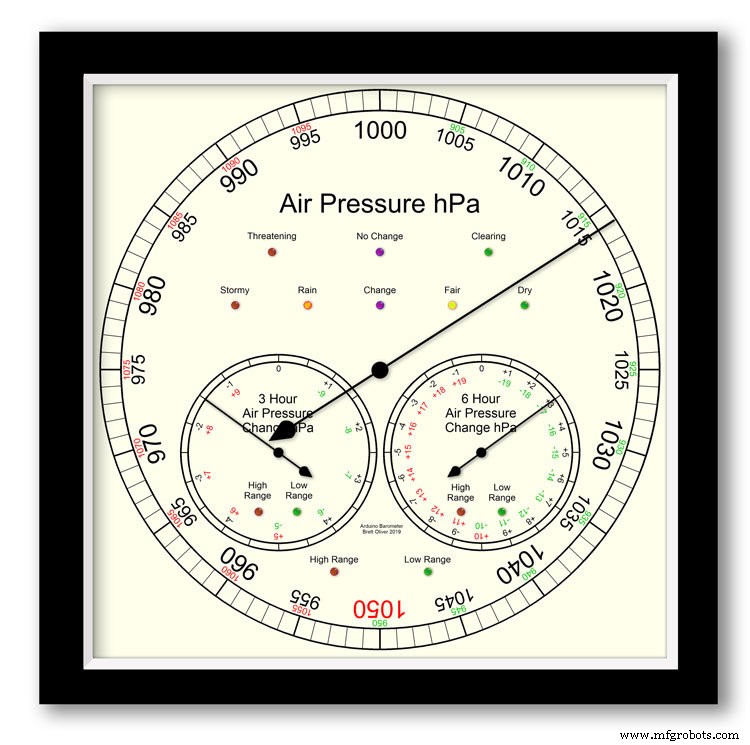
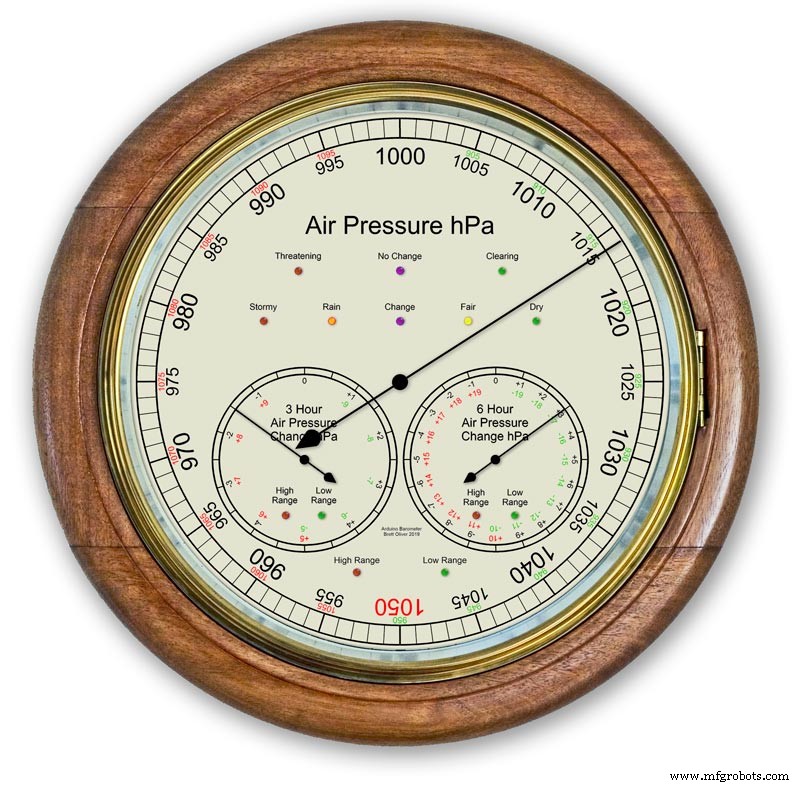
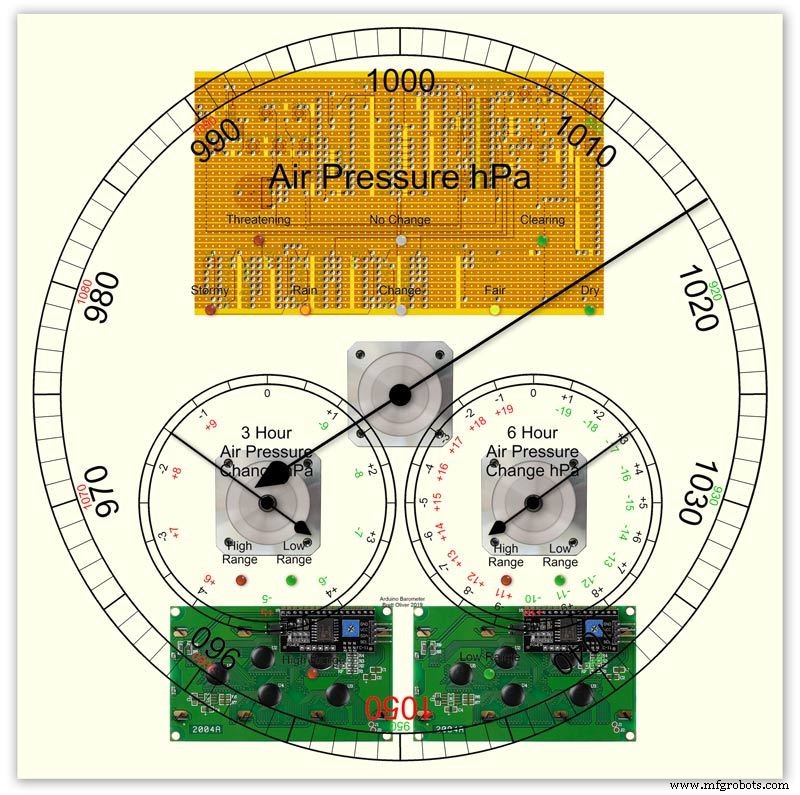
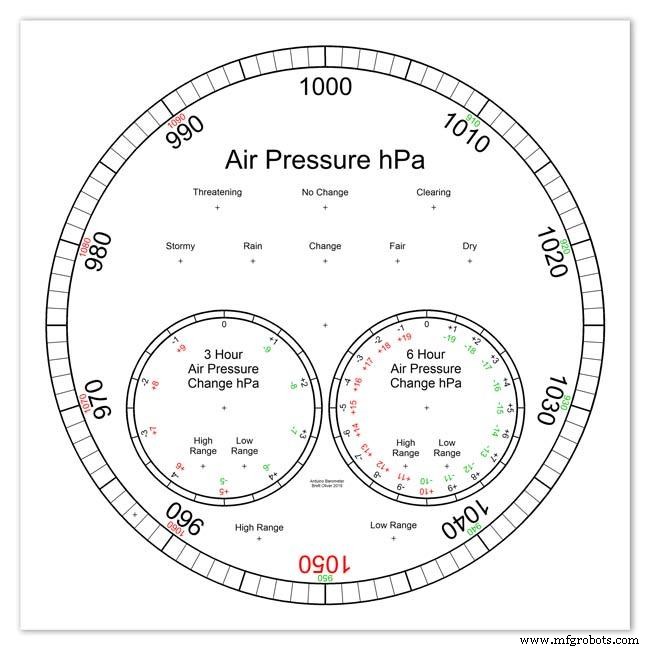
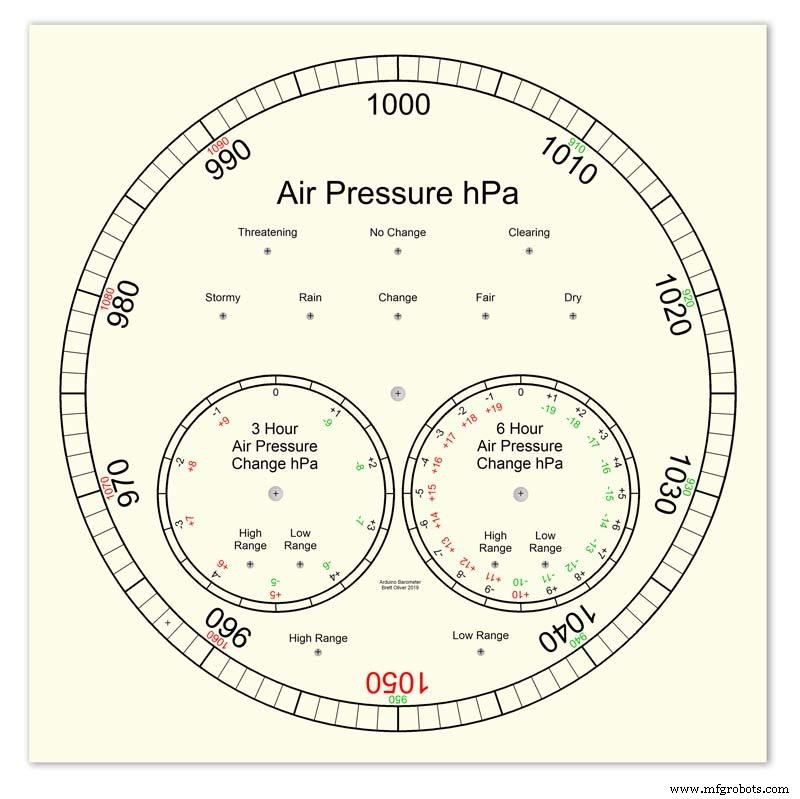
Давление воздуха в гПа (гектопаскалях) отображается на большом главном циферблате и обновляется каждые 10 минут.
Есть 2 дополнительных шкалы, один показывает изменение давления за последние 6 часов, а другой показывает изменение давления за последние 3 часа.
Трехчасовой циферблат имеет увеличенное разрешение 0,5 гПа, так как он используется для прогнозирования погоды. На всех трех дисплеях есть светодиоды, показывающие, когда используется расширенный диапазон, а также светодиоды, указывающие прогноз погоды на трехчасовом дисплее.
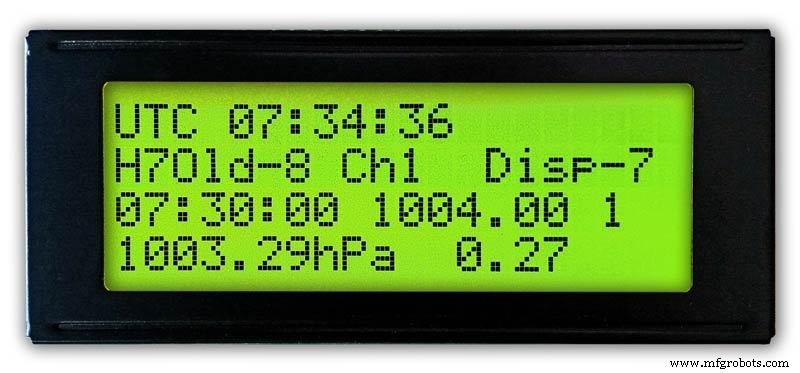
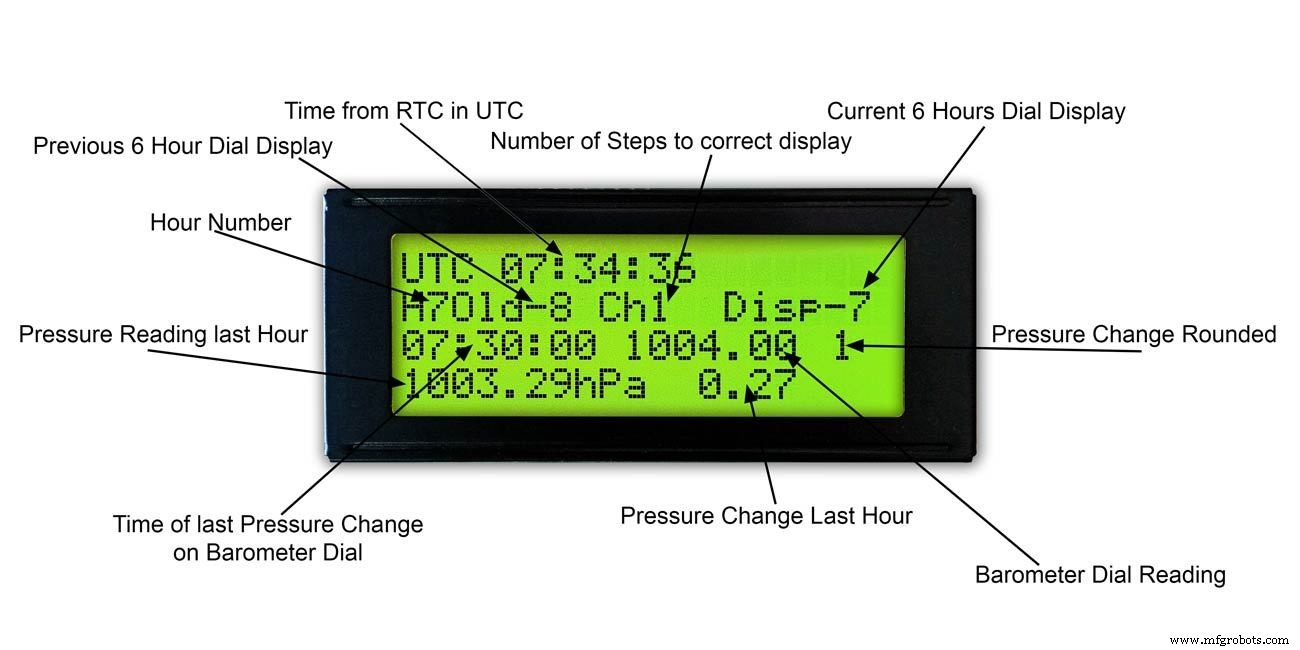
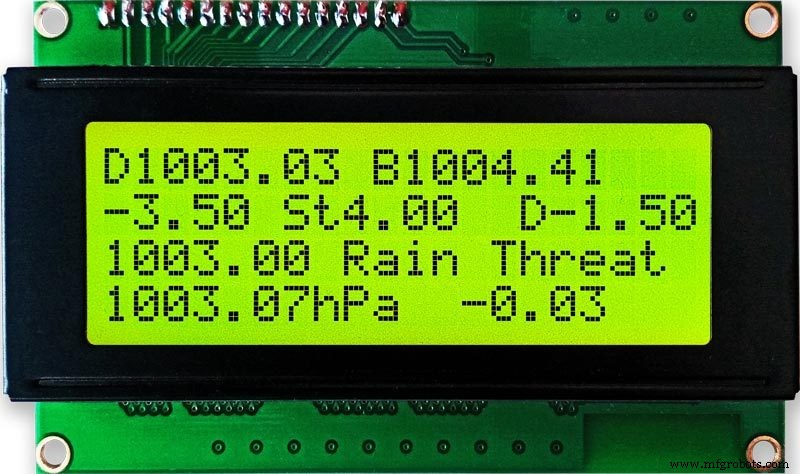
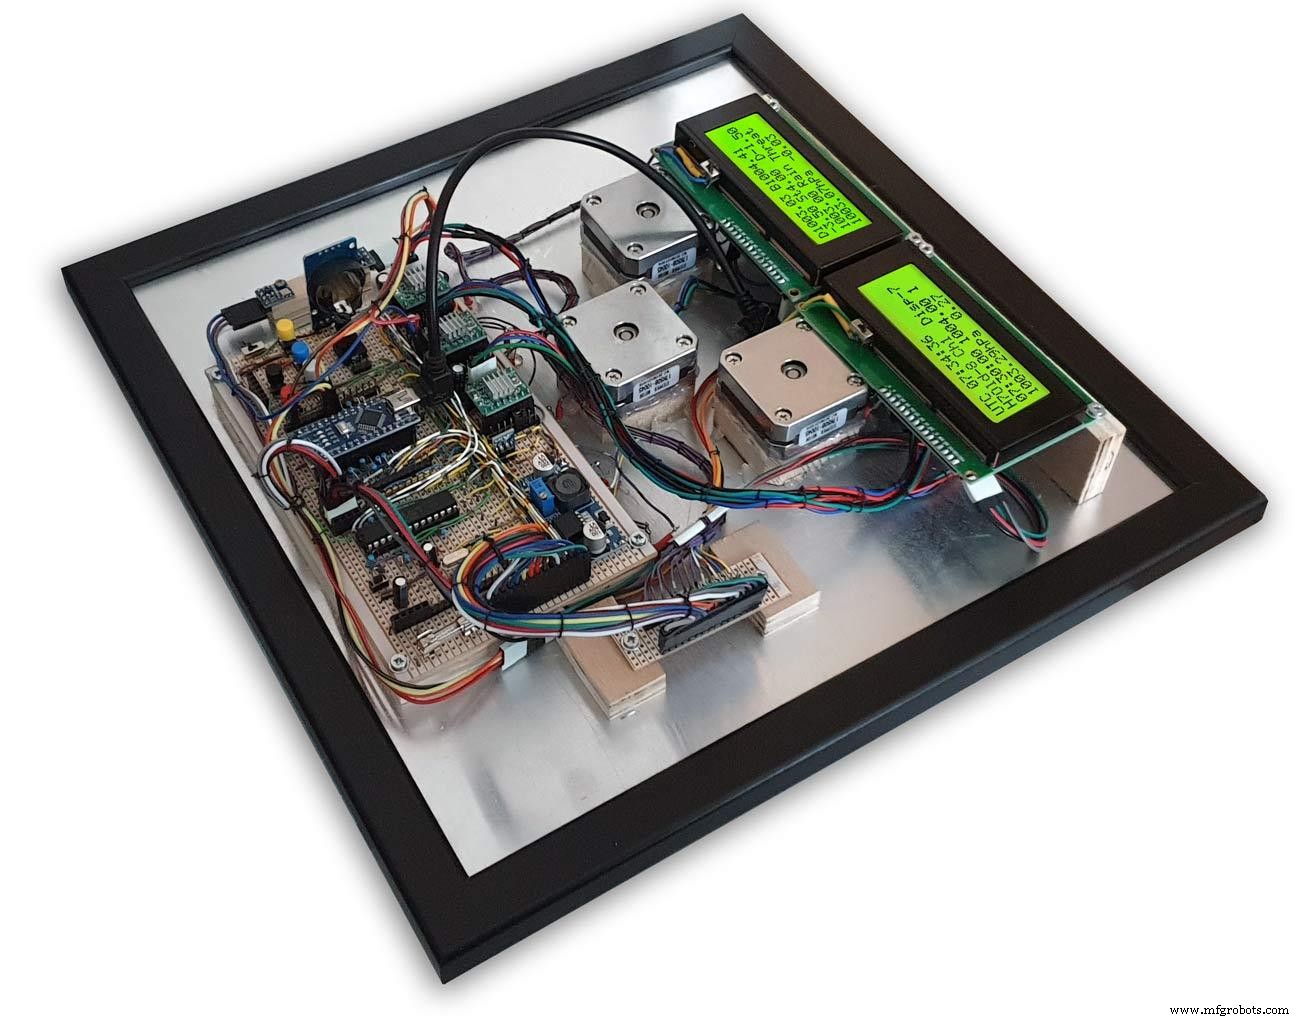
Внутри корпуса два ЖК-экрана 20x4 отображают информацию от каждого из микропроцессоров.
Главный дисплей давления воздуха и 6-часовой дисплей контролируются часами реального времени. Эти часы также показывают импульс в 1 час для отображения 3 часов.
Шаг 1. Сравнение с обычным аналоговым барометром

Большинство аналоговых барометров рис. 2 просто используйте давление воздуха в качестве индикатора для прогнозирования погоды, и вы должны не забыть установить подвижный указатель и отметить время, в которое он был установлен, чтобы увидеть изменение давления воздуха.
Погода просто записывается на циферблате и считывается с указателя. Прогнозирование немного сложнее, поскольку вам нужно использовать второй указатель и отмечать любые изменения за 3-часовой период. Вам нужно будет запомнить комбинации текущего давления и повышения / понижения давления, чтобы получить свой прогноз.
Мой барометр постоянно отслеживает изменение давления в течение 3 и 6 часов и отображает эти показания на 2 отдельных шкалах.
На рис.1 показан диапазон прогнозов погоды с помощью моего барометра.
На рис.3 крупным планом показаны светодиоды прогнозирования погодных условий. Прогноз погоды основан на изменении давления воздуха за последние 3 часа.
Шаг 2. Демонстрация барометра "Предсказание шторма"

На этой покадровой анимации показано, как стрелки барометра и светодиоды прогноза реагируют на надвигающийся шторм.
Шаг 3. Диски расширенного диапазона
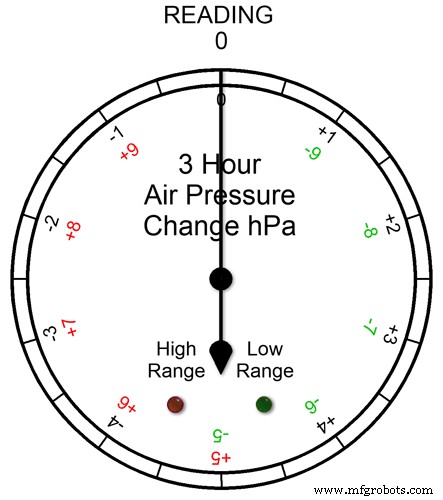

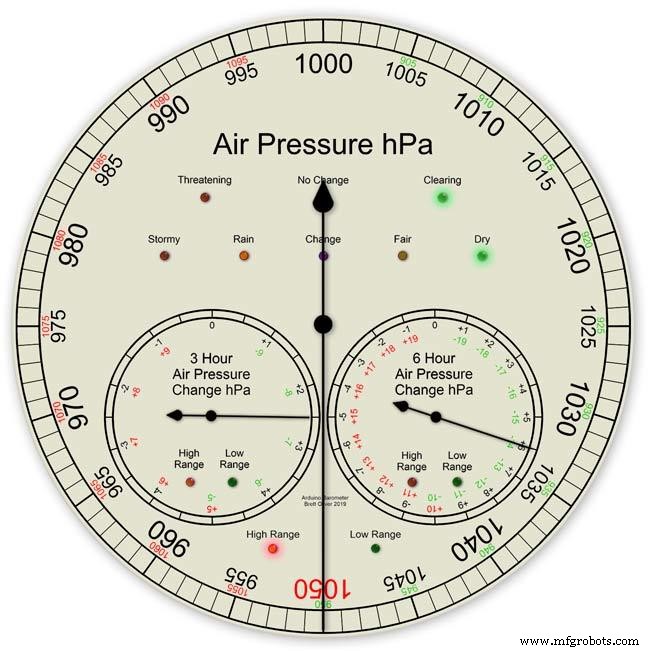
Все три циферблата имеют расширенный диапазон. Это позволяет отображать большее разрешение на циферблатах при нормальной погоде. В экстремальных погодных условиях циферблаты переключаются на расширенный диапазон.
Анимация pic1. показывает, как светятся светодиоды при работе в расширенном диапазоне. Красный светодиод показывает, когда показание составляет +5 и выше. Затем вы прочтете надпись на красной шкале. Зеленый светодиод показывает, когда показание составляет -5 и ниже. Затем вы прочтете надпись Зеленой шкалы. Если показание выходит за пределы расширенного диапазона, например, на этой шкале выше +9 или -9, оба светодиода загорятся, чтобы показать это - см. Следующий раздел.
Показания давления в расширенном диапазоне Рис.2 Если показания давления выходят за пределы расширенного диапазона + или -, тогда оба светодиода загорятся, чтобы предупредить вас о том, что произошли экстремальные показания или изменения. Циферблаты по-прежнему будут показывать показания, например, на трехчасовом циферблате, если показание было -10, тогда циферблат указывал бы на 0 с горящими обоими светодиодами. Если бы показание за 3 часа было -11, то циферблат указывал бы на -1 с горящими обоими светодиодами. Вы просто добавляете 10 к прочтению.
На анимации ниже трехчасовая разница давления начинается с 0, а разница давления уменьшается. При -5 гПа загорается зеленый светодиод, указывая на то, что используется расширенный отрицательный диапазон. Изменение давления продолжает падать, пока не достигнет -10 гПа. Теперь этот диапазон выходит за пределы расширенного диапазона, поэтому также горит красный светодиод. Затем давление снова падает до -11 гПа, и оба светодиода продолжают гореть. Изменение давления начинает снижаться до -10 гПа, и снова это все еще выходит за пределы расширенного диапазона, поэтому оба светодиода продолжают гореть. Как только изменение давления упадет ниже -10, красный светодиод погаснет, показывая, что снова используется расширенный диапазон.
Я установил расширенный диапазон на циферблатах после проверки экстремальных погодных условий в Великобритании, и хотя я ожидал, что будут использоваться расширенные диапазоны 3 и 6 часов, я не думал, что расширенный диапазон когда-либо будет использоваться на основном дисплее барометра.>
Рис.3 При создании прототипа барометра в январе 2020 года было зафиксировано рекордно высокое показание 1050 гПа. На юге Англии мой главный барометр перешел в расширенный диапазон с указателем на красном 1050 и горящим красным светодиодом верхнего диапазона.
Шаг 4. ЖК-информационные дисплеи
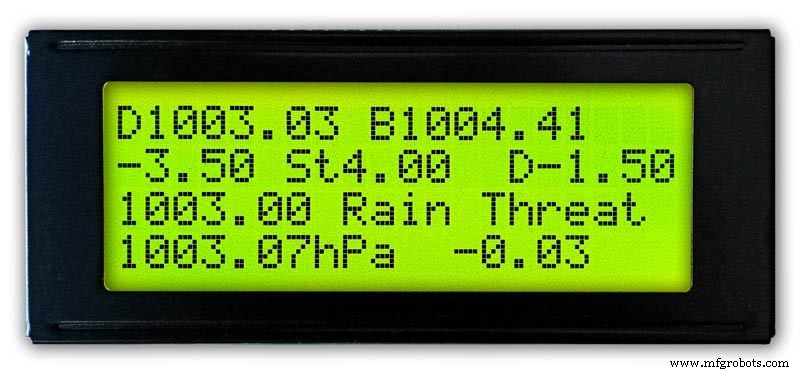

3 часа
Рис.1 и 2 На этом дисплее отображаются показания за 3 часа и информация на 3-часовом циферблате. Он также показывает прогноз погоды на основе текущего и последнего показания за 3 часа.
6 часов
Рис. 3 и 4 На этом дисплее отображаются основные показания шкалы барометра, а также показания за 6 часов.
Шаг 5. Прогноз погоды


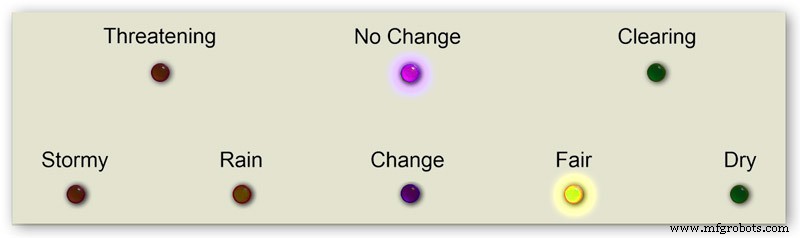
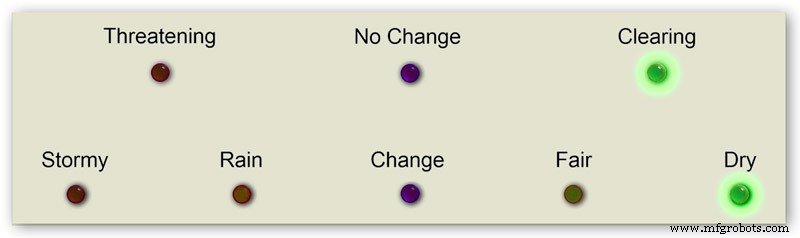

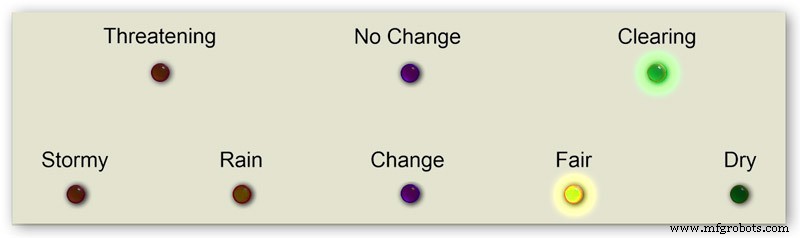

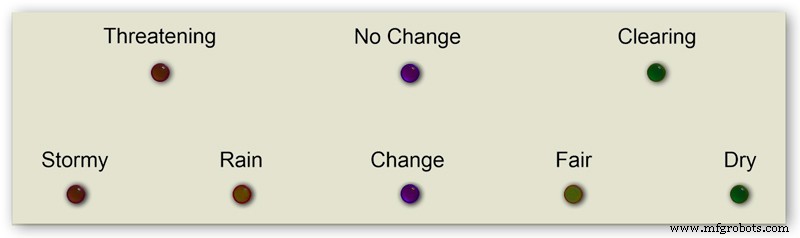
Для прогноза погоды на моем барометре используются 8 светодиодов.
На основе текущего атмосферного давления и скорости его изменения за последние 3 часа светодиоды прогнозируют погоду.
Анимация 1 показывает различные комбинации комбинаций индикаторов прогноза.
Я посетил ряд погодных сайтов и собрал следующую информацию о предсказании погоды с помощью барометра.
Прогноз погоды с помощью барометра
Более конкретно, барометр с показаниями в гПа можно интерпретировать следующим образом:
Если показание превышает 1022 гПа
Повышение или постоянное давление означает сохранение хорошей погоды. Медленно падающее давление означает хорошую погоду. Быстро падающее давление означает облачность и более теплую погоду.
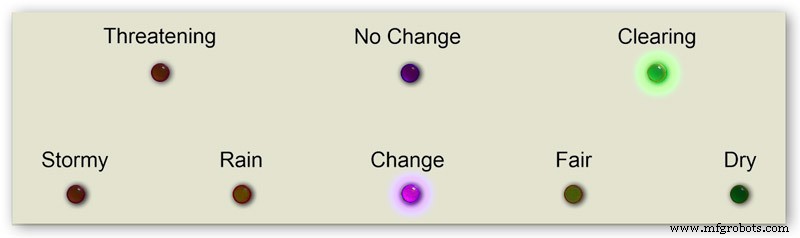
Если оно находится в пределах 1009–1022 гПа
Повышение или постоянное давление означает, что текущие условия сохранятся. Медленно падающее давление означает незначительные изменения в погоде. Резкое падение давления означает, что вероятен дождь или снег, если он достаточно холодный.
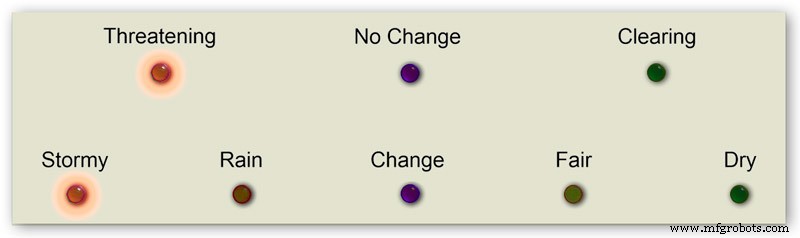
Если показание ниже 1009 гПа
Повышающееся или стабильное давление указывает на ясную и прохладную погоду. Медленно падающее давление указывает на дождь, а на быстрое падение - на приближающийся шторм.
Используя информацию над моим барометром, я использую следующую логику для предсказания погоды.
Логика применяется в следующей последовательности, при этом загораются светодиоды.
Рис.2 Давление воздуха <1009 гПа
Повышение или постоянное давление указывает на ясную и прохладную погоду.
Давление воздуха <1009,00 и изменение за 3 часа> =0
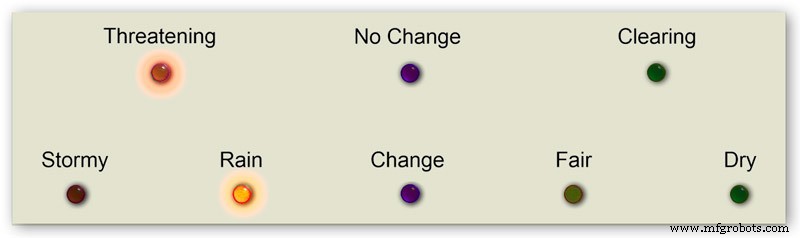
Рис.3 Давление воздуха <1009 гПа
Медленно падающее давление указывает на дождь
Давление воздуха <1009,00 и изменение за 3 часа <изменение за 0 и 3 часа> =-1,5
Рис.4 Давление воздуха <1009 гПа
Быстро падающее давление указывает на приближение шторма.
Давление воздуха <1009,00 и изменение за 3 часа <-1,5
Рис.5 Давление воздуха от 1009 до 1022 гПа
Повышение или постоянное давление означает, что текущие условия сохранятся.
Медленно падающее давление означает незначительное изменение погоды.
Давление воздуха> =1009,00 и давление воздуха <=1022,00 и изменение за 3 часа> =-1,5 и изменение за 3 часа <=1,5
Рис.6 Давление воздуха от 1009 до 1022 гПа
Быстрое повышение атмосферного давления означает, что погода улучшается
Давление воздуха> =1009,00 и давление воздуха <=1022,00 и изменение за 3 часа> 1,5
Рис.7 Давление воздуха от 1009 до 1022 гПа
Быстро падающее давление означает, что вероятен дождь или снег, если достаточно холодно.
Давление воздуха> =1009,00 и давление воздуха <=1022,00 и изменение за 3 часа <-1,5
Рис.8 Давление воздуха выше 1022 гПа
Повышение или постоянное давление означает сухую погоду.
Давление воздуха> 1022,00 и изменение за 3 часа> =0
Рис.9 Давление воздуха выше 1022 гПа
Медленно падающее давление означает хорошую погоду.
Давление воздуха> 1022,00 и изменение за 3 часа <изменение за 0 и 3 часа> =-1,5
Рис.10 Давление воздуха выше 1022 гПа
Быстро падающее давление означает изменение
Давление воздуха> 1022,00 &&изменение за 3 часа <-1,5
Шаг 6. Запуск барометра

При первом включении выполняется проверка светодиодов.
После завершения стрелки вернутся к своим начальным настройкам, готовым к калибровке.
Шаг 7:Начальные настройки запуска RTC
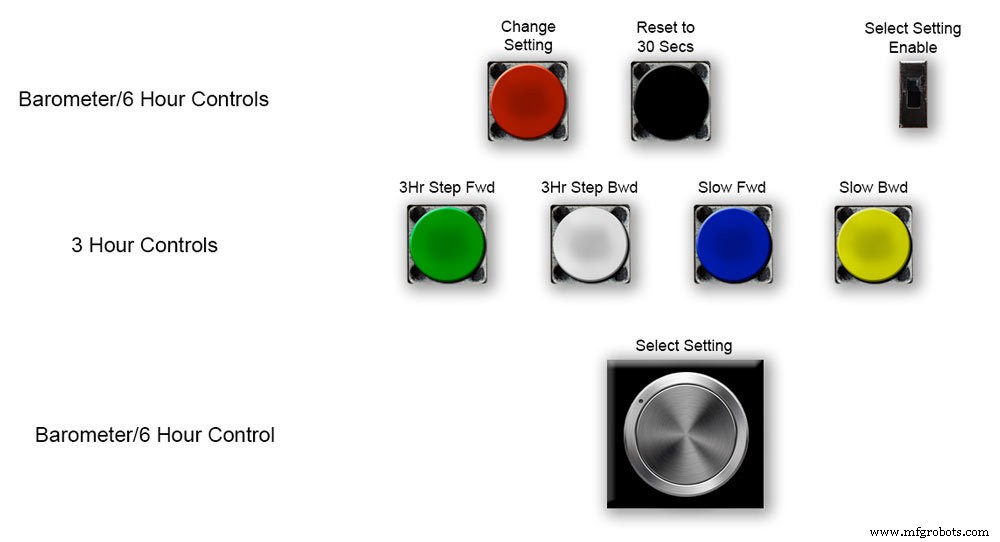


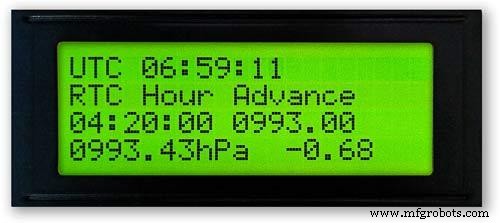
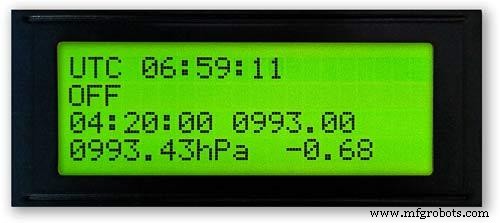
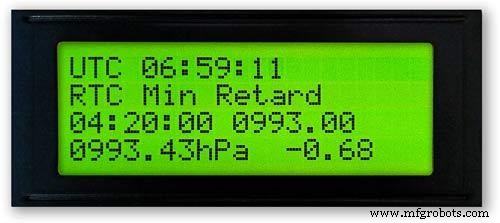

Рис.1 При первом включении барометр необходимо настроить с помощью элементов управления на Vero Board.
RTC
Рис.2 RTC нужно будет установить на правильное время. Я установил его на UTC и не беспокоюсь о переходе на летнее время. Перед настройкой времени обратите внимание на значение «Disp» в этом случае -5. Это значение 6-часовой стрелки, которое понадобится позже при настройке. Сдвиньте переключатель «Select Setting Enable» в положение «Вкл.». Дисплей не изменится.
Рис.3 Медленно поверните ручку «Select Setting» по часовой стрелке, и 2-я строка основного ЖК-дисплея изменится.
Остановите, когда на дисплее отобразится «RTC Hour Retard». Если вы хотите замедлить часы RTC, нажмите красную кнопку «изменить настройку». Один щелчок вернет часы назад. Многократные щелчки уменьшат количество нажатых щелчков, но обновление RTC займет секунду.
Рис.4. Дальнейший поворот ручки «Select Setting» изменит дисплей на «RTC Hour Advance»
Если вы хотите увеличить часы RTC, нажмите красную кнопку «изменить настройку». Один щелчок мыши переведет часы вперед. Многократные щелчки увеличивают количество нажатых нажатий, но обновление RTC займет секунду.
Рис.5. Дальнейший поворот ручки «Select Setting» изменит дисплей на «RTC Min Retard»
Если вы хотите замедлить время RTC, нажмите красную кнопку «изменить настройку». Один щелчок вернет минуты назад. Многократные щелчки уменьшат количество нажатых щелчков, но обновление RTC займет секунду.
Рис.6 Дальнейший поворот ручки «Select Setting» изменит отображение на «RTC Min Advance»
Если вы хотите увеличить минуты RTC, нажмите красную кнопку «изменить настройку». Один щелчок мыши переведет минуты вперед. Многократные щелчки увеличивают количество нажатых нажатий, но для обновления RTC потребуется секунда.
Рис.7 После того, как вы завершили настройку RTC или любую другую настройку, полностью поверните ручку «Select Setting» против часовой стрелки, пока на дисплее не отобразится «Off»
Сдвиньте переключатель «Select Setting Enable» в положение «Выкл.».
Примечание. Секунды можно синхронизировать с 30 секундами в любое время, нажав черную кнопку «Сброс до 30 секунд». Теперь время будет запоминаться на RTC, если питание отключено.
Шаг 8:Начальные настройки запуска 6-часовая стрелка


Установка 6-часовой стрелки
Рис.1 После установки часов реального времени необходимо настроить барометр и стрелки давления воздуха на 6 часов.
Сдвиньте переключатель «Select Setting Enable» в положение «Вкл.». Дисплей не изменится.
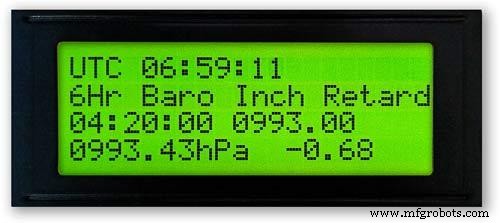
Медленно поворачивайте ручку «Выбор настройки» по часовой стрелке, пока не отобразится «6Hr Baro Inch Retard».
При самом первом включении потребуется калибровка 6-часовой стрелки до ближайшей цифры.
Если ближайшая цифра находится за стрелкой, нажмите красную кнопку «изменить настройку». Один щелчок - шаг за шагом переместит руку назад. Удерживание кнопки будет многократно сдвигать руку назад. Как только стрелка окажется на цифре, отпустите кнопку.
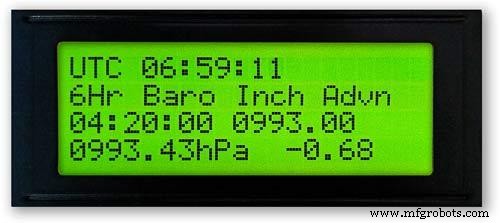
Рис.2 Если ближайшая цифра перед рукой или если у вас есть дюйм, задерживавший руку, используя указанное выше слишком много, поверните ручку «Select Setting» по часовой стрелке, пока не отобразится «6Hr Baro Inch Advn».
Нажмите красную кнопку «изменить настройку». Один щелчок - шаг за шагом продвинет руку вперед. Удерживание кнопки будет многократно продвигать руку вперед. Как только стрелка окажется на цифре, отпустите кнопку.
Рис.3 После того, как 6-часовая стрелка будет установлена точно на цифру, часовую стрелку необходимо установить на правильное значение.
Перед настройкой RTC вы записали это число -5.
Рис.4 Если стрелка 6-часового индикатора слишком продвинута.
Поворачивайте ручку «Выбор настройки» по часовой стрелке, пока не отобразится «6Hr Baro Retard». Нажмите и отпустите красную кнопку «изменить настройку». Этот шаг подоконника 6 часовой стрелкой назад на 1 целую единицу. Остановитесь, когда 6-часовая стрелка достигнет отмеченного вами числа.
Рис.5 Если 6-часовая стрелка дисплея запаздывает.
Поворачивайте ручку «Select Setting» по часовой стрелке, пока не отобразится «6Hr Baro Advance». Нажмите и отпустите красную кнопку «изменить настройку». Этот шаг подоконника 6-часовой стрелкой вперед на 1 целую единицу. Остановитесь, когда 6-часовая стрелка достигнет отмеченного вами числа.
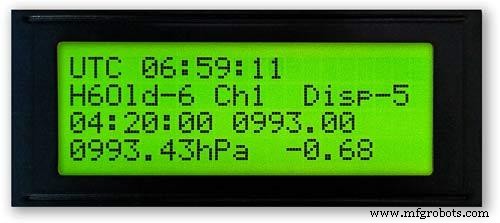
Рис.6 Обратите внимание, что для правильного отображения 6-часового дисплея потребуется 8 часов, так как в течение этого периода времени необходимо сохранять показания в памяти.
Вы всегда можете добавить предыдущие показания давления воздуха в код перед загрузкой, если вам требуется, чтобы 6-часовой дисплей работал с момента запуска.
Код преобразует часы в число H, как показано выше H =6. В строке кода 128 H6 будет означать, что текущее значение часа будет помещено под hour6, предыдущим показанием в hour7, показанием перед этим значением в hour0 и т. Д.
int hour0 =1015;
int hour1 =1016
; int hour2 =1015;
int hour3 =1016;
int hour4 =1016
; int hour5 =1016;
int hour6 =1012;
int hour7 =1013;
У вас должна быть возможность получить свои местные показания в Интернете.
Я настраиваю страницу своей метеостанции, чтобы проверить это при создании барометра.
Щелкните эту ссылку, чтобы увидеть почасовые изменения в Kenley Surrey UK.
Шаг 9. Начальные настройки запуска. Стрелка главного барометра


Установка стрелки главного барометра
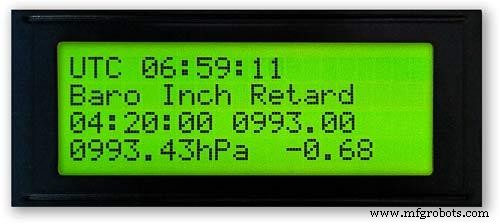
Рис.1 Теперь 6-часовой дисплей верен, стрелку главного барометра необходимо установить на округленное значение давления на уровне моря в 3-м ряду вниз на главном ЖК-дисплее.
При первом включении стрелке главного барометра потребуется выполнить калибровку до ближайшей цифры. Поворачивайте ручку «Выбор настройки» по часовой стрелке, пока не отобразится «Baro Inch Retard».
Если ближайшая цифра находится за стрелкой, нажмите красную кнопку «изменить настройку». Один щелчок - шаг за шагом переместит руку назад. Удерживание кнопки будет многократно сдвигать руку назад. Как только стрелка окажется на цифре, отпустите кнопку.
Рис.2 Если ближайшая цифра перед рукой или если у вас есть дюйм, задерживающий руку, используя указанное выше слишком много, поверните ручку «Select Setting» по часовой стрелке, пока не отобразится «Baro Inch Advn».
Нажмите красную кнопку «изменить настройку».
Один щелчок - шаг за шагом продвинет руку вперед. Удерживая кнопку, вы будете многократно продвигать руку вперед. Как только рука окажется на цифре, отпустите кнопку.
Рис.3 Если стрелка главного барометра слишком выдвинута.
Поворачивайте ручку «Выбор настройки» по часовой стрелке, пока не отобразится «Задержка барометра».
Нажмите и отпустите красную кнопку «изменить настройку».
Это переместит стрелку главного барометра назад на 1 целую единицу. Остановитесь, когда часовая стрелка достигнет указанного вами округленного значения давления на уровне моря.
Рис.4 Если основная стрелка барометра запаздывает по сравнению с указанным вами округленным давлением на уровне моря.
Поворачивайте ручку «Выбор настройки» по часовой стрелке до тех пор, пока не отобразится «Перемещение барометра».
Нажмите и отпустите красную кнопку «изменить настройку».
Это переместит стрелку главного барометра вперед на 1 целую единицу. Остановитесь, когда стрелка достигнет указанного вами округленного значения давления на уровне моря.
Шаг 10:Начальные настройки запуска. 3-часовая стрелка


Установка 3-часовой стрелки.
Oic.1 3-часовая стрелка регулируется четырьмя кнопками Зеленая, Белая, Синяя и Желтая на плате Vero.
При первоначальном включении 3-часовая стрелка должна быть откалибрована до ближайшей единицы или половины единицы.
Рис.2 Если 3-часовая стрелка, ближайшая к единице измерения, опережает 3-часовую стрелку, нажмите желтую кнопку «Slow Bwd», чтобы переместить стрелку назад. Если удерживать кнопку нажатой, рука будет несколько раз смещаться назад.
Если 3-часовая стрелка, значение ближайшей единицы находится за 3-часовой стрелкой, нажмите синюю кнопку «Slow Fwd», чтобы переместить стрелку вперед. Если удерживать кнопку нажатой, рука будет постоянно продвигаться вперед.
Как только 3-часовая стрелка окажется точно на единице / половине, стрелку можно установить на значение «D» на 3-часовом ЖК-дисплее.
Если стрелка находится перед значением «D», нажмите белую кнопку «3Hr Step Bwd», чтобы сдвинуть 3-часовую стрелку на половину единицы назад.
Если в руке значение меньше, чем «D», нажмите зеленую кнопку «3Hr Step Fwd», чтобы переместить 3-часовую стрелку вперед на половину единицы.
Обратите внимание, что для правильного отображения трехчасового дисплея потребуется 4 часа, так как в течение этого периода времени необходимо сохранять показания в памяти.
Вы всегда можете добавить предыдущие показания давления воздуха в код перед загрузкой, если вам нужен прогноз и трехчасовой дисплей для работы с момента запуска.
3-часовой код отображения в строке 124
float hour0 - текущий час
float hour1 - предыдущий час и т. д.
float hour0 =1036.00;
float hour1 =1036.00;
float hour2 =1036.00;
float hour3 =1036.00;
float hour4 =1036.00;
У вас должна быть возможность получить свои местные показания в Интернете.
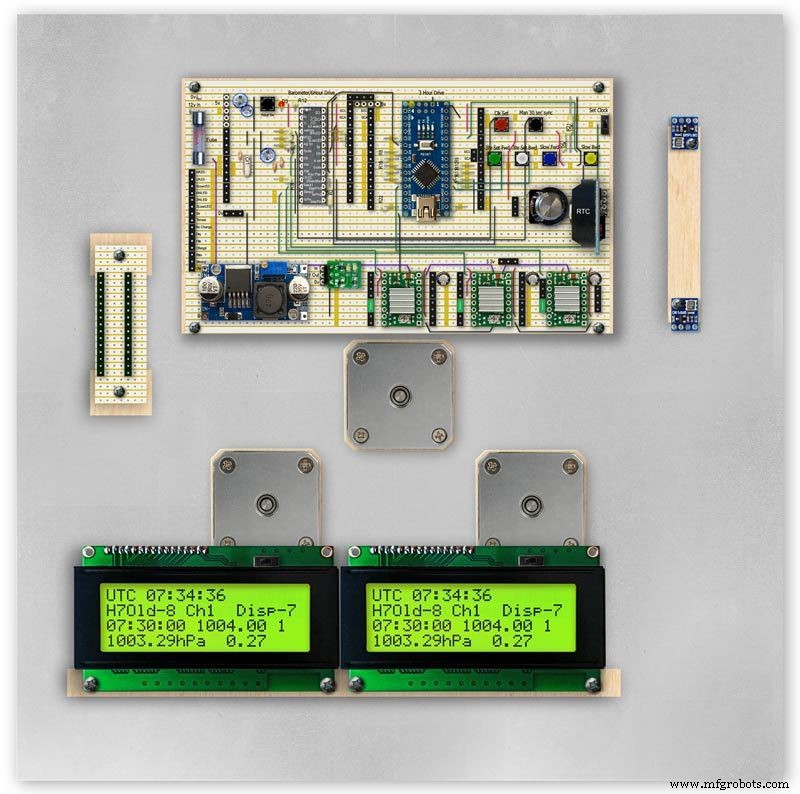
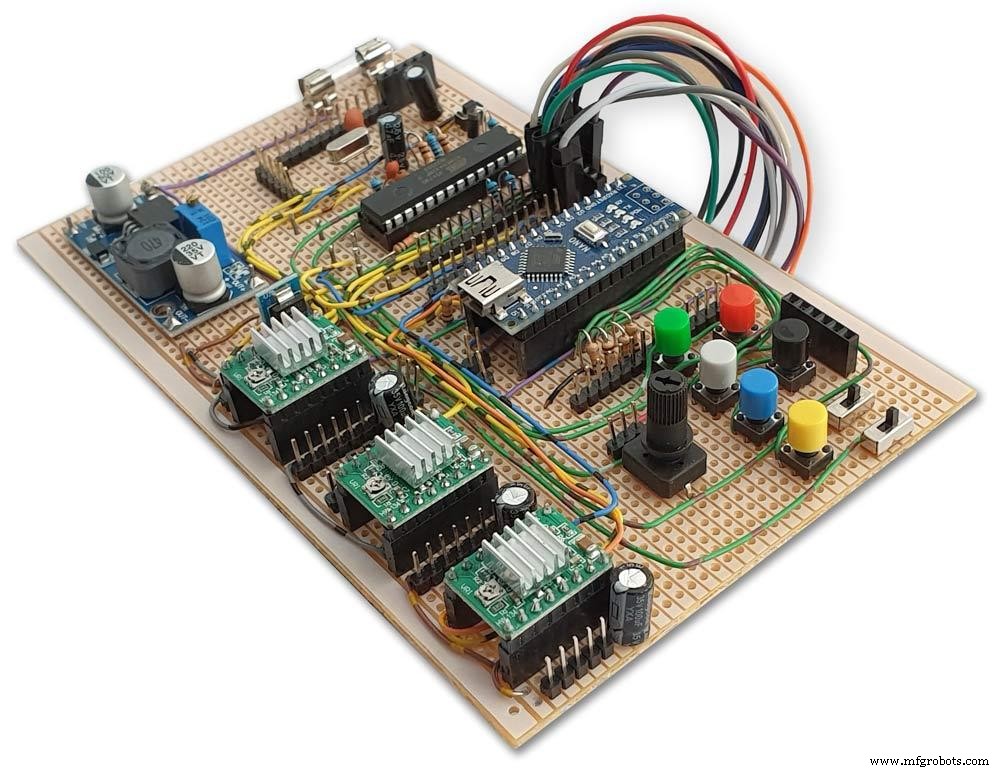
Шаг 11. Модули / компоненты


Модули
По возможности в этом проекте используются готовые модули для экономии времени на строительство и проектирование.
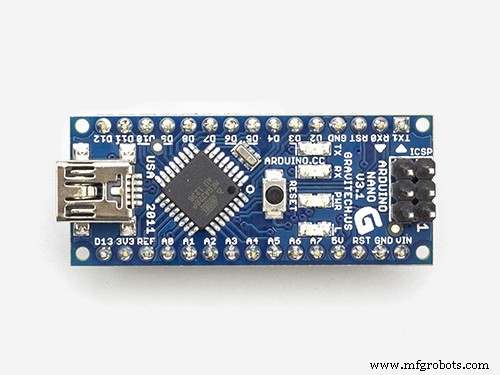
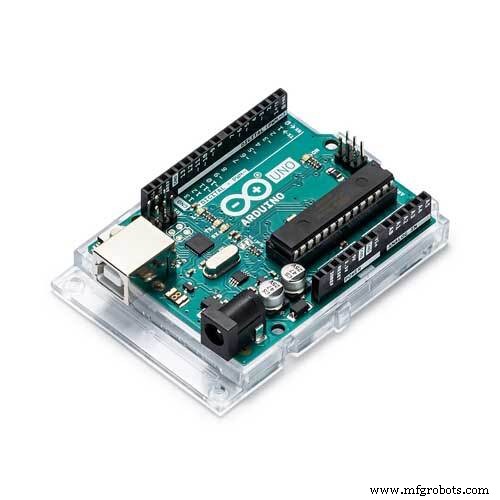
Микропроцессоры
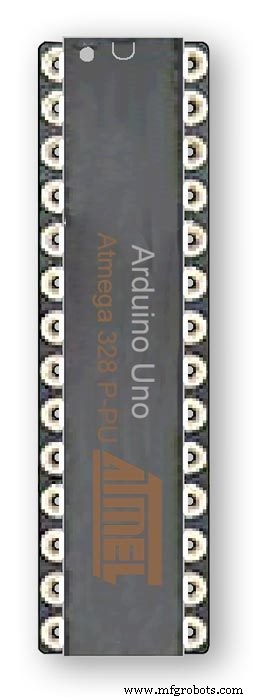
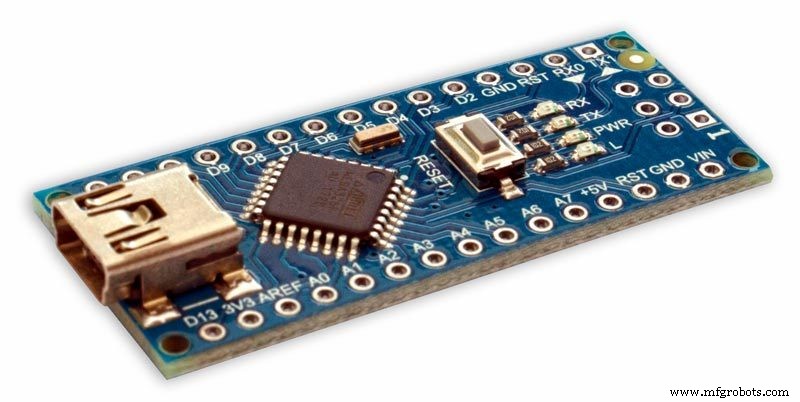
В этом проекте используются 2 микропроцессора:Atmega 328 (UNO) рис.1 и Arduino Nano рис.2. Я использовал эту комбинацию, так как у меня уже был 328, построенный из другого проекта, и из-за ограниченного места на плате Vero Board я также добавил Nano.
Мощность
Барометр потребляет около 65 мА, и этот показатель будет немного увеличиваться по мере того, как каждый двигатель будет работать на долю секунды каждые 10 минут до 1 часа
AMS117 рис.3
Модуль в этом проекте имеет напряжение 3,3 В и используется для питания модуля BMP180.
Серия регулируемых и фиксированных регуляторов напряжения AMS1117 предназначена для обеспечения выходного тока до 1 А и работы с дифференциалом между входами и выходами до 1 В. Гарантированное падение напряжения устройства составляет не более 1,3 В, которое уменьшается при более низких токах нагрузки. Внутренняя подстройка настраивает опорное напряжение до 1,5%. Ограничение по току установлено для минимизации нагрузки в условиях перегрузки как на стабилизатор, так и на схему источника питания. Модуль в этом проекте имеет напряжение 3,3 В и используется для питания модуля BMP180.
LM2596 понижающий преобразователь постоянного тока 3,0-40 В в 1,5-35 В рис. 4 Этот модуль преобразует входной сигнал 12 В в 5 В
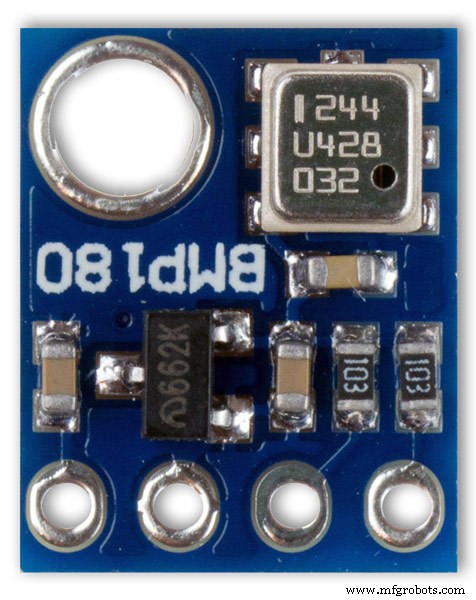
Модуль датчика давления 2 BMP180, снимок 5 BMP180 Breakout - это датчик атмосферного давления с интерфейсом I2C («провод»). Датчики атмосферного давления измеряют абсолютное давление воздуха вокруг них. Это давление зависит как от погоды, так и от высоты. В зависимости от того, как вы интерпретируете данные, вы можете отслеживать изменения погоды, измерять высоту или выполнять любые другие задачи, требующие точных показаний давления.
Подключите контакты +, -, CL и DA к Arduino.
CL переходит в SCL, а DA - в SDA.
ВАЖНО:Подключайте контакты питания (+ и -) ТОЛЬКО к источнику питания 3,3 В. Повышенное напряжение приведет к необратимому повреждению детали. Обратите внимание, что, поскольку I2C использует драйверы с открытым стоком, можно безопасно подключать выводы I2C (DA и CL) к порту I2C на микропроцессоре 5 В.
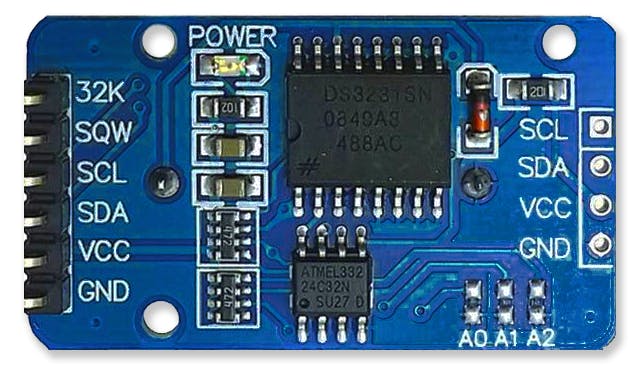
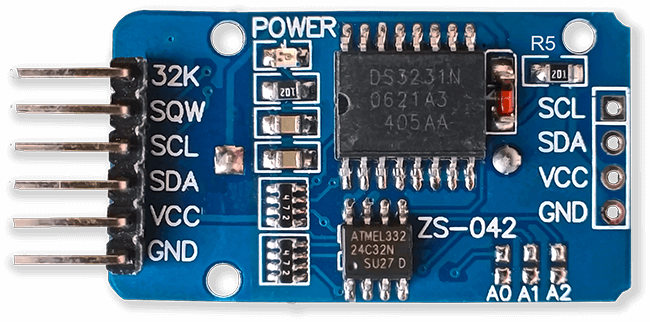
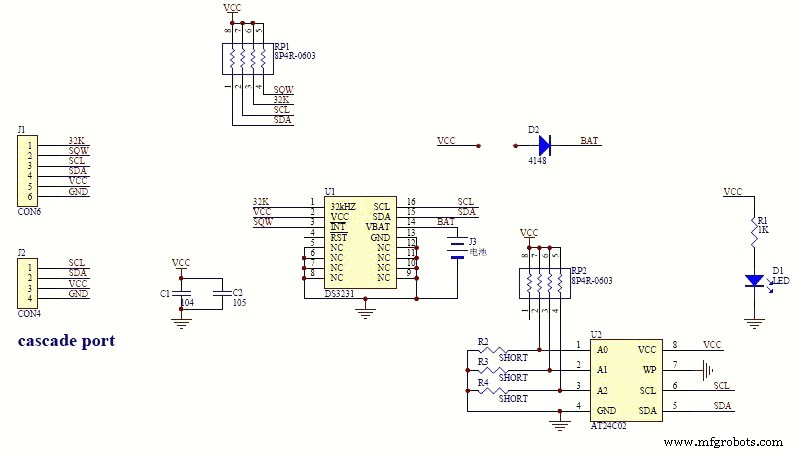
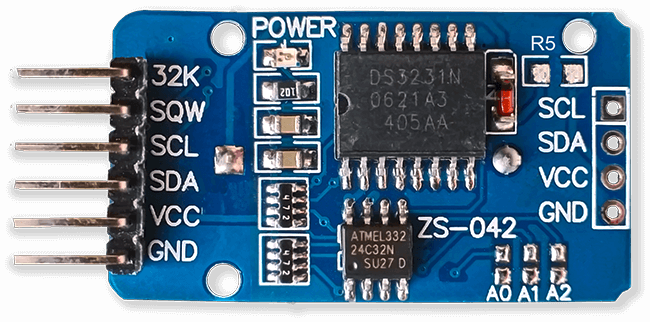
Часы реального времени RTC рис.6
В этом брометре используется прецизионный модуль часов реального времени DS3231 AT24C32 I2C.
Этот модуль используется в основном для отсчета времени, но также выводит отметки времени на ЖК-дисплей. Время установлено на всемирное координированное время и не меняется на летнее время. В комплект поставки модуля входит литий-ионная аккумуляторная батарея (см. Диаграмму выше). Я использую неперезаряжаемую батарею, поэтому удалил резистор R5 из модуля, подробности см. В разделе «Модификация RTC».
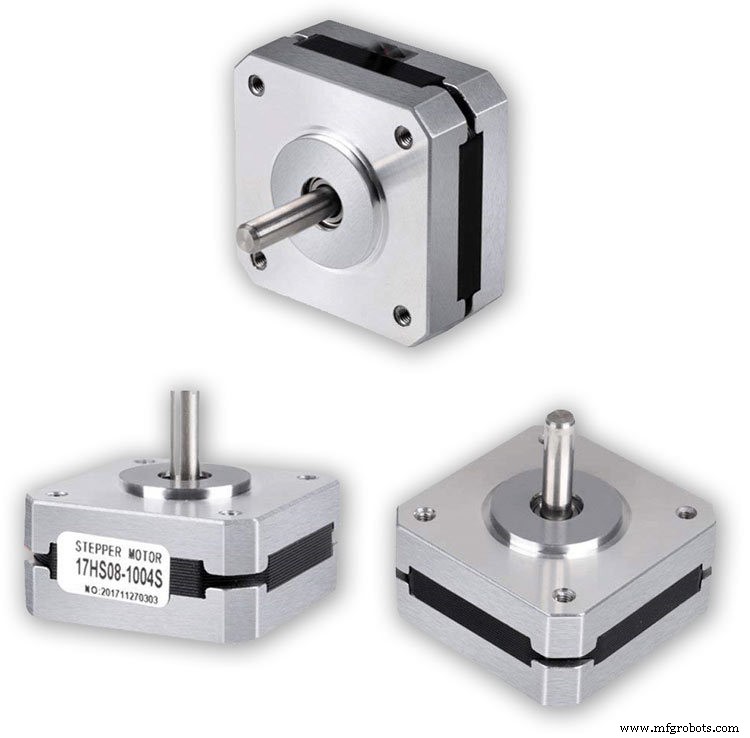
Шаговые двигатели 3 выкл. В барометре используются 3 шаговых двигателя Nema 17 1А, удерживающий момент 13 Нсм, 4-выводные, 1,8 °. Я использовал двигатели 1,8 °, так как ступеньки точно соответствуют 360 ° 200 раз. Вы можете использовать двигатели Nema 8, если хотите, но не используйте двигатели 28BYJ-48-5V, поскольку они не имеют необходимого угла шага 1,8 °.
Угол шага 1,8 ° необходим, поскольку он делится точно на 360 ° для моих циферблатов барометра.
ЖК-дисплеи 2 выключены
Я использовал 2 ЖК-дисплея 20 x 4:один для барометра, часов и 6-часового дисплея, а другой - для 3-часового дисплея и прогноза.
Шаг 12. Модули / компоненты Драйвер шагового двигателя A4988
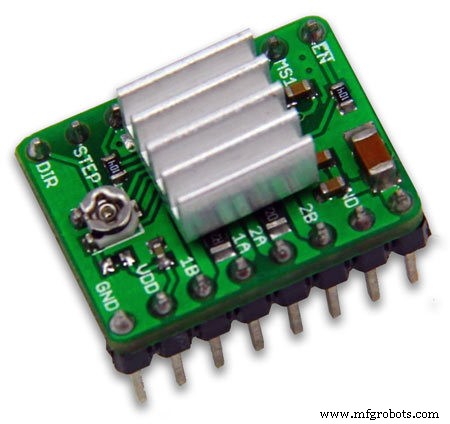
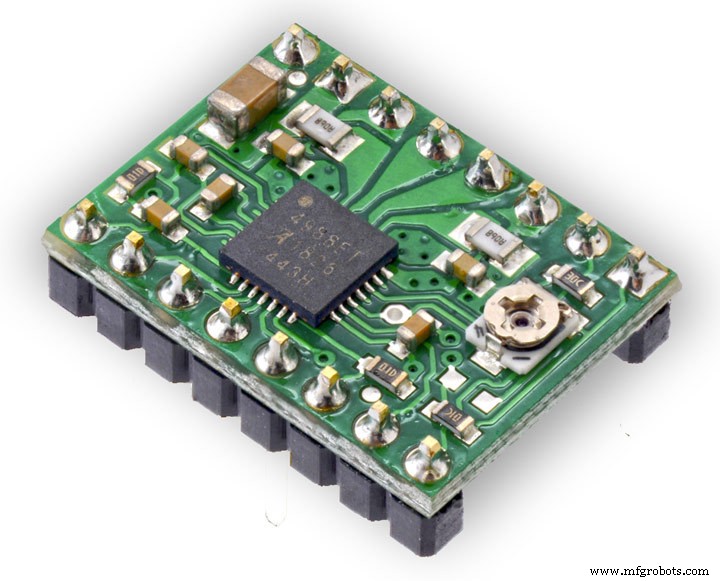
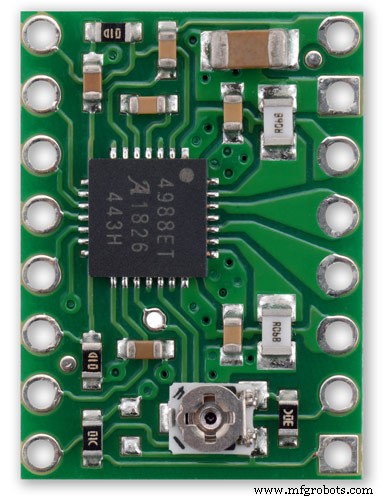
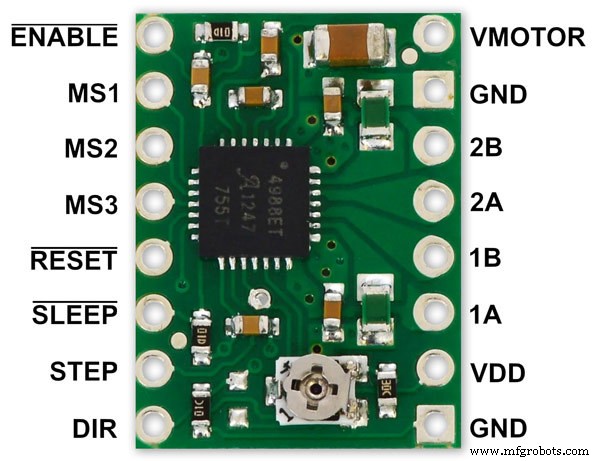
Драйвер микрошагового биполярного шагового двигателя A4988 3 выкл.
Важно, внимательно прочтите этот раздел
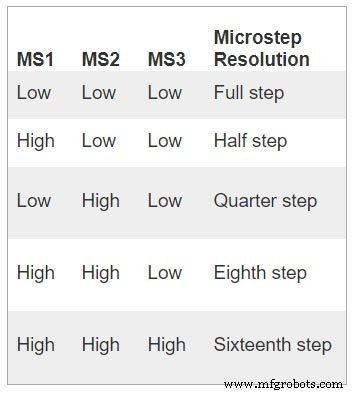
Мой барометр настроен на поворот на 1/16 шага, и код корректируется соответствующим образом.
Драйвер микрошагового биполярного шагового двигателя A4988 рис.1 с радиатором и рис.2 без радиатора
Эта коммутационная плата для микрошагового драйвера биполярного шагового двигателя A4988 от Allegro оснащена регулируемым ограничением тока, защитой от перегрузки по току и перегреву, а также пятью различными разрешениями микрошагов (вплоть до 1/16 шага).
Он работает от 8 В до 35 В и может выдавать примерно до 1 А на фазу без радиатора или принудительного воздушного потока (он рассчитан на 2 А на катушку при достаточном дополнительном охлаждении).
Вот некоторые из ключевых особенностей драйвера:Простой интерфейс управления шагом и направлением Пять различных разрешений шага:полный шаг, полушаг, четверть шаг, восьмой шаг и шестнадцатый шаг Регулируемое управление током позволяет вам установить максимальный выходной ток с потенциометром, который позволяет вам использовать напряжения, превышающие номинальное напряжение вашего шагового двигателя для достижения более высокой скорости шага. Интеллектуальное управление прерыванием, которое автоматически выбирает правильный режим затухания тока (быстрое затухание или медленное затухание). защита от перекрестного тока Защита от короткого замыкания на землю и от короткого замыкания нагрузки
Подключение питания Драйвер требует, чтобы напряжение питания логики (3–5,5 В) было подключено к контактам VDD и GND, а напряжение питания двигателя (8–35 В) было подключено к контактам VMOT и GND. Эти источники питания должны иметь соответствующие развязывающие конденсаторы рядом с платой, и они должны обеспечивать ожидаемые токи (пики до 4 А для питания двигателя).
Предупреждение. В этой несущей плате используются керамические конденсаторы с низким ESR, что делает ее восприимчивой к деструктивным скачкам напряжения LC, особенно при использовании кабелей питания длиной более нескольких дюймов. При правильных условиях эти всплески могут превысить максимальное номинальное напряжение 35 В для A4988 и необратимо повредить плату, даже когда напряжение питания двигателя составляет всего 12 В. Один из способов защитить драйвер от такие всплески связаны с подключением большого (не менее 47 мкФ) электролитического конденсатора к источнику питания двигателя (VMOT) и заземлению где-нибудь рядом с платой.
Подключение двигателя
Четырех-, шести- и восьмипроводные шаговые двигатели могут приводиться в действие A4988, если они правильно подключены. Warning:Connecting or disconnecting a stepper motor while the driver is powered can destroy the driver. (More generally, rewiring anything while it is powered is asking for trouble.)
Step (and microstep) size
see table pic. 3Stepper motors typically have a step size specification (e.g. 1.8° or 200 steps per revolution), which applies to full steps. A microstepping driver such as the A4988 allows higher resolutions by allowing intermediate step locations, which are achieved by energizing the coils with intermediate current levels. For instance, driving a motor in quarter-step mode will give the 200-step-per-revolution motor 800 microsteps per revolution by using four different current levels.
The resolution (step size) selector inputs (MS1, MS2, and MS3) enable selection from the five step resolutions according to the table below. MS1 and MS3 have internal 100kΩ pull-down resistors and MS2 has an internal 50kΩ pull-down resistor, so leaving these three microstep selection pins disconnected results in full-step mode. For the microstep modes to function correctly, the current limit must be set low enough (see below) so that current limiting gets engaged. Otherwise, the intermediate current levels will not be correctly maintained, and the motor will skip microsteps.
Control inputs
pics 4 &5Each pulse to the STEP input corresponds to one microstep of the stepper motor in the direction selected by the DIR pin. Note that the STEP and DIR pins are not pulled to any particular voltage internally, so you should not leave either of these pins floating in your application.
If you just want rotation in a single direction, you can tie DIR directly to VCC or GND. The chip has three different inputs for controlling its many power states:RST, SLP, and EN. For details about these power states, see the datasheet.
Please note that the RST pin is floating; if you are not using the pin, you can connect it to the adjacent SLP pin on the PCB to bring it high and enable the board.
Current LImiting Before connecting the motor we should adjust the current limiting of the driver so that we are sure that the current is within the current limits of the motor. We can do that by adjusting the reference voltage using the potentiometer on the module to set the VRef.
See details on the video link pic. 6
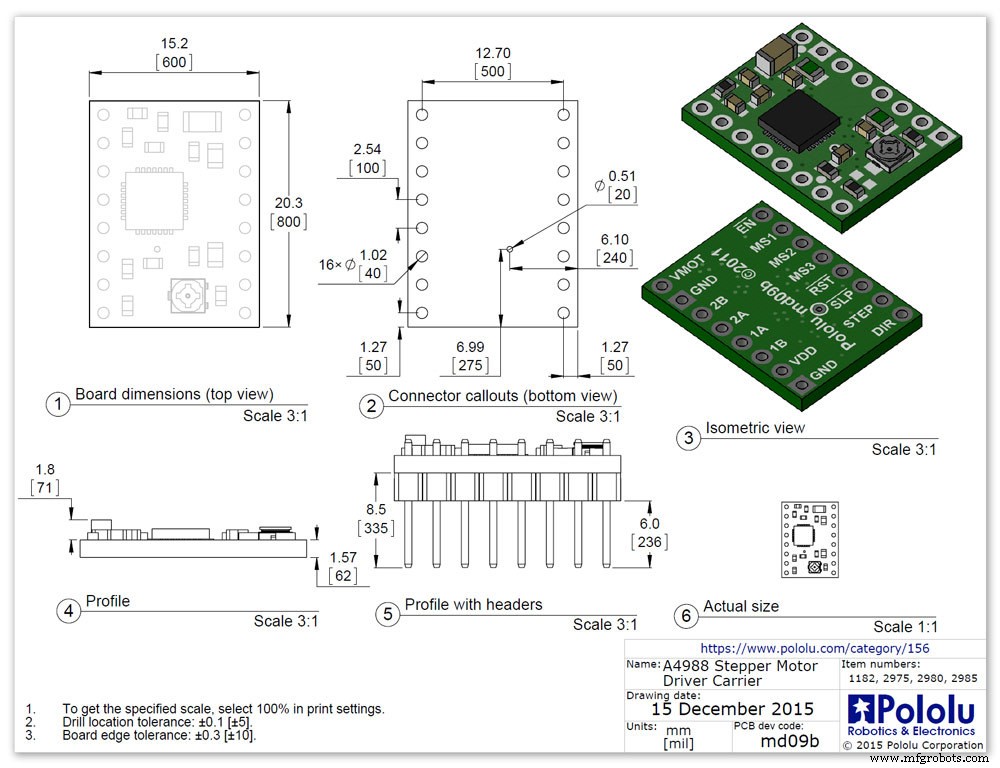
Manufacturers Drawing sheet pic.7
Step 13:Construction Prototyping
The circuit was prototyped using a hardboard dial with holes drilled for the motor spindles and LEDs.
Various dial designs were then printed on normal paper and Sellotaped over the top. The LED wiring loom was made with the LEDs in position on the temporary dial.
If you are using the round dial design this will allow you to check if the board etc will be mounted on the dial or in the back box.
Step 14:Construction RTC Modification
The module comes supplied with a Lithium-Ion rechargeable battery see diagram pic. 2.
I use a non rechargeable battery (I am not happy with the circuit design with a lithium-iron battery and associated fire risk) of the so have removed resistor R5 from the module as below. This stops any charge current to the battery.
Pic.3 shows the module without the resistor (just break it off) and pic.4 the modified circuit.
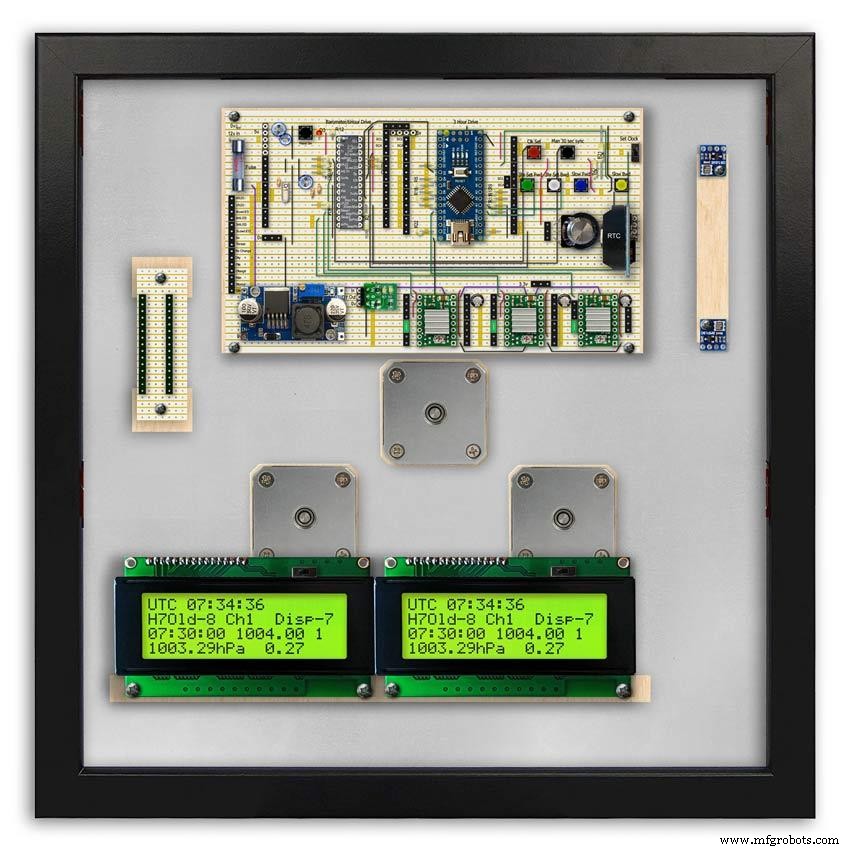
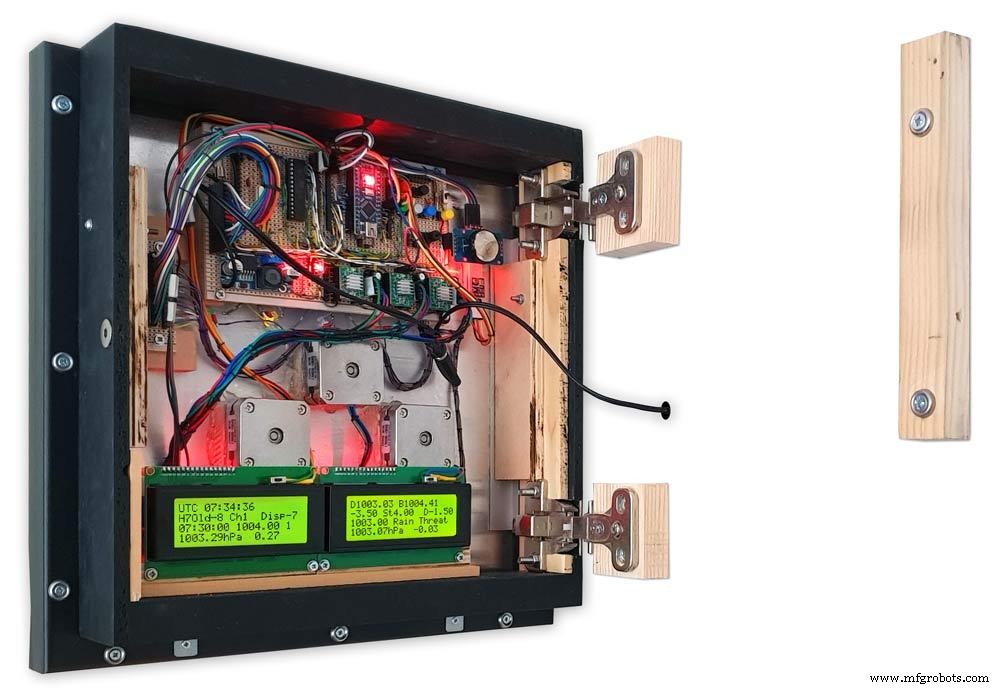
Step 15:Construction Mounting Modules &Boards
On the modern square dial design all the modules and boards are mounted on the dial. The classic round dial desgn will need some parts mounted in the back box as there is less space on the dial.
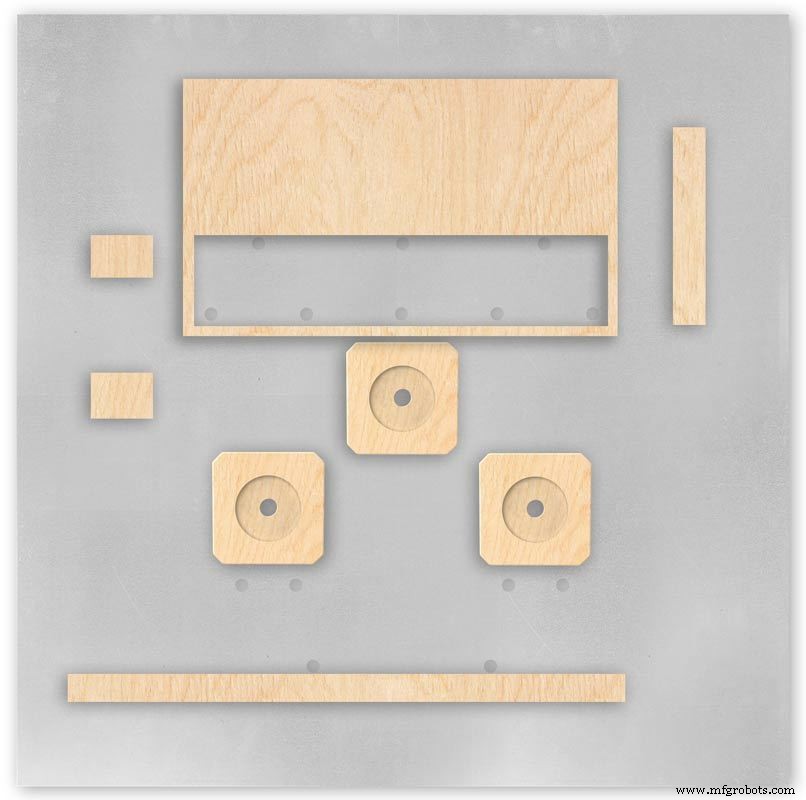
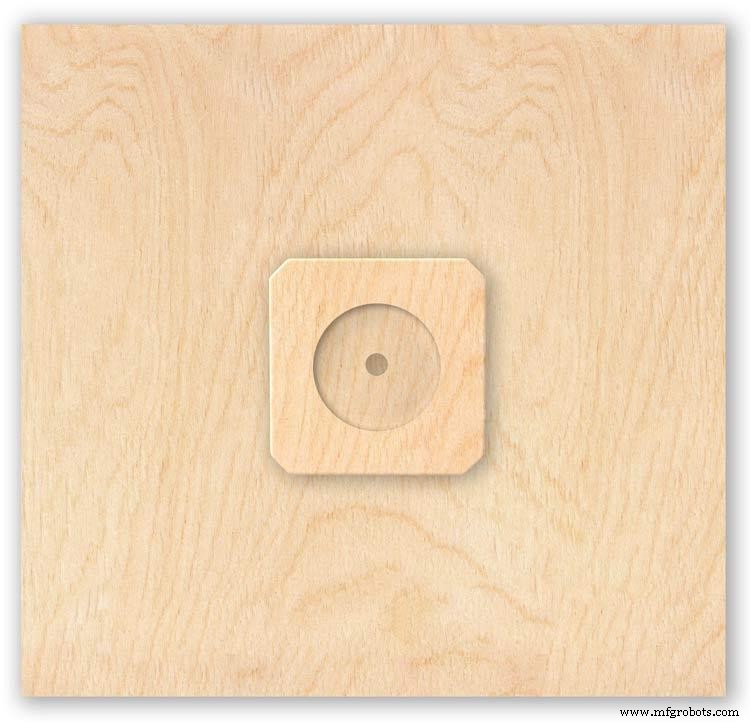
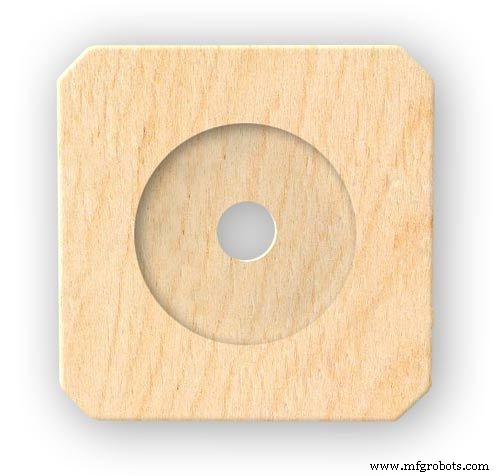
Motors are hot melt glued to wooden mounting blocks pic.1&2. The wooded blocks are cut fron a sheet of plywood pic.3. The mounting blocks depths are set to allow the correct protrusion of the spindles through the dial. I have hot melt glued the blocls to the dial.
The Vero Boards and LCD displays are also screwed to wooden blocks which have been glued to the dial using impact adhesive.
Pic.4 shows the front view with a transparent dial showing mounting locations.
Pic. 5 shows the same but the rear view.
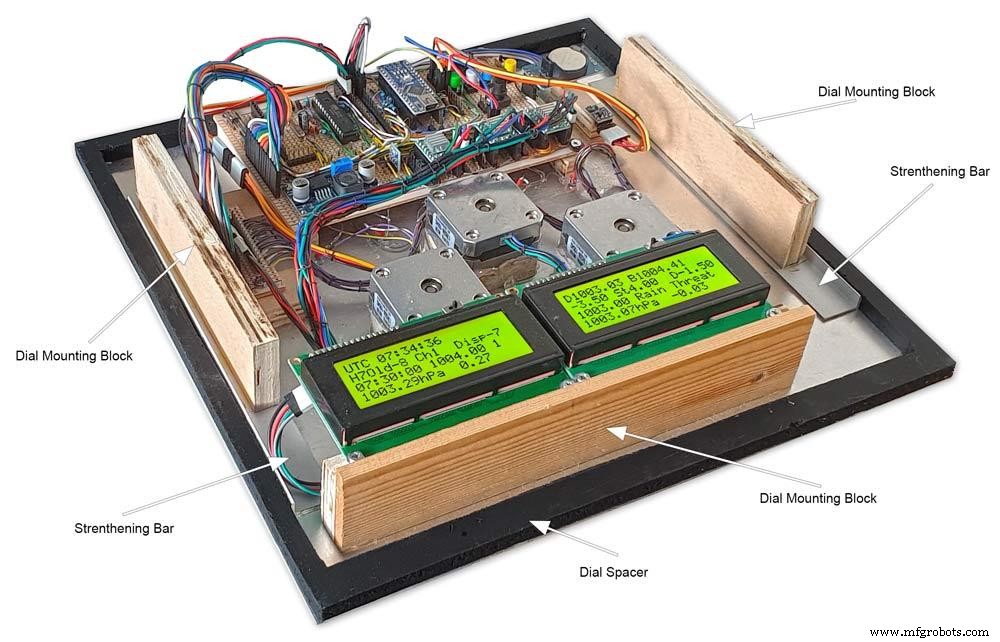
Pic.6 shows the wooden mounting blocks locations and layout.
Pic.7 shows the modules and motors mounted on the blocks.
Step 16:Construction LED Fixing

The 3mm LEDs are mounted so they just show above the surface of the dial pic.1.
3mm holes are drilled and hot melt glue holds them in place.
To get a uniform depth I made a jig using a washer and piece of card glued to it pic.2.When fixing the LEDs the jig is pressed against the dial with the depth of the washer setting the protrusion of the LED through the dial.
Step 17:Construction Classic Style English Dial Clock Case
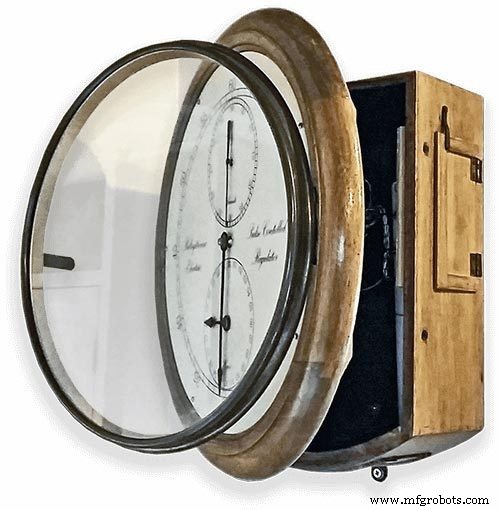
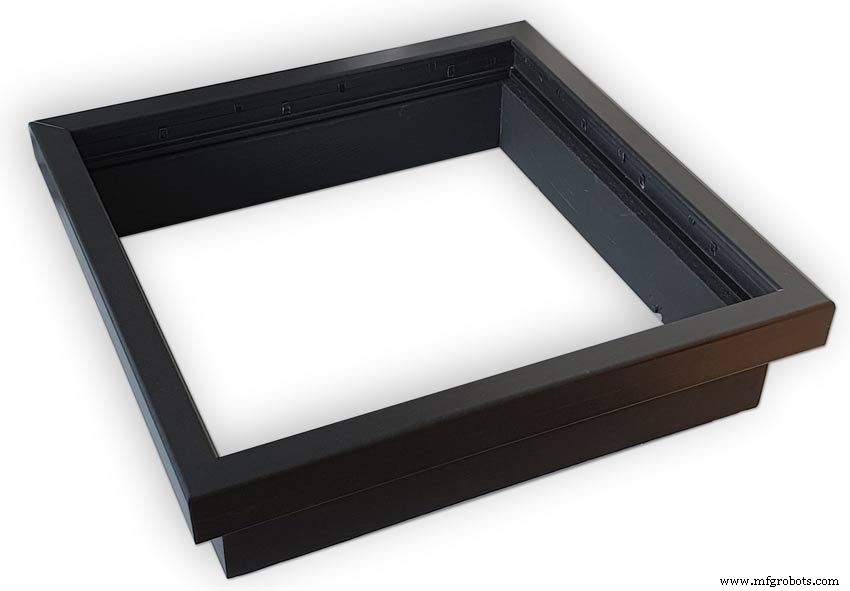
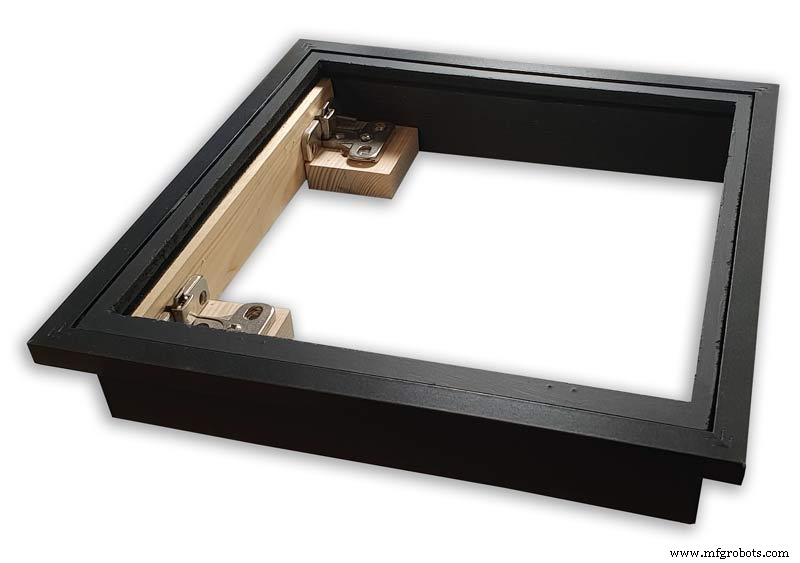
The classic 12" Dial Clock case can be purchased from Ebay as "case only" pic.1.
Various styles are available this one is oak and has a dial surround that hinges away from the back box pic.2.
This makes for a very easy build as all the hard work has been done. The dial is mounted by 3 small wood screws hidden behind the brass dial bezel.
This dial surround has been stripped and bleached to bring out the original light colour of the wood pic.3.The dial was removed as it had a winding hole off center.
A new dial was cut from a sheet of alluminium pic.4.
Pic.5 side view of the Barometer showing the back box.
Pic.6 shows my regulator clock case with original curved back box, hinged dial bezel and pegged dial surround.
Many of these clock cases were held in place by four wooden pegs. If your case is constructed like this add a pair of hinges to one side and use the remaining two pegs to lock the dial surround in place.
Step 18:Construction Modern Case
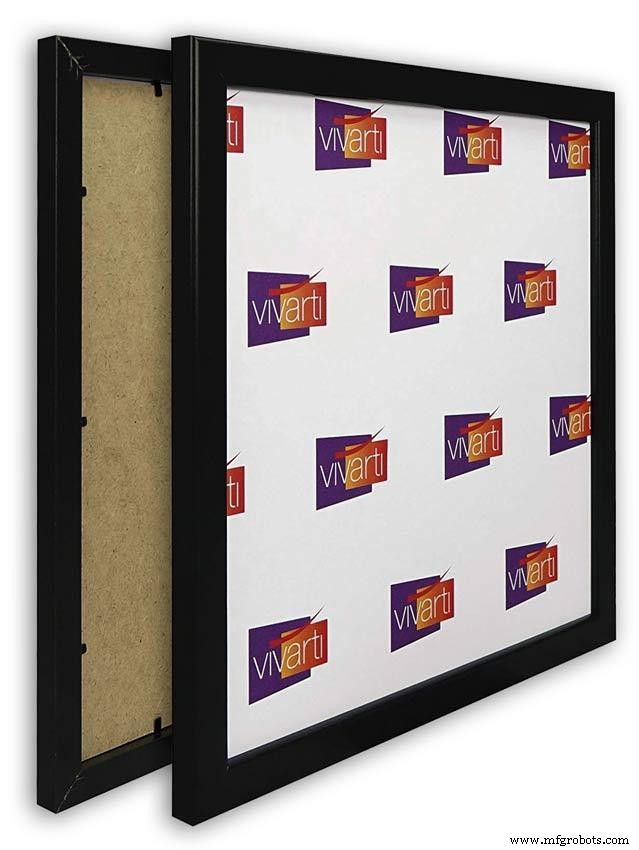


Picture Frame Version
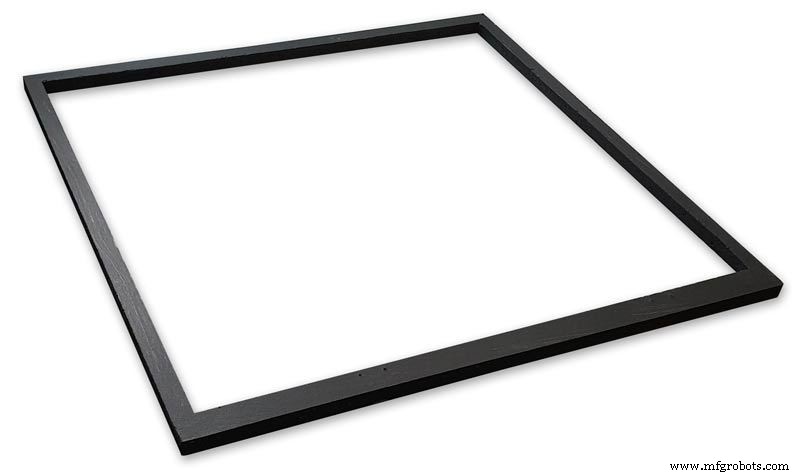
I have used two identical picture frames mounted back to back. These frames are 30cm x 30cm approx. 12"x12" pic.1.
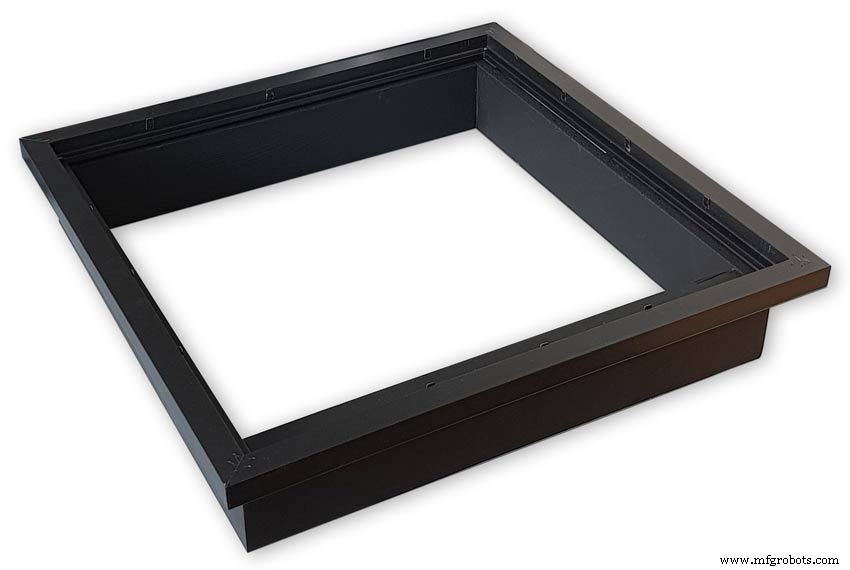
pic.2 Frames are joined back to back.
pic.3 This gives a double depth frame.
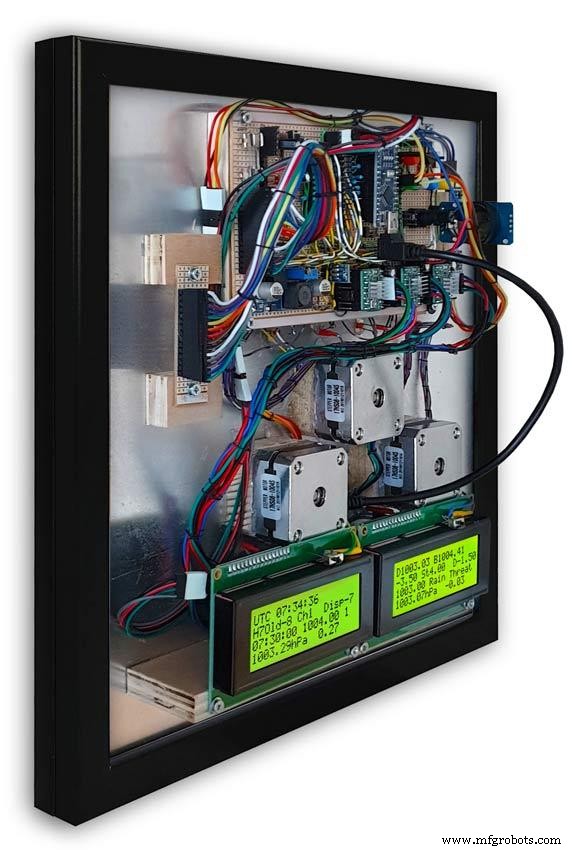
pic.4 Rear side view showing wired boards and modules.
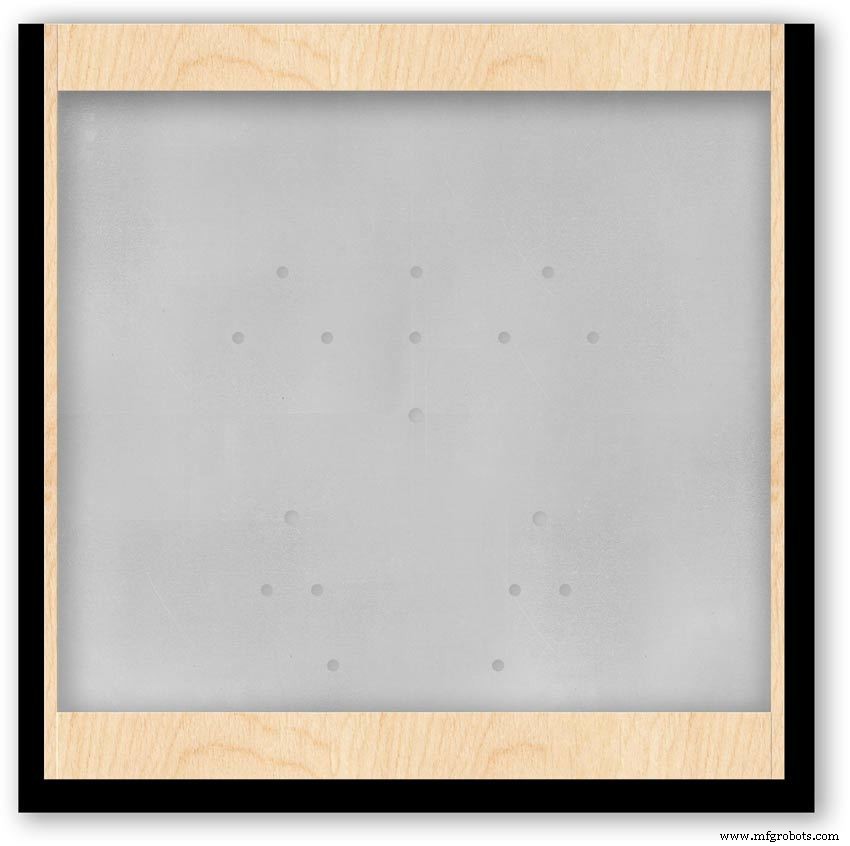
pic.5 The dial viewed through the rear frame.
pic.6 Rear half of the frame with all wiring in place.
pic.7 The front of the dial now shows through the front half of the frame. Wooden bevels hide the space behind the front half of the frame.
Step 19:Construction Modern Case Backbox


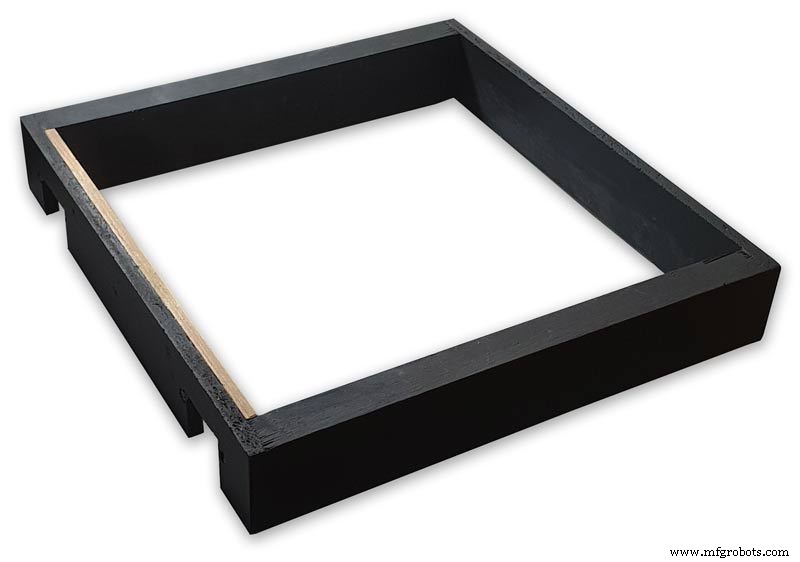
Back Box
Pic.1 The barometer is housed in a back box that is smaller than the dial frame on all side apart from the top. The fram overlap helps hide the back box and adds a shadow effect to the case on the wall.
Pic.2 The back box is 50mm deep and is simply constructed of glued and screwed wood.
Pic.3 Rear view of back box in position behind rear dial frame showing the frame overlap.
Pic.4 The screw holes are filled then a coat of matt black is applied to the back box.
Pic.5 Back box with rear picture frame in place this holds the dial.Note the rear frame is placed upside down.
Pic.6 A spacer is cut the same size and depth as the recess of the picture frame.
Pic.7 The spacer is set under the dial.
Pic.8 This will raise the dial level with the top edge of the rear frame.
Pic.9 Back box with front picture frame in place on top of the rear frame.This frame holds the glass.
Step 20:Construction Modern Case Wall Mounting
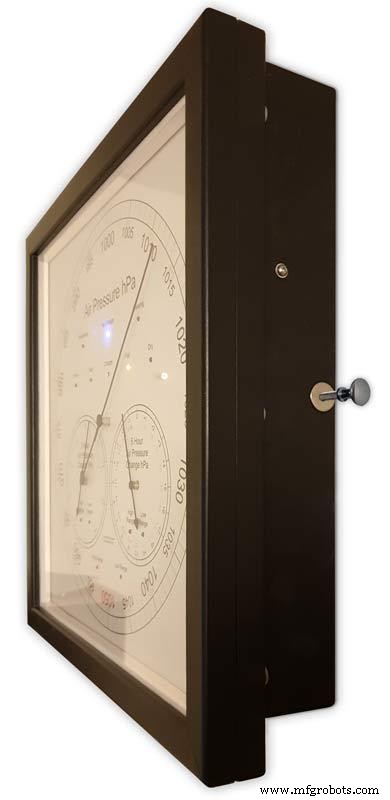
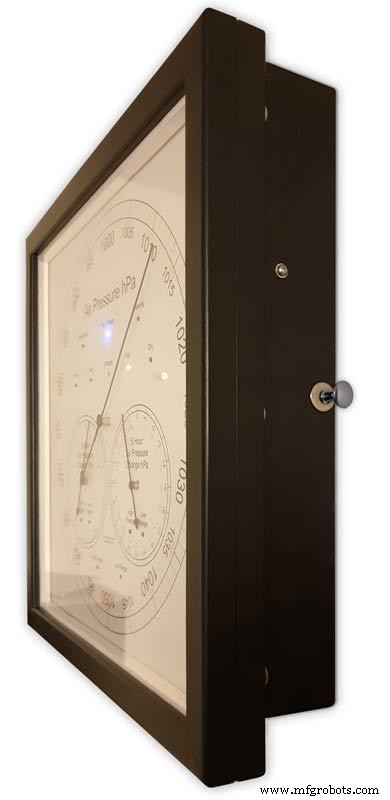
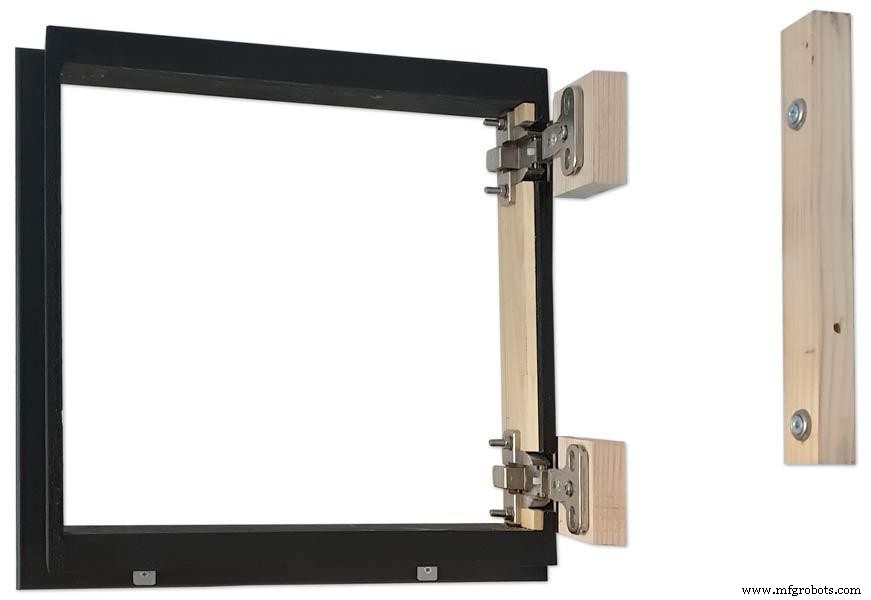


Mounting the Barometer
Pic.1 To allow access to the rear of the Barometer I have mounted it on a pair of GTV 270° inset hinges. The hinges are mounted on a block of wood fixed to the wall and allow the barometer to be swung out for access. The hinges also have a quick release function if the Barometer needs to be taken down for maintenance at any time. The hinge pivot is set back which also allows the top of the case to clear the wall when hinged out.
Pic.2 The hinges are mounted on wooden blocks screwed to the wall.
Pic.3 I have screwed and glued an extra piece of timber to the left hand side where the hinges will mount.This will add strength as all the weight of the clock will be on this side when the clock case is open. Two aluminium plates will cover the hinge holes.
Pic.4 Hinge blocks in place. Note these are bolted through the case rather than screwed.
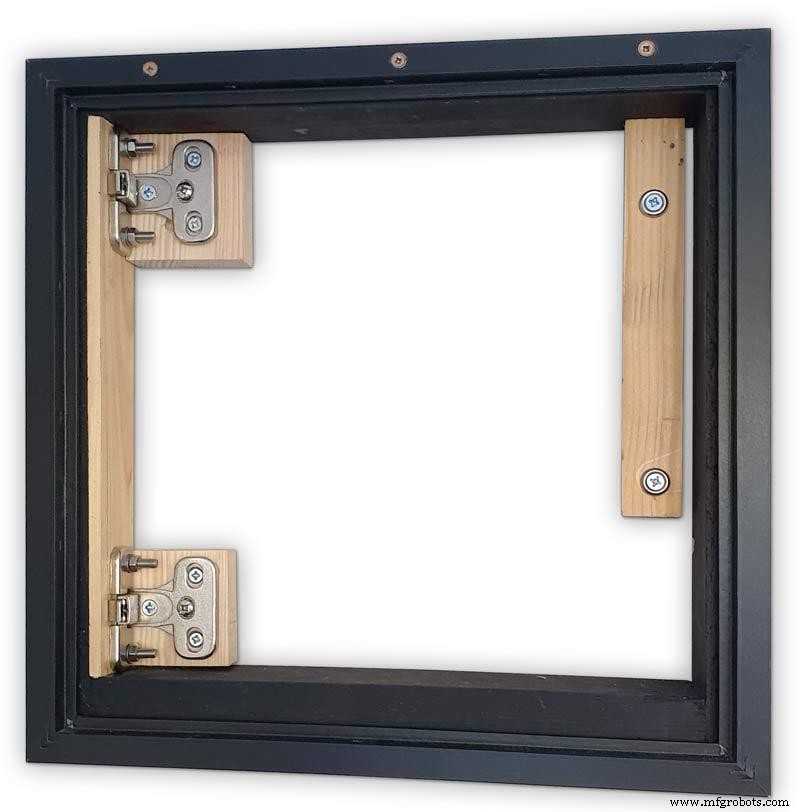
Pic.5 Back Box mounted on the wall. The fixing screws also hold the hinge to the wooden mounting blocks The wooden baton on the right is also fixed to the wall and supports the top right hand corner of the back box. It also serves as a fixing point for the wall mount locking pins that holds the back box shut against the wall.
Pic.6 The back box is shown open with the wooden mounting blocks and batons fixed to the wall. The hole in the front edge of the baton aligns with a hole in the side of the back box. A steel pin is inserted here to lock the barometer shut against the wall.
Pic.7 Back box open allowing access to the LCD displays and setting switches.
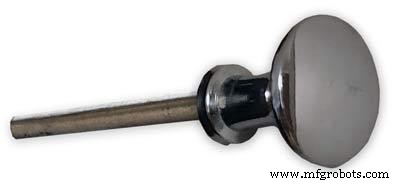
Pic.8 Steel Locking Pin This is a small cabinet knob with a length of treaded bar screwed into the thread.
Pic.9 &10 The locking pin when pushed fully in lock the barometer against the wall. When pulled out the barometer is able to swing out to allow access to the control switched and LCD displays.
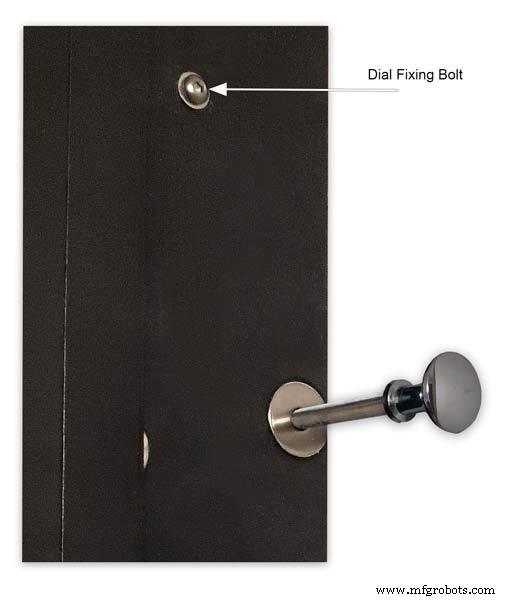
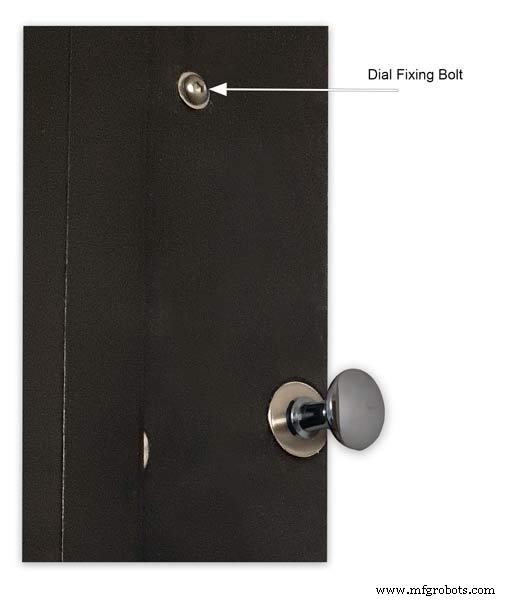
Pic.11 Detail of Locking Pin and location of right side dial fixing bolt. I have glued a washer in place over the hole as an escutcheon plate.
Step 21:Construction Modern Case Dial Mounting

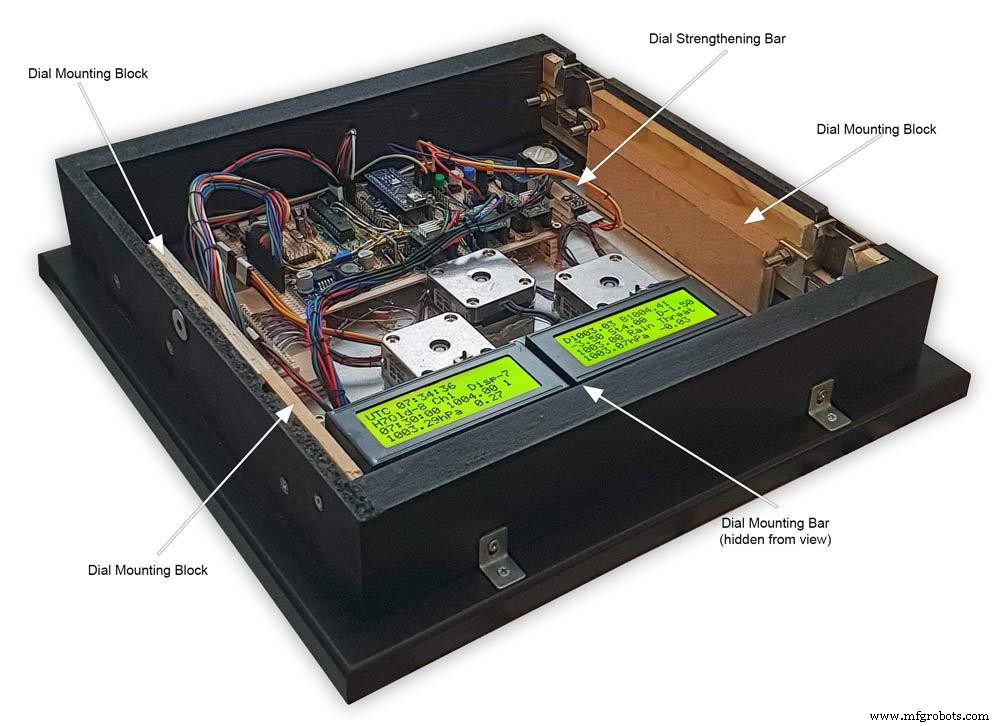
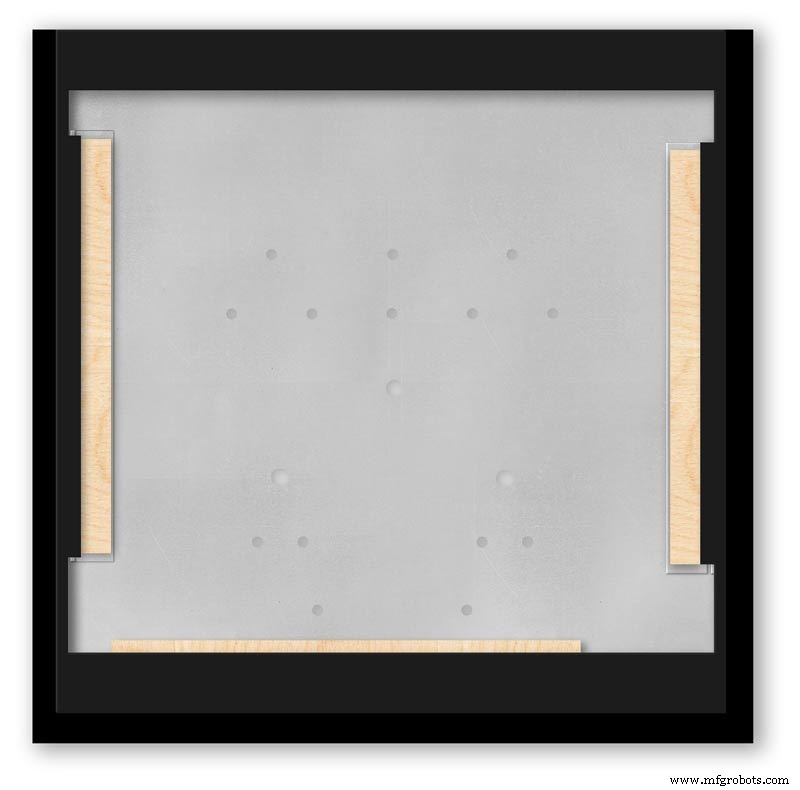
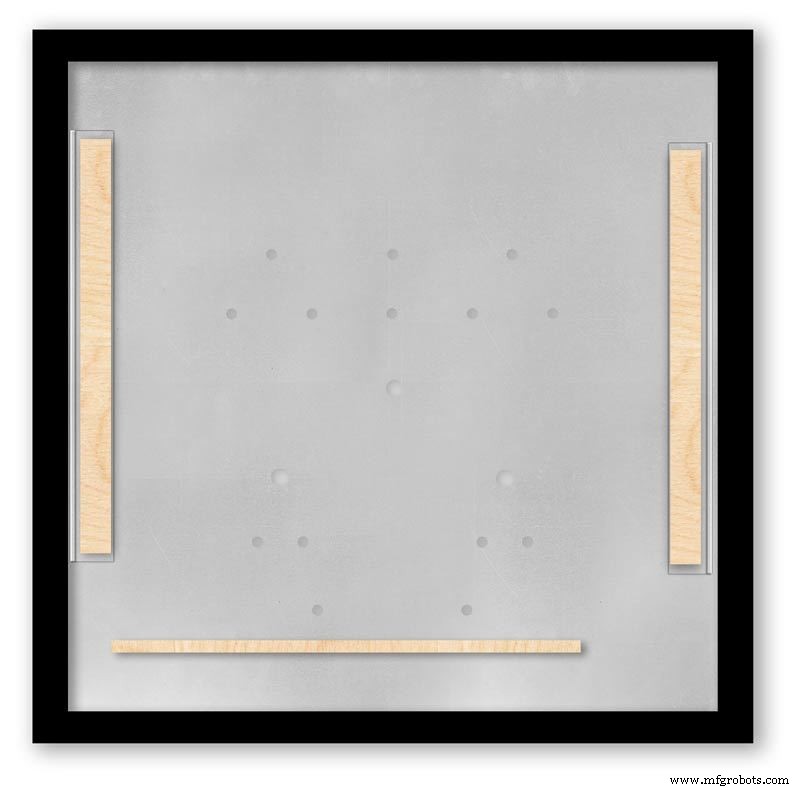
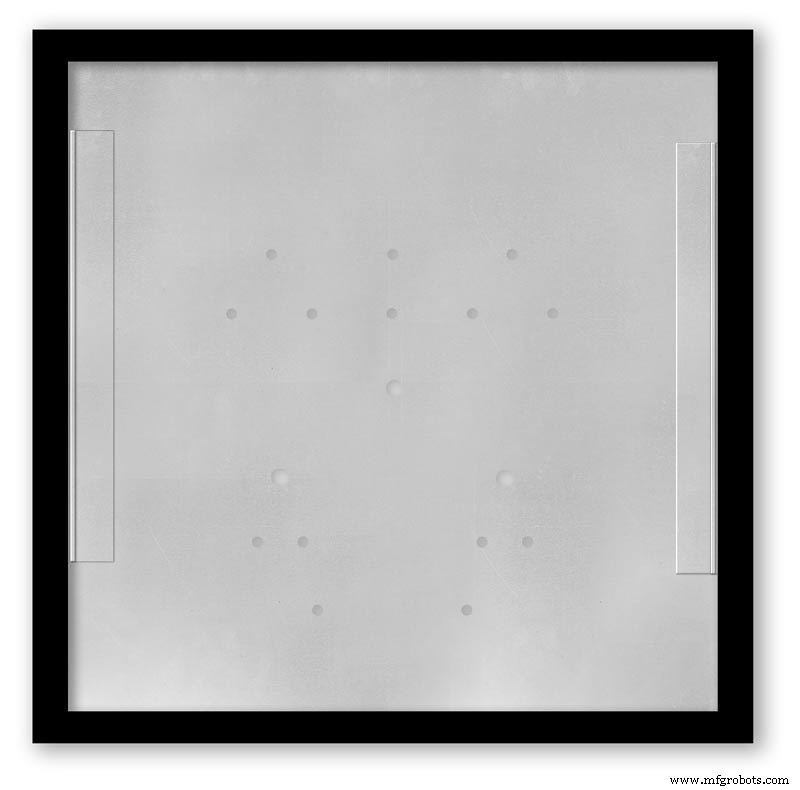
The dial and all the boards etc are removable for maintenance and is held to the backbox by 2 bolts.
Mounting the Dial in the Back Box
The dial holds the combined weight of all the stepper motors, boards and modules and is stiffened by impact gluing two strips of unequal aluminium angle to it's rear surface.Two blocks of wood are then glued to these bars and small screws then hold these wooden blocks through the side of the back box. A further thin strip of wood is glued to the dial below the LCD mounting block. This is not screwed to the case but sits on the back box to support the dial.
Pic.1 Strengthening bar of alluminium unequal angle.
Pic.2 Strengthening bar locations.
Pic.3 Glued wooden fixing/support blocks for dial fixing bolts left and right and glued dial support lower.
Pic.4 Shows contact/fixing points between the back box and dial. Back box in black with dial fixings/support in wood.
Pic.5 Rear view showing mounting block and bar locations.
Pic.6 Dial with Back Box Removed showing mounting blocks and strengthening bars glued to the rear of the dial.
The dial spacer allows the dial to sit flush with the top of the rear picture frame.
Pic.7 Right side of clock showing dial fixing bolt location.
Pic.8 A mount is constructed from 4 thin strips of wood and is placed in the recess of the front picture frame. This fills the gap between the picture frame and dial, holds the Perspex sheet in place and also adds a photo mount effect to the dial.
Pic.9 Mount in place behind the front picture frame.
Step 22:Contruction Dial

Pic.1 The dial is made from 1.5mm thick alluminium sheet and comes covered with a protective plastic film.
Pic.2 From your cad program print out the dial on A3 paper and include center marks for all the LED and stepper motor shaft holes.This will be your drill template.Lay the paper of the alluminium dial blank and tape the edges to stop it moving.Center punch all the holes through the paper.
Pic.3 Remove the paper template and drill out the holes 3mm for the LEDs and 3 larger holes for your stepper motor spindle.
Start with a small pilot hole and increase the drill size in 3 stages. If you are using a round dial mark it out on the projective film with a market pen and cut it out at this stage.
Pic.4 The protective plastic film can now be removed. Rub down the dial back and front to remove any burrs and to provide a key for the paint.
Pic.5 Spray a coat of acrylic primer and then your choice of top coat - I have used antique white.
I then give a final coat of matt clear acrylic. Leave to dry over night.
I have included a high res pic of the dial pic.6. Contact me if you need it in another format. My CAD format is TurboCad.
Step 23:Construction Dial Decal

Apply the water slide decal transfer.
I use Water Slide Decal paper from BIGBITE Studio They have some good tutorials on their site. https://www.bigbitestudio.co.uk/tutorials/water-decal-tutorials/
Pic.1 Water slide decals are printed out on an inkjet printer soaked in water then slid into place. They give a very detailed print and once given a coat of varnish are tough.
Don't forget to order transparent transfers so the dial colour can be seen through the transfer.Follow the instructions with the pack as they do vary.
Pic.2 On my transfers I print out the dial on transfer paper let it dry and then cut it out to just under the size of the dial. I then give it a coat of acrylic varnish.
I set my printer as follows:Plain Paper, Photo &High Speed Off This stops my printer from over inking the paper When the varnish is dry the transfer is soaked in water until the transparent transfer comes away from the white backing sheet.
Pic.3 Move the soaked transfer over the dial.
Pic.4 Slide the transfer into position.
Pic.5 Gently pull the white backing paper backward while holding the transfer down.
Make sure the crosses line up with the center of all the holes.
Pic.6 Get rid of any air bubbles.
Pic.7 Then leave it to dry before adding a coat of matt varnish.
After the coat of varnish break through the layer of transfer over the holes using the back of a drill bit jus smaller than the holes. Then give a final coat of varnish to seal the edges around the holes.
Step 24:Construction Hands


Hands are a very personnal choice and there are many diffent styles to choose from. The hardest part is finding hands that match each other. I found a perfect set of small hands but was unable to find a matching longhand for the main barometer. In the end I made my own from 3 donor hands.
All my hands were quartz second hands so I hand to file the mounting spindle off the back for mounting on the stepper motor spindle.
On some stepper motors the spindle can be drilled out to take the hand spindle but my spindles were too hard to drill.
Pic.1 my completed hands.
Pic.2 The long barometer hand was constructed from 3 different hands
Pic.3 To get the lower spade balance part of the hand I used a spade hand.
Pic.4 First I cut off the top using sharp scissors.
Pic.5 The top was then trimmed by cutting the point off.
Pic.6 The remaining part was then filed away to match the shape of the 2 smaller hands.
Pic.7 The completed balance for the hand.
Pic.8 To make the front pointer and center I cut the end off one off my donor hands.
Pic.9 To make the rear balance shaft I cut a section out of the 3rd donor hand.
Pic.10 Left the 3 parts of the new hand. Middle shows the overlap of the balance shaft to allow for bonding. Right pic shows the balance shaft bonded with impact adhesive to the underside of the balance and center shaft.
To fix the hands to the stepper motor spindle I did not want to use impact adhesive as the hands are fragile and would be damaged if I hand to remove them. In the end I went for a tiny bit of Blu Tack on each hand. Blu Tack is putty like and is non setting but seems to hold very well!
Step 25:Construction Schematic
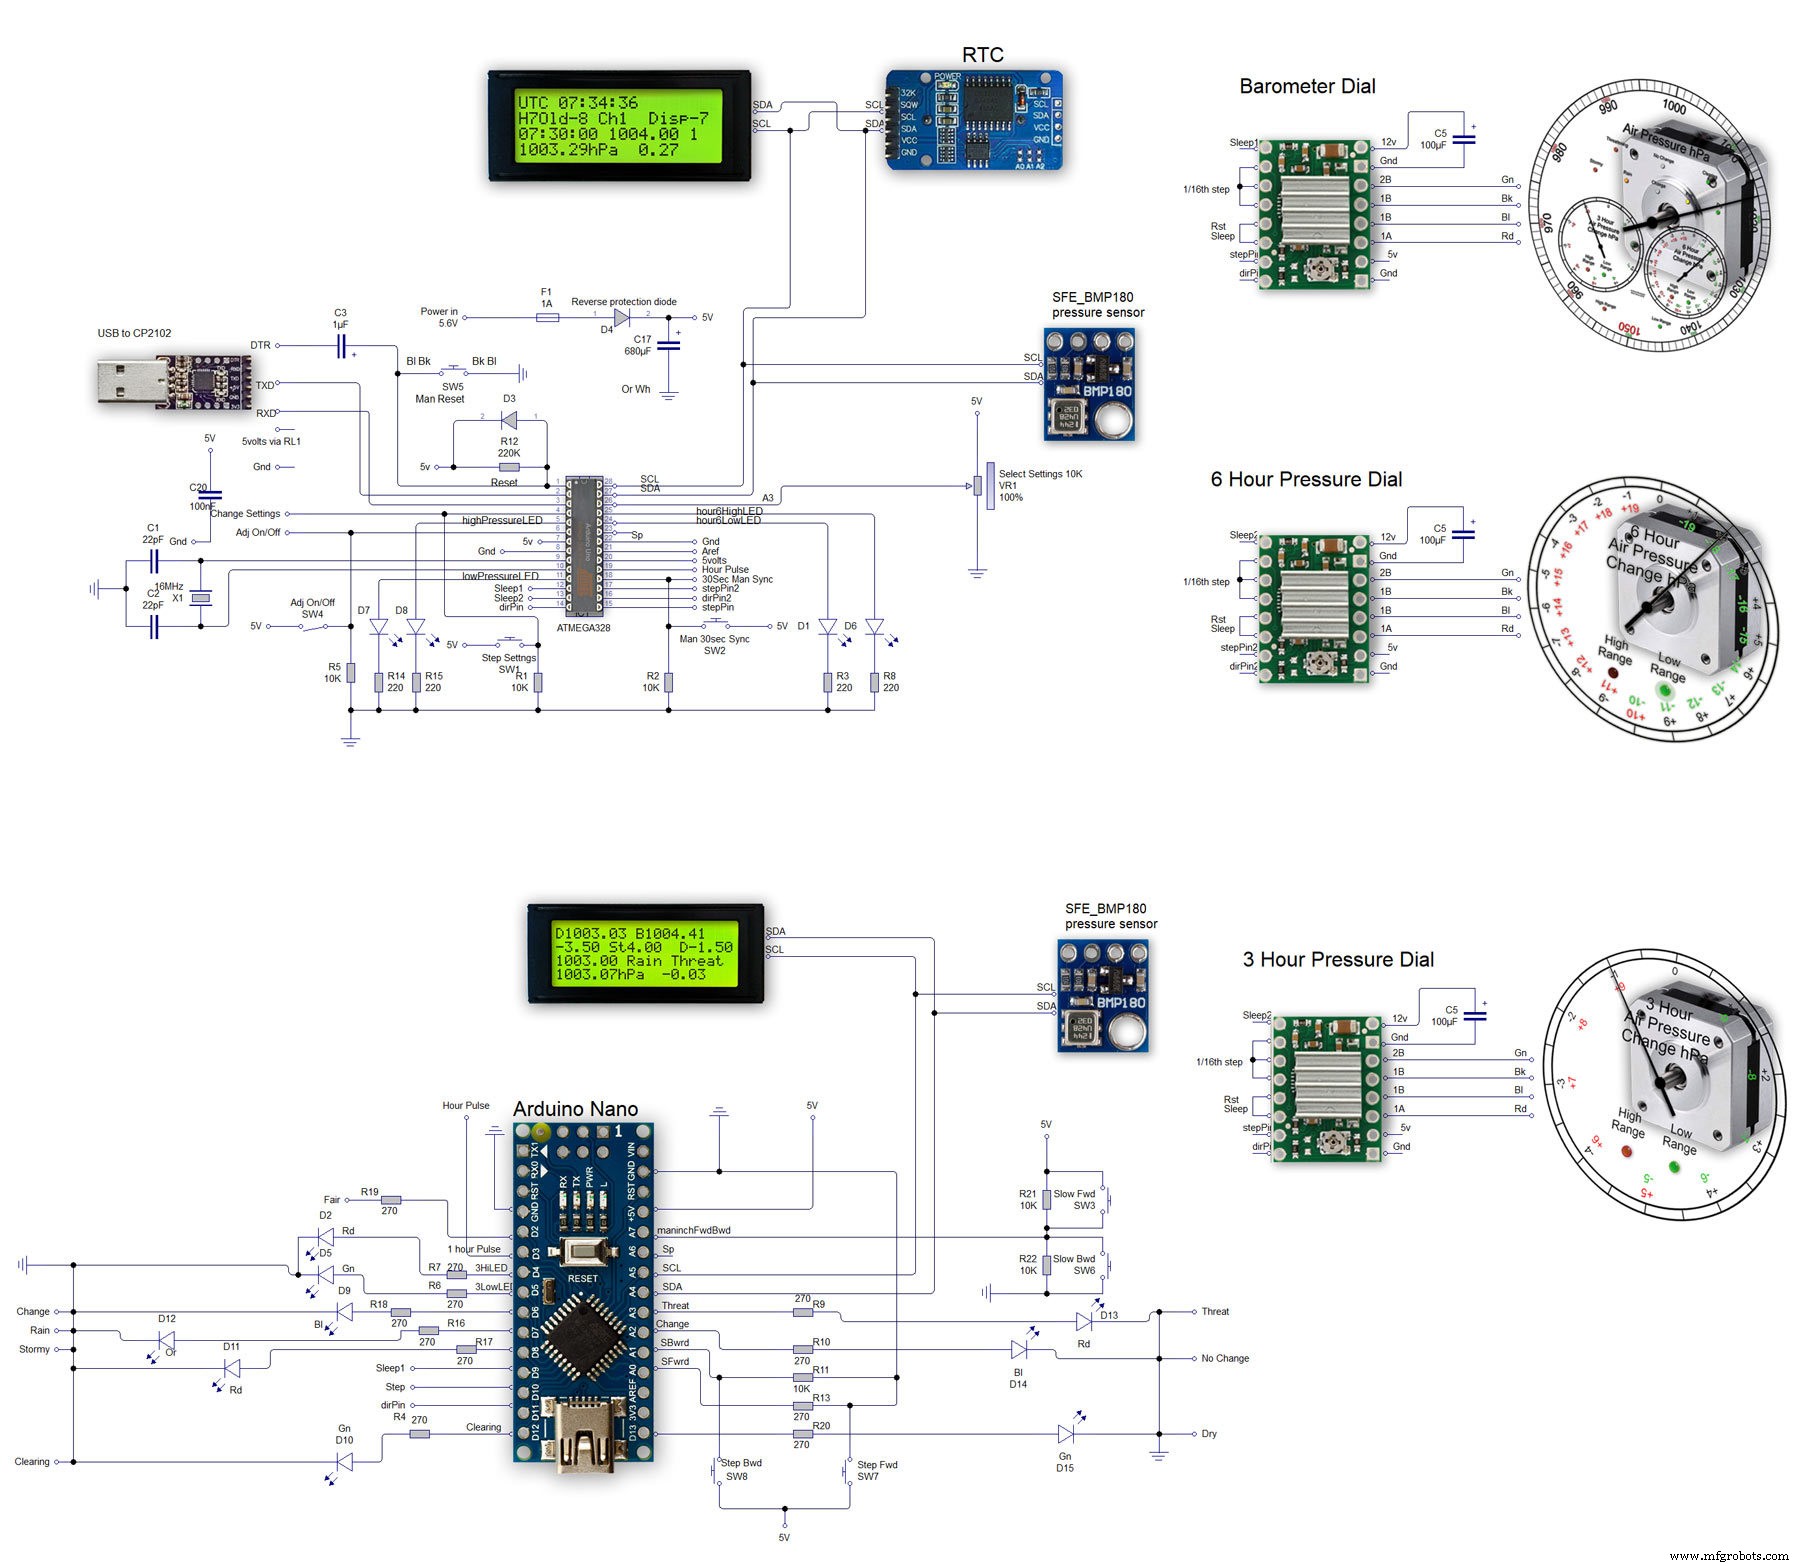
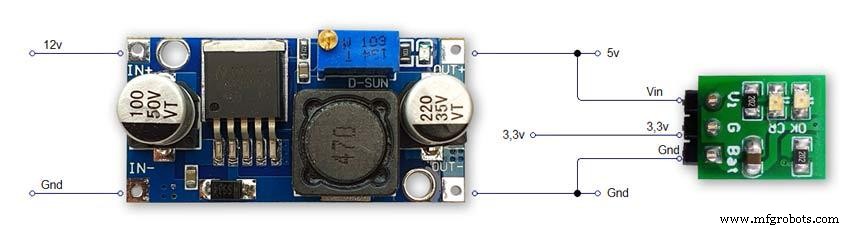
The main shematic is shown in Pic. 1 with the power supply in Pic.2.
You will also need a regulated plug in 12v supply adaptor of around 1amp.
Note I have fitted switches on the LCD displays to turn the backlight LEDs On and Off. This is optional but as the displays are not visible for 99.99% of the time it will save power.
Note larger schematics can be found on my web site here
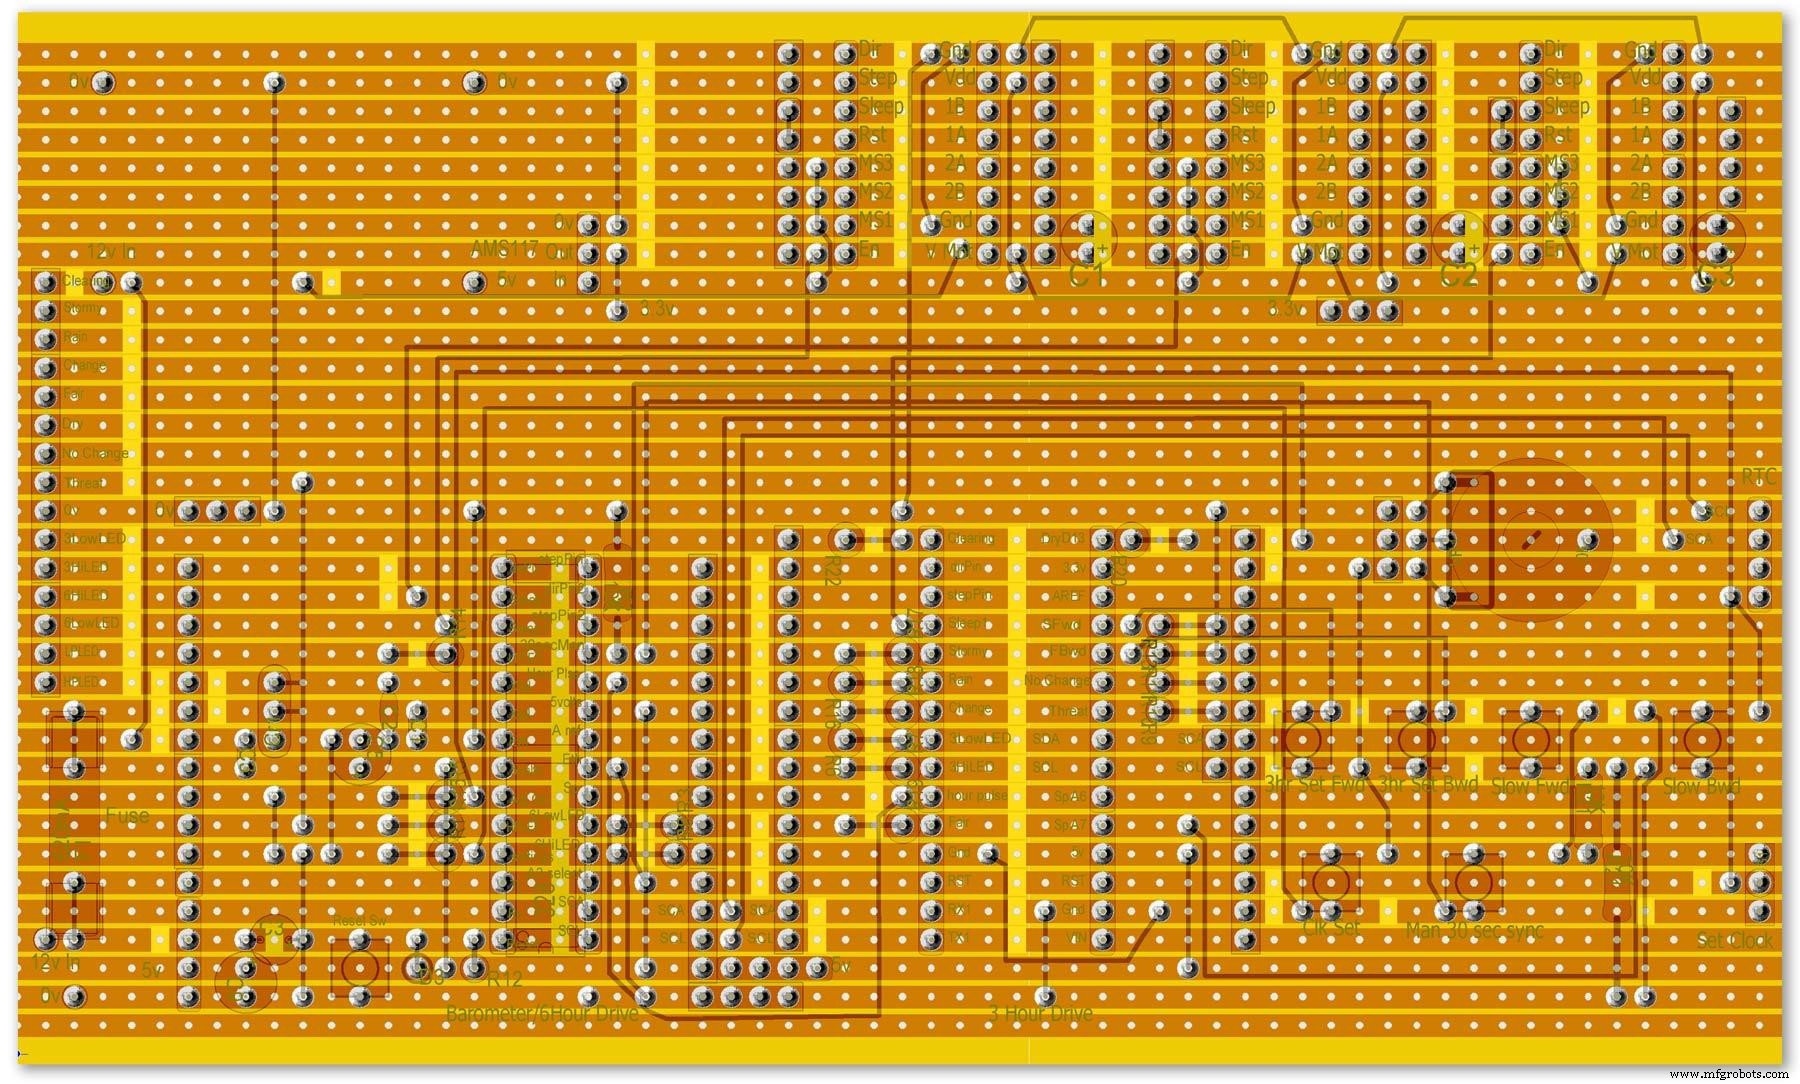
Step 26:Construction Vero Board
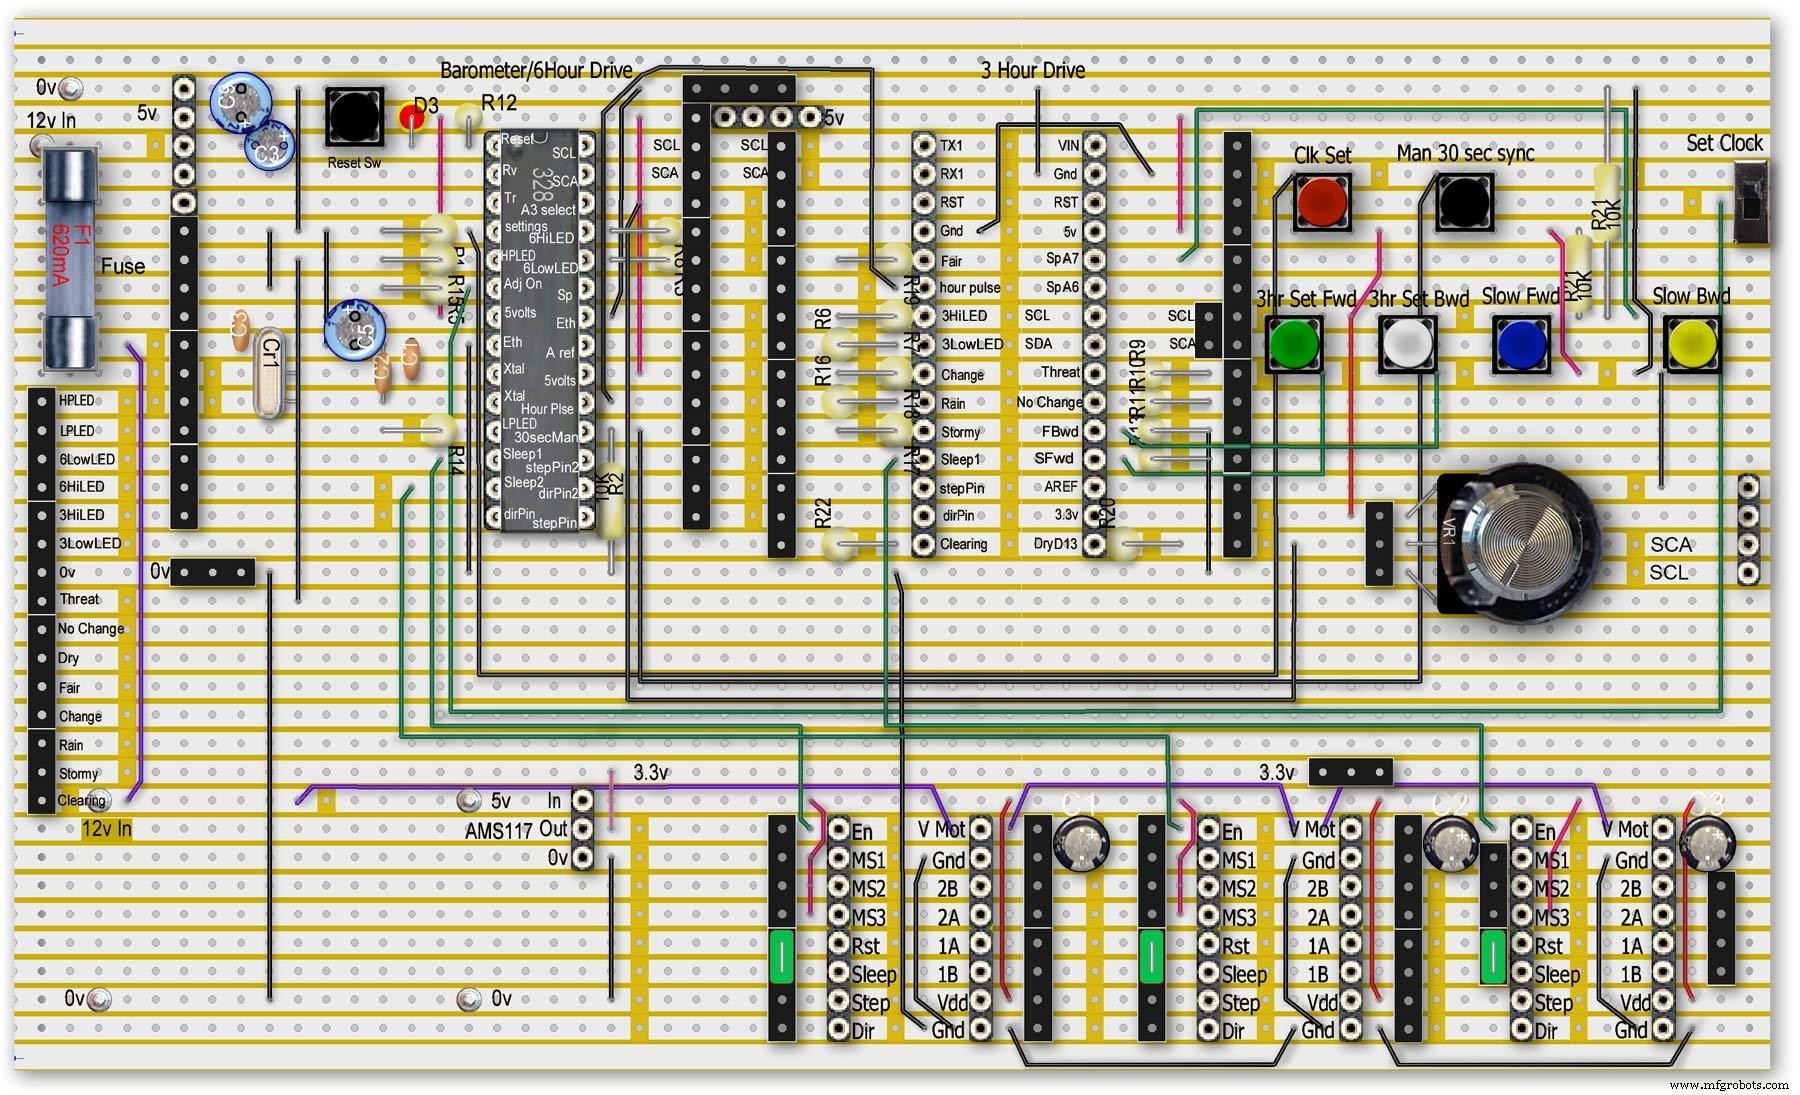
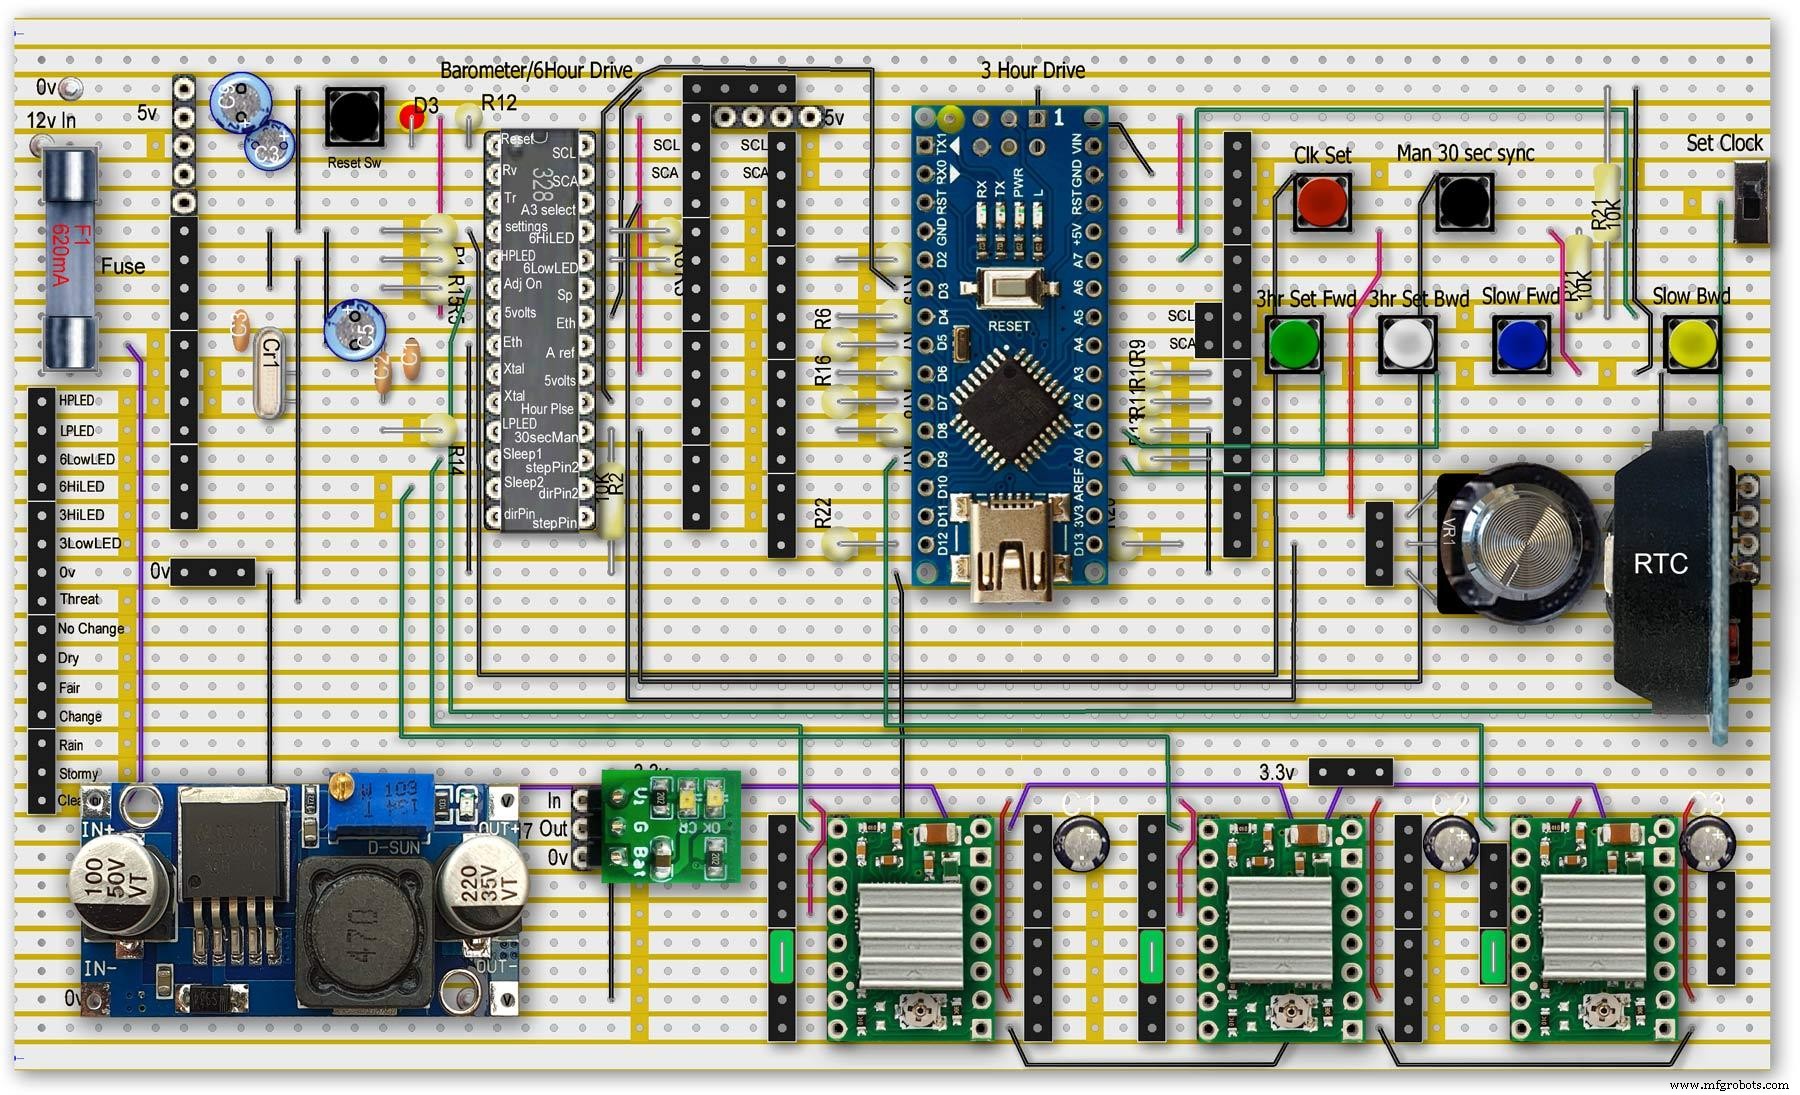
Vero Board Layouts
Pic.1 Vero Board with all modules removed.
Pic.2 Vero Board with modules in place.
Pic.3 Vero Board rear view (flipped down from top).
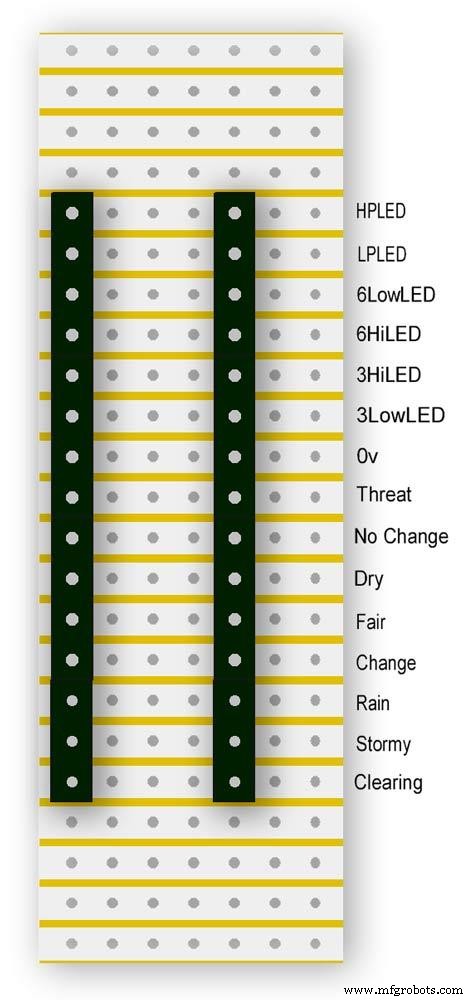
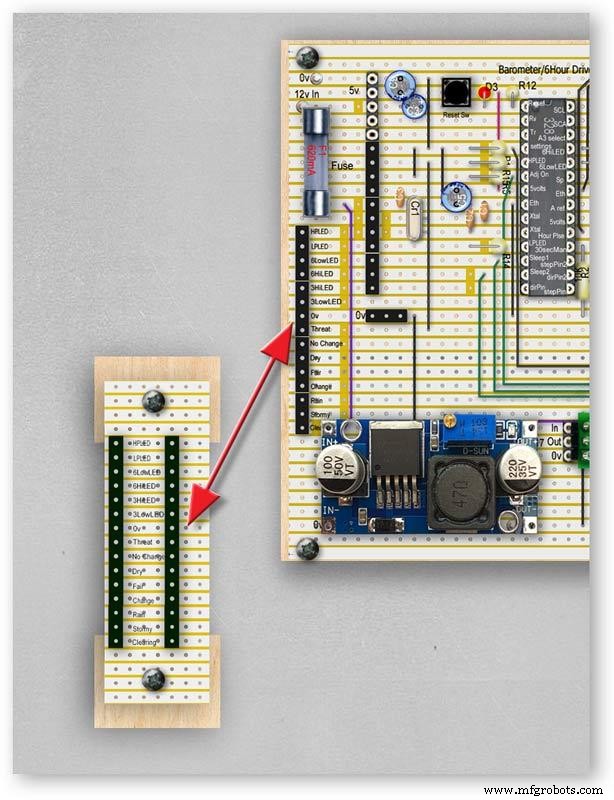
Pic.4 LED Vero Board
This board is used as a connection point for the dial LEDs. This allows the dial to be disconnected from the main board if required for maintenance.
Pic.5 The LED Vero Board connects to the main board with Dupont sockets and male Dupont cable
Pic.6 Vero Board wiring in progress.
Pic.7 Vero Boards and module location on the rear of the dial.
Step 27:Code
Код
There are 2 parts to the code 1 for the Main Barometer Code and 6 hour display and 1 for the 3 hour display and weather forecast.
Step 28:Time-Lapse Video
Time-Lapse Video showing rain radar and the Barometer predicting rain and a storm.
This is a 4K video so you should be able to see full details of the dial and forecast LEDs.
Код
- BarometerA4988_23.ino
- BarometerA4988_3hour__21.ino
BarometerA4988_23.inoArduino
Main file for Barometer and 6 hour display/* Example sketch to control a 28BYJ-48 stepper motor with ULN2003 driver board, AccelStepper and Arduino UNO:number of steps/revolutions. More info:https://www.makerguides.com v4 moved step 6 hour pressure step from void getpressure 1523 to main loop check every hour 365v5 remove unwamted step elementsv6 convert to diff display on 6 hr motorv8 modified hour change formula 1486v9 sleepv10 chnged high/low for EN control v11 chenge calc for hour change 1380v12 added calcCurrentDisp (); to calc current time from line 1384v13 removed 30 sec syncv14 air pressure extremes LEDsv15 add hour diff hour calc etc to row 1 when not on settingsv16 adding 16th stepsv17 errorv18 change min pulse to hour pulse on the hour + 1minv19 check enable and sleepsv20 added DAC to NANO so pins changed on 328 to match (analogue and digital swapped A6 D3 - deleted v20 also changed Low range hi range to both light above 19 or -19v21 same as 20 with serial print removedv23 notes added LCD display info added to startup */#include//SFE_BMP180 pressure sensor#include #include #include // ######## You will need to create an SFE_BMP180 object, here called "pressure":SFE_BMP180 pressure;#define ALTITUDE 118.0 // Altitude of Kenley Surrey in meters// also used to adjust/sync/calibrate to nearby weather station/3 hour display//#########//**********************// set the LCD address to 0x27 for a 20 chars 4 line display// Set the pins on the I2C chip us ed for LCD connections:// addr, en,rw,rs,d4,d5,d6,d7,bl,blpolLiquidCrystal_I2C lcd(0x27, 2, 1, 0, 4, 5, 6, 7, 3, POSITIVE); // Set the LCD I2C address#define DS3231_I2C_ADDRESS 0x68// Convert normal decimal numbers to binary coded decimalbyte decToBcd(byte val){ return( (val/10*16) + (val%10) );}// Convert binary coded decimal to normal decimal numbersbyte bcdToDec(byte val){ return( (val/16*10) + (val%16) );}// Include the AccelStepper library:#include // Define stepper motor connections and motor interface type. Motor interface type must be set to 1 when using a driver:#define dirPin 8#define stepPin 9#define dirPin2 10#define stepPin2 11#define motorInterfaceType 1// Create a new instance of the AccelStepper class:AccelStepper stepper =AccelStepper(motorInterfaceType, stepPin, dirPin);//barometer motorAccelStepper stepper2 =AccelStepper(motorInterfaceType, stepPin2, dirPin2);// 6 hour motorfloat seaPressure =0;float pressureNow =0;float pressurePrevious =0;float pressureDiff =0;int checkStop =0;int pressureRndDiff =0;int pressureRndNow =0;int pressureRndPrevious =0;int adjustOn =4; // allows adjustment of barometer// int test =0; // test mode 0 off 1 is onchar status; double T,P,a;//int h =0;//int m =0;//int j =0;int stepcount =0;int time =0;int resetmins =1;int secondNow =0;int secondPrevious=0;int minuteNow =0;int minutePrevious=0;int hourNow =0;int hourPrevious=0;int hourNow1=0;int hourPrevious1=0;int initial =0;int initial1 =0;int initial3 =0;int highPressureLED =3;int lowPressureLED =5;int hour6LowLED =15;int hour6HighLED =16;int manSync =12; // resets seconds to 30 secondsint changeSetting =2;int syncStop =0;int sync30Stop =0;int stepoffHour =0;int stepoffHourbkw =0;int stepoffMin =0;int stepoffMinbwd =0;int stepoffRTCminfwd =0;int stepoffRTCminbwd =0;int stepoffRTChourfwd =0;int stepoffRTChourbwd =0;int settingreadPin =A3; //Pin for sensing analogue value from potint settingVal =0; // Analogue value 0-1023int LCDstop =0; // stops settings on LCD display refreshing until they changeint hourPulse =13; //min pulse for seconds display was 14int adjustLock =0; // turns off adjust lockint hourcalc =0; // number from 0 to 7 representing the 8 hours of stored pressure readings int hourDiff =0; // used to check if 6hour previous motor should be stepped.int hourChange =0; // the amount of 6 hour to stepint currentDisplay =0; //current 6hour change readingint hour0 =1013; // you can set last 8 hours pressure here or leave at 0 and theint hour1 =1014; // readings will catch up over the next 8 hoursint hour2 =1015;int hour3 =1016;int hour4 =1016;int hour5 =1016;int hour6 =1012;int hour7 =1013;int sleep1 =6;int sleep2 =7;// check air pressure here https://www.meteoplug.com/cgi-bin/meteochart.cgi?draw=a3aeaaa1acbdf9f1fcfed4fedbc2c094c0d6d6d1d2c5edcebbfee9ffeff1fbf9//int Disp3hrIn =A3;//int Disp3hrVal =0;void setup() { pinMode(adjustOn, INPUT); pinMode(hourPulse, OUTPUT); pinMode(highPressureLED, OUTPUT); pinMode(lowPressureLED, OUTPUT); pinMode(hour6LowLED, OUTPUT); pinMode(hour6HighLED, OUTPUT); pinMode(manSync, INPUT); pinMode(sleep1, OUTPUT); pinMode(sleep2, OUTPUT); pinMode(settingreadPin, INPUT); // Set the maximum steps per second:stepper.setMaxSpeed(1000); stepper2.setMaxSpeed(1000); lcd.begin(20,4); // initialize the lcd for 20 chars 4 lines, turn on backlight lcd.backlight(); // backlight on not needed as man controlled lcd.setCursor(0,0); //Start at character 0 on line 0 lcd.print("Barometer A988"); //@@@@@@@@@@@@@@@@@@@@@@@@@@@@@@@@@@@@@@@@@@@@@@@@@@@@@@@@@@@@@@@@@@@@@@@@@@@@@@@@@@@@@@@@@@@@@@@@@@@@@@@@@@@@@@@@@@@@@@@@@@@@@@@@ lcd.setCursor(0,1); //Start at character 0 on line 1 lcd.print(" Version 23"); //@@@@@@@@@@@@@@@@@@@@@@@@@@@@@@@@@@@@@@@@@@@@@@@@@@@@@@@@@@@@@@@@@@@@@@@@@@@@@@@@@@@@@@@@@@@@@@@@@@@@@@@@@@@@@@@@@@@@@@@@@@@@@@@@ { Wire.begin(); Serial.begin (9600); // set the initial time here:// DS3231 seconds, minutes, hours, day, date, month, year // setDS3231time(10,42,9,5,18,12,19);//delay(2000);lcd.clear();}Serial.println("REBOOT");// serial removed // Initialize the sensor (it is important to get calibration values stored on the device). if (pressure.begin()) Serial.println("BMP180 init success");// serial removed else { // Oops, something went wrong, this is usually a connection problem, // see the comments at the top of this sketch for the proper connections. Serial.println("BMP180 init fail\n\n");// serial removed while(1); // Pause forever. } //LED TestdigitalWrite(hour6HighLED, HIGH);delay (500);digitalWrite(hour6HighLED, LOW);digitalWrite(hour6LowLED, HIGH);delay (500);digitalWrite(hour6LowLED, LOW);digitalWrite(highPressureLED, HIGH);delay (500);digitalWrite(highPressureLED, LOW);digitalWrite(lowPressureLED, HIGH);delay (500);digitalWrite(lowPressureLED, LOW);delay (500);lcd.clear();getPressure ();// gets all pressure readings// Disp readings on startup so hands can be set lcd.setCursor(0,1); lcd.print (""); lcd.setCursor (0,1); lcd.print("H"); lcd.print(hourcalc); lcd.setCursor(2,1); lcd.print (""); lcd.setCursor(2,1); lcd.print("Old"); lcd.print(currentDisplay); lcd.setCursor(13,1); lcd.print (""); lcd.setCursor(13,1); lcd.print("Disp"); lcd.print(hourDiff); //disable motors on startupdigitalWrite(sleep1, HIGH);digitalWrite(sleep2, HIGH);stepper.disableOutputs();stepper2.disableOutputs();// test =1; // test set to 0 off 1 on}void loop() { if( digitalRead(adjustOn) ==HIGH || adjustLock ==1)// only alow settings when change settings switch is ON{ //digitalWrite(sleep1, LOW);//enable on //digitalWrite(sleep2, LOW);//enable on only enable outputs for 2 mins Settings(); //set what function the setiing switches have adjustLock =1; //hold on adjustment if( digitalRead(adjustOn) ==LOW){//digitalWrite(sleep1, HIGH);//disable on//digitalWrite(sleep2, HIGH);//enable on only enable outputs for 2 minsadjustLock =0; //hold on adjustment } }// only allow settings change when setting switch is on // displayTime(); // display the real-time clock data on the Serial Monitor, byte second, minute, hour, dayOfWeek, dayOfMonth, month, year; // retrieve data from DS3231 readDS3231time(&second, &minute, &hour, &dayOfWeek, &dayOfMonth, &month, &year);//@@@@@@@@@@@@@@@@@@@@@@@@@@@@@@@@@@@@@@@@@@@@@@@@@@@@@@@@@@@@@@@@@@@@@@@@@@@@@@@@@@@@@@@@@@@@@@@@@@@@@@@@@@@@@@@@@ //enable air pressure readings if (minute ==9 || minute ==19 || minute ==29 || minute ==39 || minute ==49 || minute ==59 &&second ==59) { checkStop =0;// resets checkstop to allow air pressure readings every 10 mins }//check air pressure every 10 mins if (checkStop ==0) { if ( minute ==0 || minute ==10 || minute ==20 || minute ==30 || minute ==40 || minute ==50 ) { //digitalWrite(sleep1, LOW);//enable on -only enable outputs for 1 min // only sleep1 needs activation getPressure ();// gets all pressure readings checkStop =1;// stops multiple readings of air pressure }// else //digitalWrite(sleep1, HIGH);//enable off // Serial.print("Sleep 1 HIGH (off) "); // Serial.println(hourChange); } //@@@@@@@@@@@@@@@@@@@@@@@@@@@@@@@@@@@@@@@@@@@@@@@@@@@@@@@@@@@@@@@@@@@@@@@@@@@@@@@@@@@@@@@@@@@@@@@@@@@@@@@@@@@@@@@@if(digitalRead(manSync)==HIGH)// resets seconds to 30{ setDS3231time(30, minute, hour, dayOfWeek, dayOfMonth, month, year); //Set seconds to 30 on RTC } // counts seconds secondNow =second; if(secondNow!=secondPrevious || initial) { lcd.setCursor(0,0); lcd.print("UTC "); if(hour<10) { lcd.print(0); } lcd.print(hour); lcd.print (":"); if(minute<10) { lcd.print(0); } lcd.print(minute); lcd.print (":"); if(second<10) { lcd.print(0); } lcd.print(second); lcd.print (""); // Serial.print("-1*0 ");// Serial.println(-1*0); initial =0; secondPrevious =secondNow; } // count minutes minuteNow =minute; if(minuteNow!=minutePrevious || initial) //settingVal <690 stops clock motors operating when setting RTC { initial =0; minutePrevious =minuteNow; // digitalWrite(minPulse,HIGH);//1 min pulse for seconds display sync syncStop =0;// clock will not sync again untill a new minute has started. // digitalWrite(minPulse,LOW);//1 min pulse for seconds display sync } // counts hours + 1min for hourPulse at 15 seconds past the hour this allows barometer and 6 hour dial to step first if ( minute ==0 &&second ==15) // send hour pulse 15 seconds past the hour to 3 hour circuit allows other motors to stop { digitalWrite(hourPulse,HIGH); digitalWrite(highPressureLED,HIGH); // Serial.println("hourPulse Hi "); } else if (minute !=1 || second !=0) { digitalWrite(hourPulse,LOW);digitalWrite(highPressureLED,LOW); }// counts hours hourNow =hour; if ((minute ==59 &&second> 50) || (minute ==0 &&second <10) )// allows change on the hour only {// digitalWrite(sleep2, LOW);// enable 6hr motor if(hourNow!=hourPrevious || initial) //settingVal <690 stops clock motors operating when setting RTC { initial =0; hourPrevious =hourNow;//print hour stores every hour // serial removed /* Serial.print("hour0 "); Serial.println(hour0); Serial.print("hour1 "); Serial.println(hour1); Serial.print("hour2 "); Serial.println(hour2); Serial.print("hour3 "); Serial.println(hour3); Serial.print("hour4 "); Serial.println(hour4); Serial.print("hour5 "); Serial.println(hour5); Serial.print("hour6 "); Serial.println(hour6); Serial.print("hour7 "); Serial.println(hour7); */ //##############################################################################//step 6 hour motorif (hourChange> 0 &&hourChange <40) // 6 hour motor will not step if diff> 10 { stephourFwd(); //Serial.print("Step 6 hour Forward ");// serial removed // Serial.println(hourChange);// serial removed hourChange =0; } else if (hourChange <0 &&hourChange> -40) // else if (hourDiff ==-1 || test ==1) { stephourBwd(); // Serial.print("Step 6 Hour Backward ");// serial removed // Serial.println(hourChange);// serial removed hourChange =0; } // hourChange =0; //############################################################################## } // digitalWrite(sleep2, HIGH);// disable 6hr motor// add LCD stop if(second==0) { // lcd.setCursor(0,1); //lcd.print(" "); lcd.setCursor (0,1); lcd.print (""); lcd.setCursor (0,1); lcd.print("H"); lcd.print(hourcalc); lcd.setCursor(2,1); lcd.print (""); lcd.setCursor(2,1); lcd.print("Old"); lcd.print(currentDisplay); lcd.setCursor(13,1); lcd.print (""); lcd.setCursor(13,1); lcd.print("Disp"); lcd.print(hourDiff); } } } // Set Clock/Motors###################################################################################################//gets advance retard settings from potvoid Settings(){ settingVal =analogRead(settingreadPin); // read the value from the pot if ( settingVal>=0 &&settingVal <85 ) { setMinsfwd(); } if ( settingVal>=85 &&settingVal <170 ) { setMinsbwd(); } if ( settingVal>=170 &&settingVal <255 ) { setMinsslowfwd(); } if ( settingVal>=255 &&settingVal <340 ) { setMinsslowbkd(); } if ( settingVal>=340 &&settingVal <425 ) { setHoursfwd(); } if ( settingVal>=425 &&settingVal <510 ) { setHoursbwd(); } if ( settingVal>=510 &&settingVal <595 ) { setHoursslowfwd(); } if ( settingVal>=595 &&settingVal <690 ) { setHourslowbkd(); } if ( settingVal>=690 &&settingVal <765 ) { setRTCfwdmin(); } if ( settingVal>=765 &&settingVal <850 ) { setRTCbwdmin(); } if ( settingVal>=850 &&settingVal <900 ) { setRTCfwd(); } if ( settingVal>=900 &&settingVal <970 ) { setRTCbwd(); }if ( settingVal>=970 &&settingVal <1025 ) { } if ( settingVal>=0 &&settingVal <85 &&LCDstop==0)// LCDstop prevents the LCD from freshing until another item is selected { lcd.setCursor(0,1); lcd.print (""); lcd.setCursor (0,1); lcd.print("Barometer Advance"); LCDstop=1; } if ( settingVal>=85 &&settingVal <170 &&LCDstop==1) { lcd.setCursor(0,1); lcd.print (""); lcd.setCursor (0,1); lcd.print("Barometer Retard"); LCDstop=0; } if ( settingVal>=170 &&settingVal <255 &&LCDstop==0 ) { lcd.setCursor(0,1); lcd.print (""); lcd.setCursor (0,1); lcd.print("Baro Inch Advance"); LCDstop=1; } if ( settingVal>=255 &&settingVal <340 &&LCDstop==1 ) { lcd.setCursor(0,1); lcd.print (""); lcd.setCursor (0,1); lcd.print("Baro Inch Retard"); LCDstop=0; } if ( settingVal>=340 &&settingVal <425 &&LCDstop==0 ) { lcd.setCursor(0,1); lcd.print (""); lcd.setCursor (0,1); lcd.print("6Hr Baro Advance"); LCDstop=1; } if ( settingVal>=425 &&settingVal <510 &&LCDstop==1 ) { lcd.setCursor(0,1); lcd.print (""); lcd.setCursor (0,1); lcd.print("6Hr Baro Retard"); LCDstop=0; } if ( settingVal>=510 &&settingVal <595 &&LCDstop==0 ) { lcd.setCursor(0,1); lcd.print (""); lcd.setCursor (0,1); lcd.print("6Hr Baro Inch Advn"); LCDstop=1; } if ( settingVal>=595 &&settingVal <690 &&LCDstop==1 ) { lcd.setCursor(0,1); lcd.print (""); lcd.setCursor (0,1); lcd.print("6Hr Baro Inch Retard"); LCDstop=0; } if ( settingVal>=690 &&settingVal <765 &&LCDstop==0) { lcd.setCursor(0,1); lcd.print (""); lcd.setCursor (0,1); lcd.print("RTC Min Advance"); LCDstop=1; } if ( settingVal>=765 &&settingVal <850 &&LCDstop==1 ) { lcd.setCursor(0,1); lcd.print (""); lcd.setCursor (0,1); lcd.print("RTC Min Retard"); LCDstop=0; } if ( settingVal>=850 &&settingVal <900 &&LCDstop==0 ) { lcd.setCursor(0,1); lcd.print (""); lcd.setCursor (0,1); lcd.print("RTC Hour Advance"); LCDstop=1; } if ( settingVal>=900 &&settingVal <970 &&LCDstop==1 ) { lcd.setCursor(0,1); lcd.print (""); lcd.setCursor (0,1); lcd.print("RTC Hour Retard"); LCDstop=0; } if ( settingVal>=970 &&settingVal <1025 &&LCDstop==0 ) { lcd.setCursor(0,1); lcd.print (""); lcd.setCursor (0,1); lcd.print("OFF"); LCDstop=1; } }// END of Loop// set RTC min forward 1 min per press ##################################################################################void setRTCfwdmin(){ if( digitalRead(changeSetting) ==HIGH &&stepoffRTCminfwd ==0 ) { byte second, minute, hour, dayOfWeek, dayOfMonth, month, year; // retrieve data from DS3231 readDS3231time(&second, &minute, &hour, &dayOfWeek, &dayOfMonth, &month, &year); minute =minute+1; if (minute ==60) { minute =0; } setDS3231time(second, minute, hour, dayOfWeek, dayOfMonth, month, year); //Set seconds to 30 on RTC stepoffRTCminfwd =1; } if( digitalRead(changeSetting) ==LOW ) { stepoffRTCminfwd =0; }}//##################################################################################// set RTC min backward 1 min per press ##################################################################################void setRTCbwdmin(){ if( digitalRead(changeSetting) ==HIGH &&stepoffRTCminbwd ==0 ) { byte second, minute, hour, dayOfWeek, dayOfMonth, month, year; // retrieve data from DS3231 readDS3231time(&second, &minute, &hour, &dayOfWeek, &dayOfMonth, &month, &year); minute =minute-1; if (minute <1) { minute =59; } setDS3231time(second, minute, hour, dayOfWeek, dayOfMonth, month, year); //Set seconds to 30 on RTC stepoffRTCminbwd =1; } if( digitalRead(changeSetting) ==LOW ) { stepoffRTCminbwd =0; }}//##################################################################################//###################################################################################################// set RTC hour forward 1 hour per press ##################################################################################void setRTCfwd(){ if( digitalRead(changeSetting) ==HIGH &&stepoffRTChourfwd ==0 ) { byte second, minute, hour, dayOfWeek, dayOfMonth, month, year; // retrieve data from DS3231 readDS3231time(&second, &minute, &hour, &dayOfWeek, &dayOfMonth, &month, &year); hour =hour+1; setDS3231time(second, minute, hour, dayOfWeek, dayOfMonth, month, year); //Set seconds to 30 on RTC stepoffRTChourfwd =1; } if( digitalRead(changeSetting) ==LOW ) { stepoffRTChourfwd =0; }}//##################################################################################// set RTC hour backward 1 hour per press ##################################################################################void setRTCbwd(){ if( digitalRead(changeSetting) ==HIGH &&stepoffRTChourbwd ==0 ) { byte second, minute, hour, dayOfWeek, dayOfMonth, month, year; // retrieve data from DS3231 readDS3231time(&second, &minute, &hour, &dayOfWeek, &dayOfMonth, &month, &year); hour =hour-1; setDS3231time(second, minute, hour, dayOfWeek, dayOfMonth, month, year); //Set seconds to 30 on RTC stepoffRTChourbwd =1; } if( digitalRead(changeSetting) ==LOW ) { stepoffRTChourbwd =0; }}//##################################################################################// set Minutes Motor forward 1 min per press ##################################################################################void setMinsfwd(){ //digitalWrite(sleep1, LOW); //stepper.enableOutputs();// step minutes 1 min per press if( digitalRead(changeSetting) ==HIGH &&stepoffMin ==0 ) { //Serial.println("Step Forward Man");// serial removed stepoffMin =1; stepminsFwd(); } if( digitalRead(changeSetting) ==LOW ) { stepoffMin =0; }//digitalWrite(sleep1, HIGH); //stepper.disableOutputs();}//##################################################################################// set Minutes Motor backward 1 min per press ##################################################################################void setMinsbwd(){ //digitalWrite(sleep1, LOW); // stepper.enableOutputs(); if( digitalRead(changeSetting) ==HIGH &&stepoffMinbwd ==0 ) { // Serial.println("Step Backward Man");// serial removed stepoffMinbwd =1; stepminsBwd(); } if( digitalRead(changeSetting) ==LOW ) { stepoffMinbwd =0; }//digitalWrite(sleep1, HIGH); // stepper.disableOutputs();}//##################################################################################// step minutes slow forward const press ##################################################################################void setMinsslowfwd(){ stepper.enableOutputs(); digitalWrite(sleep1, LOW); if( digitalRead(changeSetting) ==HIGH ) { // Serial.println("Step Baro Inch Forward Man");// serial removed stepper.setCurrentPosition(0); // Run the motor forward at 500 steps/second until the motor reaches 4096 steps (1 revolution):while (stepper.currentPosition() !=1) { //was 52 52x60 =3120 stepper.setSpeed(50); stepper.runSpeed(); } /* digitalWrite(motorPin1, LOW); digitalWrite(motorPin2, LOW); digitalWrite(motorPin3, LOW); digitalWrite(motorPin4, LOW);*/ } digitalWrite(sleep1, HIGH); stepper.disableOutputs();}//##################################################################################// step minutes slow backward const press ##################################################################################void setMinsslowbkd(){ stepper.enableOutputs(); digitalWrite(sleep1, LOW); if( digitalRead(changeSetting) ==HIGH ) { // Serial.println("Step Baro Inch Backward Man");// serial removed stepper.setCurrentPosition(0); // Run the motor forward at 500 steps/second until the motor reaches 4096 steps (1 revolution):while (stepper.currentPosition() !=-1) { //was 52 52x60 =3120 stepper.setSpeed(-50); stepper.runSpeed(); } /* digitalWrite(motorPin1, LOW); digitalWrite(motorPin2, LOW); digitalWrite(motorPin3, LOW); digitalWrite(motorPin4, LOW);*/ } digitalWrite(sleep1, HIGH); stepper.disableOutputs();}//##################################################################################// set Hour Motor forward 1 hour per press ##################################################################################void setHoursfwd(){ // stepper2.enableOutputs(); // digitalWrite(sleep2, LOW); // step hours 1 hour per press if( digitalRead(changeSetting) ==HIGH &&stepoffHour ==0 ) { // Serial.println("Step 6hr Forward Man");// serial removed stepoffHour =1; stephourmanFwd(); } // stepper2.disableOutputs(); // digitalWrite(sleep2, HIGH);if( digitalRead(changeSetting) ==LOW ) { stepoffHour =0; }...This file has been truncated, please download it to see its full contents.
BarometerA4988_3hour__21.inoArduino
File for 3 hour display and forecasting/* Example sketch to control a 28BYJ-48 stepper motor with ULN2003 driver board, AccelStepper and Arduino UNO:number of steps/revolutions. More info:https://www.makerguides.com v4 added presure extreme LEDsv5 add forcast LEDs and calcv6 sorted enable and sleep orderv7 remove adjust on and test replace it with Clearing and threatening LEDs PIN 12 and 13 v8 add dac driver-deletedv9 added LCDv10 added weather forecast usingLEDs v12 LEds test addedv13 add 1 dp point to 3 hour displayv14 void 1026 add slow set buttonsv18 voided v19last reading not included in number of stepsv20 change led test orderv20a serial.print removed indicated by // serial removedv21 as 20a identical to v20 that includes serial print*/#include//SFE_BMP180 pressure sensor#include #include // ######## You will need to create an SFE_BMP180 object, here called "pressure":SFE_BMP180 pressure;#define ALTITUDE 125.0 // Altitude of Kenley Surrey in meters//#########//**********************// set the LCD address to 0x27 for a 20 chars 4 line display// Set the pins on the I2C chip used for LCD connections:// addr, en,r w,rs,d4,d5,d6,d7,bl,blpolLiquidCrystal_I2C lcd(0x27, 2, 1, 0, 4, 5, 6, 7, 3, POSITIVE); // Set the LCD I2C address//#define DS3231_I2C_ADDRESS 0x68// Convert normal decimal numbers to binary coded decimalbyte decToBcd(byte val){ return( (val/10*16) + (val%10) );}// Convert binary coded decimal to normal decimal numbersbyte bcdToDec(byte val){ return( (val/16*10) + (val%16) );}// Include the AccelStepper library:#include // Define stepper motor connections and motor interface type. Motor interface type must be set to 1 when using a driver:#define dirPin 11#define stepPin 10#define motorInterfaceType 1// Create a new instance of the AccelStepper class:AccelStepper stepper =AccelStepper(motorInterfaceType, stepPin, dirPin);float seaPressure =0;float pressureNow =0;float pressurePrevious =0;float pressureDiff =0;int checkStop =0;//int pressureRndDiff =0;int pressureRndNow =0;int pressureRndPrevious =0;int adjustOn =12; // allows adjustment of barometer// int test =0; // test mode 0 off 1 is onchar status; double T,P,a;//int h =0;//int m =0;//int j =0;int stepcount =0;//int time =0;//int resetmins =1;//int secondNow =0;//int secondPrevious=0;//int minuteNow =0;//int minutePrevious=0;//int hourNow =0;//int hourPrevious=0;int initial =0;int initial1 =0;int initial3 =0;//int sync30 =3;//30sec sync on pin18//int syncLED =15;//int manSync =12;//int adjustOn =12;//int syncStop =0;//int sync30Stop =0;int stepoffHour =0;int stepoffHourbkw =0;int stepoffMin =0;int stepoffMinbwd =0;//int stepoffRTCminfwd =0;//int stepoffRTCminbwd =0;//int stepoffRTChourfwd =0;//int stepoffRTChourbwd =0;//int settingreadPin =A3; //Pin for sensing analogue value from pot//int settingVal =0; // Analogue value 0-1023int LCDstop =0; // stops settings on LCD display refreshing until they changeint hourPulse =3; //hour pulse from main Barometer Arduinoint adjustLock =0; // turns off adjust lockint hourcalc =0;float hourDiff =0.50; // used to check if 3hour previous motor should be stepped.float hourChange =0.00; // the amount of 3 hour to step float valueint hourStep =0; //the amount of 3 hour to stepint hourStepdigit1 =0; // gets the 1st digit from hourstepint hourStepdigit2 =0; // gets the 2nd digit from hourstepint stepTotal =0; // tptal amount of steps for 3 hour motorint hourChangeNeg =0;// if hour change is -ve this stores the value to chenge stepTotal laterfloat currentDisplay =0.50; //current 3hour change readingfloat hour0 =1036.00; // you can set last 3 hours pressure here or leave at 0 and thefloat hour1 =1036.00; // readings will catch up over the next 4 hoursfloat hour2 =1036.00;float hour3 =1036.00;float hour4 =1036.00;//check readings https://www.meteoplug.com/cgi-bin/meteochart.cgi?draw=a3aeaaa1acbdf9f1fcfed4fedbc2c094c0d6d6d1d2c5edcebbfee9ffeff1fbf9int sleep =9;int hourPulseOff =0;//int testinput =17;int testpulse =0;int hourPlus1min =0;int stepFwd1 =14;int manstepFwd1 =0;int maninchFwdBwd =A7;int stepBwd1 =15;int manstepBwd1 =0;int hour3LowLED =5;// Green low range LEDint hour3HighLED =4;//Red high range LEDint ledStormy =8;int ledRain =7;int ledChange =6;int ledFair =2;int ledDry =13;int ledClear =12;int ledThreat =17;int ledNoChange =16;//Testint n =0;int n1 =0;int n2 =0;void setup() { pinMode(ledStormy, OUTPUT); pinMode(ledRain, OUTPUT); pinMode(ledChange, OUTPUT); pinMode(ledFair, OUTPUT); pinMode(ledDry, OUTPUT); pinMode(ledClear, OUTPUT); pinMode(ledThreat, OUTPUT); pinMode(ledNoChange, OUTPUT); pinMode(stepFwd1, INPUT); pinMode(stepBwd1, INPUT); // pinMode(adjustOn, INPUT); pinMode(hourPulse, INPUT); pinMode(hour3LowLED, OUTPUT); pinMode(hour3HighLED, OUTPUT); pinMode(sleep, OUTPUT); // pinMode(settingreadPin, INPUT); // Set the maximum steps per second:stepper.setMaxSpeed(1000); lcd.begin(20,4); // initialize the lcd for 20 chars 4 lines, turn on backlight lcd.backlight(); // backlight on not needed as controlled by 7 MAX2719 lcd.setCursor(0,0); //Start at character 0 on line 0 lcd.print("Barometer A988 3 Hr"); //@@@@@@@@@@@@@@@@@@@@@@@@@@@@@@@@@@@@@@@@@@@@@@@@@@@@@@@@@@@@@@@@@@@@@@@@@@@@@@@@@@@@@@@@@@@@@@@@@@@@@@@@@@@@@@@@@@@@@@@@@@@@@@@@ lcd.setCursor(0,1); //Start at character 0 on line 0 lcd.print(" Version 20"); //@@@@@@@@@@@@@@@@@@@@@@@@@@@@@@@@@@@@@@@@@@@@@@@@@@@@@@@@@@@@@@@@@@@@@@@@@@@@@@@@@@@@@@@@@@@@@@@@@@@@@@@@@@@@@@@@@@@@@@@@@@@@@@@@ { // Wire.begin(); Serial.begin (9600); delay(2000);lcd.setCursor(0,2); //Start at character 0 on line 0 lcd.print("##### LED TEST #####"); //@@@@@@@@}//#############################################################Serial.println("REBOOT v08");//############################################################ // Initialize the sensor (it is important to get calibration values stored on the device). if (pressure.begin()) Serial.println("BMP180 init success"); else { // Oops, something went wrong, this is usually a connection problem, // see the comments at the top of this sketch for the proper connections. Serial.println("BMP180 init fail\n\n"); в то время как (1); // Pause forever. }// test =1; // test set to 0 off 1 on//LED Testdelay (2000);digitalWrite(ledThreat, HIGH);delay (500);digitalWrite(ledThreat, LOW);digitalWrite(ledNoChange, HIGH);delay (500);digitalWrite(ledNoChange, LOW);digitalWrite(ledClear, HIGH);delay (500);digitalWrite(ledClear, LOW);digitalWrite(ledStormy, HIGH);delay (500);digitalWrite(ledStormy, LOW);digitalWrite(ledRain, HIGH);delay (500);digitalWrite(ledRain, LOW);digitalWrite(ledChange, HIGH);delay (500);digitalWrite(ledChange, LOW);digitalWrite(ledFair, HIGH);delay (500);digitalWrite(ledFair, LOW);digitalWrite(ledDry, HIGH);delay (500);digitalWrite(ledDry, LOW);digitalWrite(hour3HighLED, HIGH);delay (500);digitalWrite(hour3HighLED, LOW);digitalWrite(hour3LowLED, HIGH);delay (500);digitalWrite(hour3LowLED, LOW); lcd.clear (); getPressure ();// gets all pressure readings showLCD(); // load display to LCD getForecast(); //get forcast and set LEDs for weather //disable motors on startupdigitalWrite(sleep, HIGH);stepper.disableOutputs(); }void loop() { hourPlus1min =(digitalRead(hourPulse));//checks for pulse at 1min past the hour from the barometer if (hourPlus1min ==HIGH &&hourPulseOff ==0 || initial1 ) { initial1 =0; hourcalc++; if (hourcalc> 4) { hourcalc =0; } //Serial.print("hourcalc ");// serial removed // Serial.println(hourcalc);// serial removed getPressure ();// gets all pressure readings getForecast(); //get forcast and set LEDs for weather showLCD(); // load display to LCD hourPulseOff =1; //turns off } else if (hourPlus1min ==LOW) { hourPulseOff =0; } adjustLock =0; //hold on adjustment// Step forward/back man~~~~~~~~~~~~~~~~~~~~~~~~~~~~~~~ // step hours 1 hour per press manstepFwd1 =digitalRead(stepFwd1); if( manstepFwd1 ==HIGH &&stepoffHour ==0 ) { stepoffHour =1; stephourmanFwd(); } manstepFwd1 =digitalRead(stepFwd1);if( manstepFwd1 ==LOW ) { stepoffHour =0; } // step hours 1 hour per press manstepBwd1 =digitalRead(stepBwd1); if( manstepBwd1 ==HIGH &&stepoffHour ==0 ) { stepoffHour =1; stephourmanBwd(); } manstepBwd1 =digitalRead(stepBwd1); if( manstepBwd1 ==LOW) { stepoffHour =0; } //~~~~~~~~~~~~~~~~~~~~~~~~~~~~~~~~~~~~~~~~~~~~~~~~ //Inch 3hr forward/backwardsmaninchFwdBwd=analogRead(A7);if (maninchFwdBwd>800 ){// Serial.print(" maninchFwdBwd=");// serial removed // Serial.println(maninchFwdBwd);// serial removed maninchFwd(); } else if (maninchFwdBwd <200) { // Serial.print(" maninchFwdBwd=");// serial removed// Serial.println(maninchFwdBwd);// serial removed maninchBwd(); } //##############################################################################//step 3 hour motorif (hourChange> 0 &&hourChange <20) // 3 hour motor will not step if diff> 40 { stephourFwd(); // Serial.print("Step 3 hour Forward ");// serial removed // Serial.println(hourChange);// serial removed hourChange =0; } else if(hourChange <0 &&hourChange> -20) { stephourBwd(); // Serial.print("Step 3 Hour Backward ");// serial removed // Serial.println(hourChange);// serial removed hourChange =0; } //############################################################################## } //##################################################################################// set Hour Motor backward 1 hour per press ##################################################################################void setHoursbwd(){ // digitalWrite(sleep, LOW);// stepper.enableOutputs(); // step hours 1 hour per press if( digitalRead(adjustOn) ==HIGH &&stepoffHourbkw ==0 ) { // Serial.println("Step 3hr Backward Man"); stepoffHourbkw =1; stephourmanBwd(); }// stepper.disableOutputs();// digitalWrite(sleep, HIGH);if( digitalRead(adjustOn) ==LOW ) { stepoffHourbkw =0; }// End step hours 1 hour per press}//##################################################################################// step hours slow forward const press ##################################################################################void maninchFwd(){ stepper.enableOutputs(); digitalWrite(sleep, LOW); if( digitalRead(adjustOn) ==HIGH ) { // Serial.println("Step 3hr Inch Forward Man");// serial removed stepper.setCurrentPosition(0); // Run the motor forward at 500 steps/second until the motor reaches 8 steps (1 revolution):while (stepper.currentPosition() !=1) { //was 52 52x60 =3120 stepper.setSpeed(10); stepper.runSpeed(); } } digitalWrite(sleep, HIGH);stepper.disableOutputs();}//##################################################################################// step hours slow backward const press ##################################################################################void maninchBwd(){ stepper.enableOutputs(); digitalWrite(sleep, LOW); if( digitalRead(adjustOn) ==HIGH ) { // Serial.println("Step 3hr Inch backward Man");// serial removed stepper.setCurrentPosition(0); // Run the motor forward at 500 steps/second until the motor reaches 8 steps (1 revolution):while (stepper.currentPosition() !=-1) { //was 52 52x60 =3120 stepper.setSpeed(-10); stepper.runSpeed(); } } digitalWrite(sleep, HIGH);stepper.disableOutputs();}//################################################################################## //Hour Motor #####################################################################################################void stephourFwd() // steps hour hand forward 1 hour{ stepper.enableOutputs(); // Serial.println("Step 3 hrs forward auto");// serial removed digitalWrite(sleep, LOW); stepper.setCurrentPosition(0); // Run the motor forward at 500 steps/second until the motor reaches 4096 steps (1 revolution):while (stepper.currentPosition() !=hourChange*160) { //hourDiff gives the nuber of steps to take stepper.setSpeed(400); stepper.runSpeed(); } digitalWrite(sleep, HIGH); stepper.disableOutputs(); }//###############################################################################################################//Hour Motor #####################################################################################################void stephourBwd() // steps hour hand backward 1 hour{ stepper.enableOutputs(); //Serial.println("Step 3hrs backward auto");// serial removed digitalWrite(sleep, LOW); stepper.setCurrentPosition(0);while ( stepper.currentPosition() !=hourChange*160) { stepper.setSpeed(-400); stepper.runSpeed(); }digitalWrite(sleep, HIGH); stepper.disableOutputs(); }//###############################################################################################################//Hour Motor Man Step forward#####################################################################################################void stephourmanFwd() // steps hour hand forward 1 hour{ stepper.enableOutputs(); digitalWrite(sleep, LOW); //Serial.println("Step 3hr forward man");// serial removed stepper.setCurrentPosition(0); // Run the motor forward at 500 steps/second until the motor reaches 4096 steps (1 revolution):while ( stepper.currentPosition() !=160) { stepper.setSpeed(400); stepper.runSpeed(); } digitalWrite(sleep, HIGH); stepper.disableOutputs(); }//###############################################################################################################//Hour Motor Man Step back ward #####################################################################################################void stephourmanBwd() // steps hour hand backward 1 hour{ stepper.enableOutputs(); digitalWrite(sleep, LOW); // Serial.println("Step 3hr backward man");// serial removed stepper.setCurrentPosition(0);while ( stepper.currentPosition() !=-160) { stepper.setSpeed(-400); stepper.runSpeed(); }digitalWrite(sleep, HIGH); stepper.disableOutputs(); }//###############################################################################################################void getPressure ()//get all pressure readings checked every 10 mins eg 0 10 20 etc{ if (checkStop ==0){ // If you want sea-level-compensated pressure, as used in weather reports, // you will need to know the altitude at which your measurements are taken. // We're using a constant called ALTITUDE in this sketch:// Serial.println(); // Serial.print("provided altitude:"); // Serial.print(ALTITUDE,0);// Serial.print(" meters, "); // Serial.print(ALTITUDE*3.28084,0);// Serial.println(" feet"); // If you want to measure altitude, and not pressure, you will instead need // to provide a known baseline pressure. This is shown at the end of the sketch. // You must first get a temperature measurement to perform a pressure reading. // Start a temperature measurement:// If request is successful, the number of ms to wait is returned. // If request is unsuccessful, 0 is returned. status =pressure.startTemperature(); if (status !=0) { // Wait for the measurement to complete:delay(status); // Retrieve the completed temperature measurement:// Note that the measurement is stored in the variable T. // Function returns 1 if successful, 0 if failure. status =pressure.getTemperature(T); if (status !=0) { // Print out the measurement:// Serial.print("temperature:"); // Serial.print(T,2); // Serial.print(" deg C, "); // Serial.print((9.0/5.0)*T+32.0,2); // Serial.println(" deg F"); // Start a pressure measurement:// The parameter is the oversampling setting, from 0 to 3 (highest res, longest wait). // If request is successful, the number of ms to wait is returned. // If request is unsuccessful, 0 is returned. status =pressure.startPressure(3); if (status !=0) { // Wait for the measurement to complete:delay(status); // Retrieve the completed pressure measurement:// Note that the measurement is stored in the variable P. // Note also that the function requires the previous temperature measurement (T). // (If temperature is stable, you can do one temperature measurement for a number of pressure measurements.) // Function returns 1 if successful, 0 if failure. status =pressure.getPressure(P,T); if (status !=0) { // Print out the measurement:// Serial.print("absolute pressure:"); // Serial.print(P,2); // Serial.print(" mb, "); // Serial.print(P*0.0295333727,2); // Serial.println(" inHg"); // The pressure sensor returns abolute pressure, which varies with altitude. // To remove the effects of altitude, use the sealevel function and your current altitude. // This number is commonly used in weather reports. // Parameters:P =absolute pressure in mb, ALTITUDE =current altitude in m. // Result:p0 =sea-level compensated pressure in mb seaPressure =pressure.sealevel(P,ALTITUDE); // we're at 160 meters (Kenley, Surrey UK) // serial removed /* Serial.print("relative (sea-level) pressure:"); Serial.print(seaPressure,2); Serial.print(" mb, "); Serial.print(seaPressure*0.0295333727,2); Serial.println(" inHg"); */ // On the other hand, if you want to determine your altitude from the pressure reading, // use the altitude function along with a baseline pressure (sea-level or other). // Parameters:P =absolute pressure in mb, p0 =baseline pressure in mb. // Result:a =altitude in m. a =pressure.altitude(P,seaPressure); // Serial.print("computed altitude:"); // Serial.print(a,0); // Serial.print(" meters, "); // Serial.print(a*3.28084,0); // Serial.println(" feet"); } else Serial.println("error retrieving pressure measurement\n"); } else Serial.println("error starting pressure measurement\n"); } else Serial.println("error retrieving temperature measurement\n"); } else Serial.println("error starting temperature measurement\n");}//Serial.print("hourscalc "); // Serial.println(hourcalc);if (hourcalc ==0){ hour0 =seaPressure;//was rnd sea pressure currentDisplay =hourDiff; // the last display reading becomes the old reading called currentDisplay hourDiff =hour0 - hour3; // this is the air pressure difference from now to the reading 3 hours ago and wil be displayed onthe 3 hour dial calcCurrentDisp (); // calculates 3 hour Air pressure display }else if (hourcalc ==1){ hour1 =seaPressure; currentDisplay =hourDiff; hourDiff =hour1 - hour4; calcCurrentDisp (); }else if (hourcalc ==2 ){ hour2 =seaPressure; currentDisplay =hourDiff;hourDiff =hour2 - hour0; calcCurrentDisp (); }else if (hourcalc ==3 ){ hour3 =seaPressure; currentDisplay =hourDiff; hourDiff =hour3 - hour1; calcCurrentDisp (); }else if (hourcalc ==4 ){ hour4 =seaPressure; currentDisplay =hourDiff; hourDiff =hour4 - hour2; calcCurrentDisp (); }//show 3 hour pressure scale hi/low LEDsif(hourDiff> 9 || hourDiff <-9) // if 3 hour pressure is outside of extended range both hi and low range leds light{digitalWrite( hour3HighLED, HIGH); digitalWrite( hour3LowLED, HIGH);}else if(hourDiff>=4.80) { digitalWrite( hour3HighLED, HIGH); digitalWrite( hour3LowLED, LOW); } else if (hourDiff <=-4.80) { digitalWrite( hour3LowLED, HIGH); digitalWrite( hour3HighLED, LOW); } else if ( hourDiff <4.80 &&hourDiff>-4.80 ) { digitalWrite( hour3LowLED, LOW); digitalWrite( hour3HighLED, LOW); } // Serial.print("currentDisplay (old) ");// serial removed // Serial.println(currentDisplay);// serial removed// Serial.print("3 hour display to show ");// serial removed// Serial.println(hourDiff);// serial removed//Serial.print("RND seaPressure ");//Serial.println(round(seaPressure));//get pressure change and show change over 1 hour on LCD bottom row pressureNow =seaPressure; if ( pressureNow !=pressurePrevious || initial ) { initial =0; pressureDiff =pressureNow - pressurePrevious; //Print pressure and diff on LCD lcd.setCursor(0,3); if (pressurePrevious ==0.00) { pressurePrevious =pressureNow;// shows previous pressure at startup } if(pressurePrevious<1000) { lcd.print(0); } lcd.print(pressurePrevious);// shows previous pressure until 1hPa change lcd.print("hPa "); // pressurePrevious =pressureNow; lcd.setCursor(12,3); lcd.print(" ");//blank section lcd.setCursor(12,3); lcd.print(pressureDiff); // show rounded pressure reading on display updayes every hour lcd.setCursor(0,2); lcd.print (""); // show rounded pressure on lcd lcd.setCursor(0,2); if(pressureNow<1000) { lcd.print(0); } lcd.print(round(pressureNow)); } pressureRndPrevious =pressureRndNow; pressurePrevious =pressureNow;//resets pressure change//################################################################################# } //####################################################################// show forecast on LEDs/* Predicting the Weather With the BarometerMore specifically, a barometer with readings in hPa can be interpreted in this manner:If the reading is over 1022 hPa Rising or steady pressure means continued fair weather.Slowly falling pressure means fair weather.Rapidly falling pressure means cloudy and warmer conditions.If it falls between 1009–1022 hPa Rising or steady pressure means present conditions will continue.Slowly falling pressure means little change in the weather.Rapidly falling pressure means that rain is likely, or snow if it is cold enough.If the reading is under (1009 hPaRising or steady pressure indicates clearing and cooler weather.Slowly falling pressure indicates rainRapidly falling pressure indicates a storm is coming.Rising or Fallin g slowlyPressure change of 0.1 to 1 mb in the preceding three hoursRising or FallingPressure change of 1 to 3 mb in the preceding three hoursRising or Falling quicklyPressure change of 3 to 6 mb in the preceding three hoursRising or Falling very rapidlyPressure change of more than 6.0 mb in the preceding three hours */void getForecast(){ //reading is under (1009 hPa //Rising or steady pressure indicates clearing and cooler weather if(seaPressure <1009.00 &&hourDiff>=0 ) { ClearforecastLED();// clear all forecast LEDs before changing digitalWrite( ledChange, HIGH); digitalWrite( ledClear, HIGH); lcd.setCursor(8,2); lcd.print (""); lcd.setCursor(8,2); lcd.print("Chg Clearing"); } //reading is under (1009 hPa //Slowly falling pressure indicates rain else if(seaPressure <1009.00 &&hourDiff <0 &&hourDiff>=-1.5 ) { ClearforecastLED(); digitalWrite( ledRain, HIGH); digitalWrite( ledThreat, HIGH); lcd.setCursor(8,2); lcd.print(" "); lcd.setCursor(8,2); lcd.print("Rain Threat"); } //reading is under (1009 hPa //Rapidly falling pressure indicates a storm is coming. else if(seaPressure <1009.00 &&hourDiff <-1.5 ) { ClearforecastLED(); digitalWrite( ledStormy, HIGH); digitalWrite( ledThreat, HIGH); lcd.setCursor(8,2); lcd.print(" "); lcd.setCursor(8,2); lcd.print("Storm Threat"); } //1009–1022 hPa //Rising or steady pressure means present conditions will continue. //Slowly falling pressure means little change in the weather. else if(seaPressure>=1009.00 &&seaPressure <=1022.00 &&hourDiff>=-1.5 &&hourDiff <=1.5 ) { ClearforecastLED(); digitalWrite( ledNoChange, HIGH); digitalWrite( ledFair, HIGH); lcd.setCursor(8,2); lcd.print(" "); lcd.setCursor(8 ,2); lcd.print("Fair No Chge"); }//1009–1022 hPa //Rising rapidly //Clearing else if(seaPressure>=1009.00 &&seaPressure <=1022.00 &&hourDiff>1.5 )...This file has been truncated, please download it to see its full contents.
Схема

Производственный процесс